-
- Setup and Structure
- Time Tracking and Project List
- Time Tracking Mode - Slot or Cluster?
- Notes
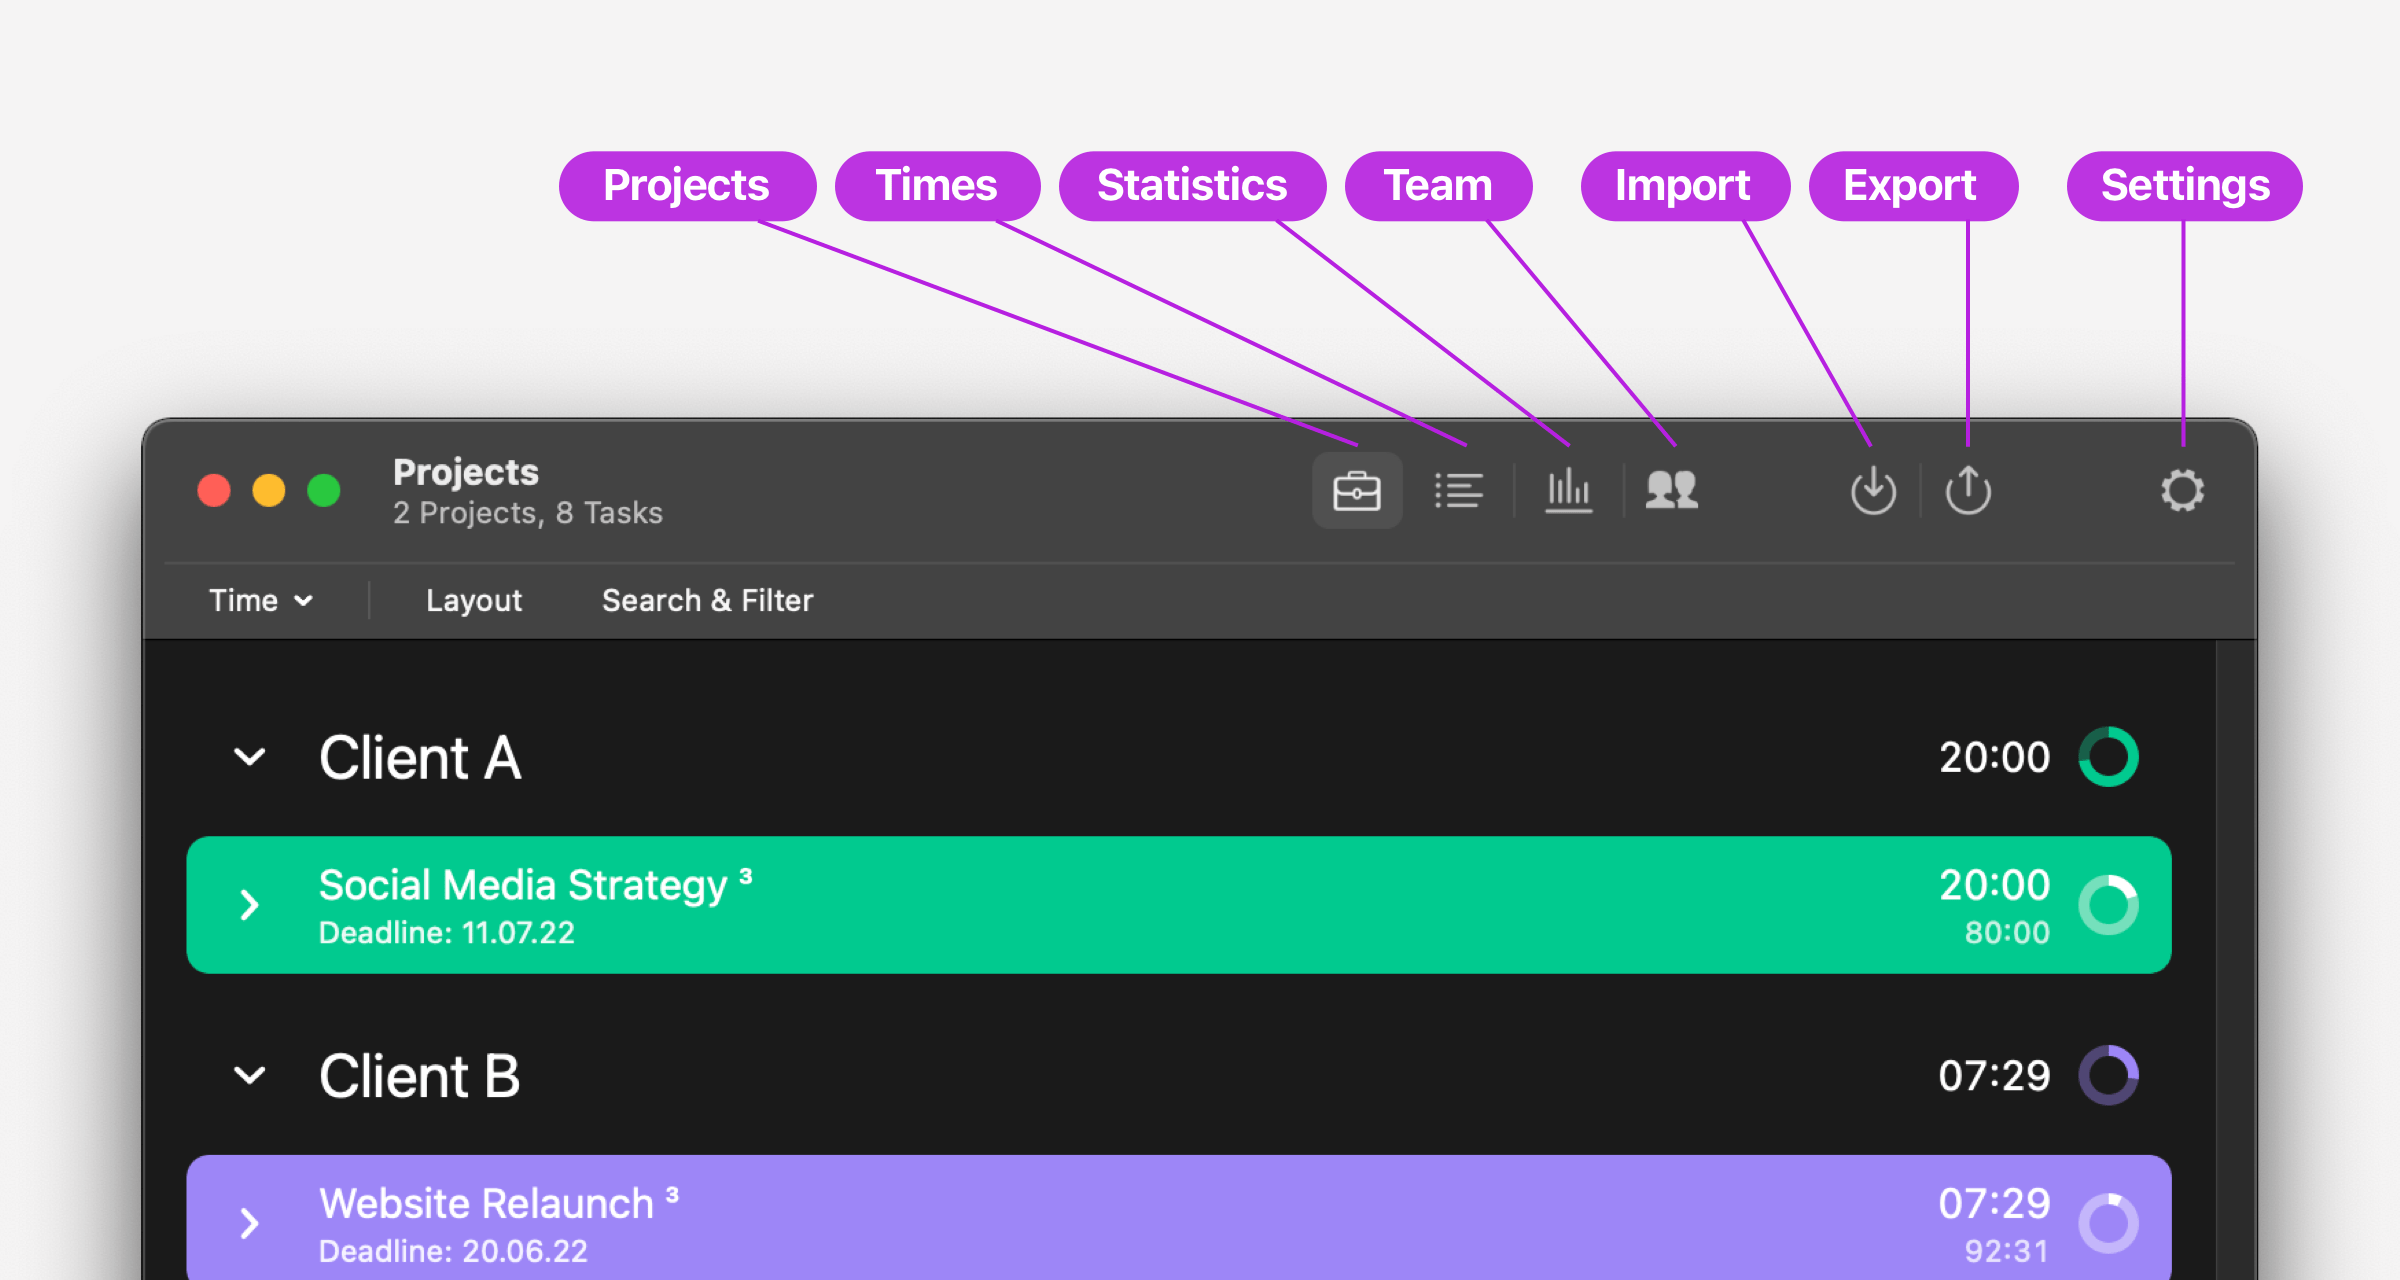
- The Main Navigation
- View Options
- Search, Filter & Archive
- Action Menu
- Enter Times Manually
- Breaks
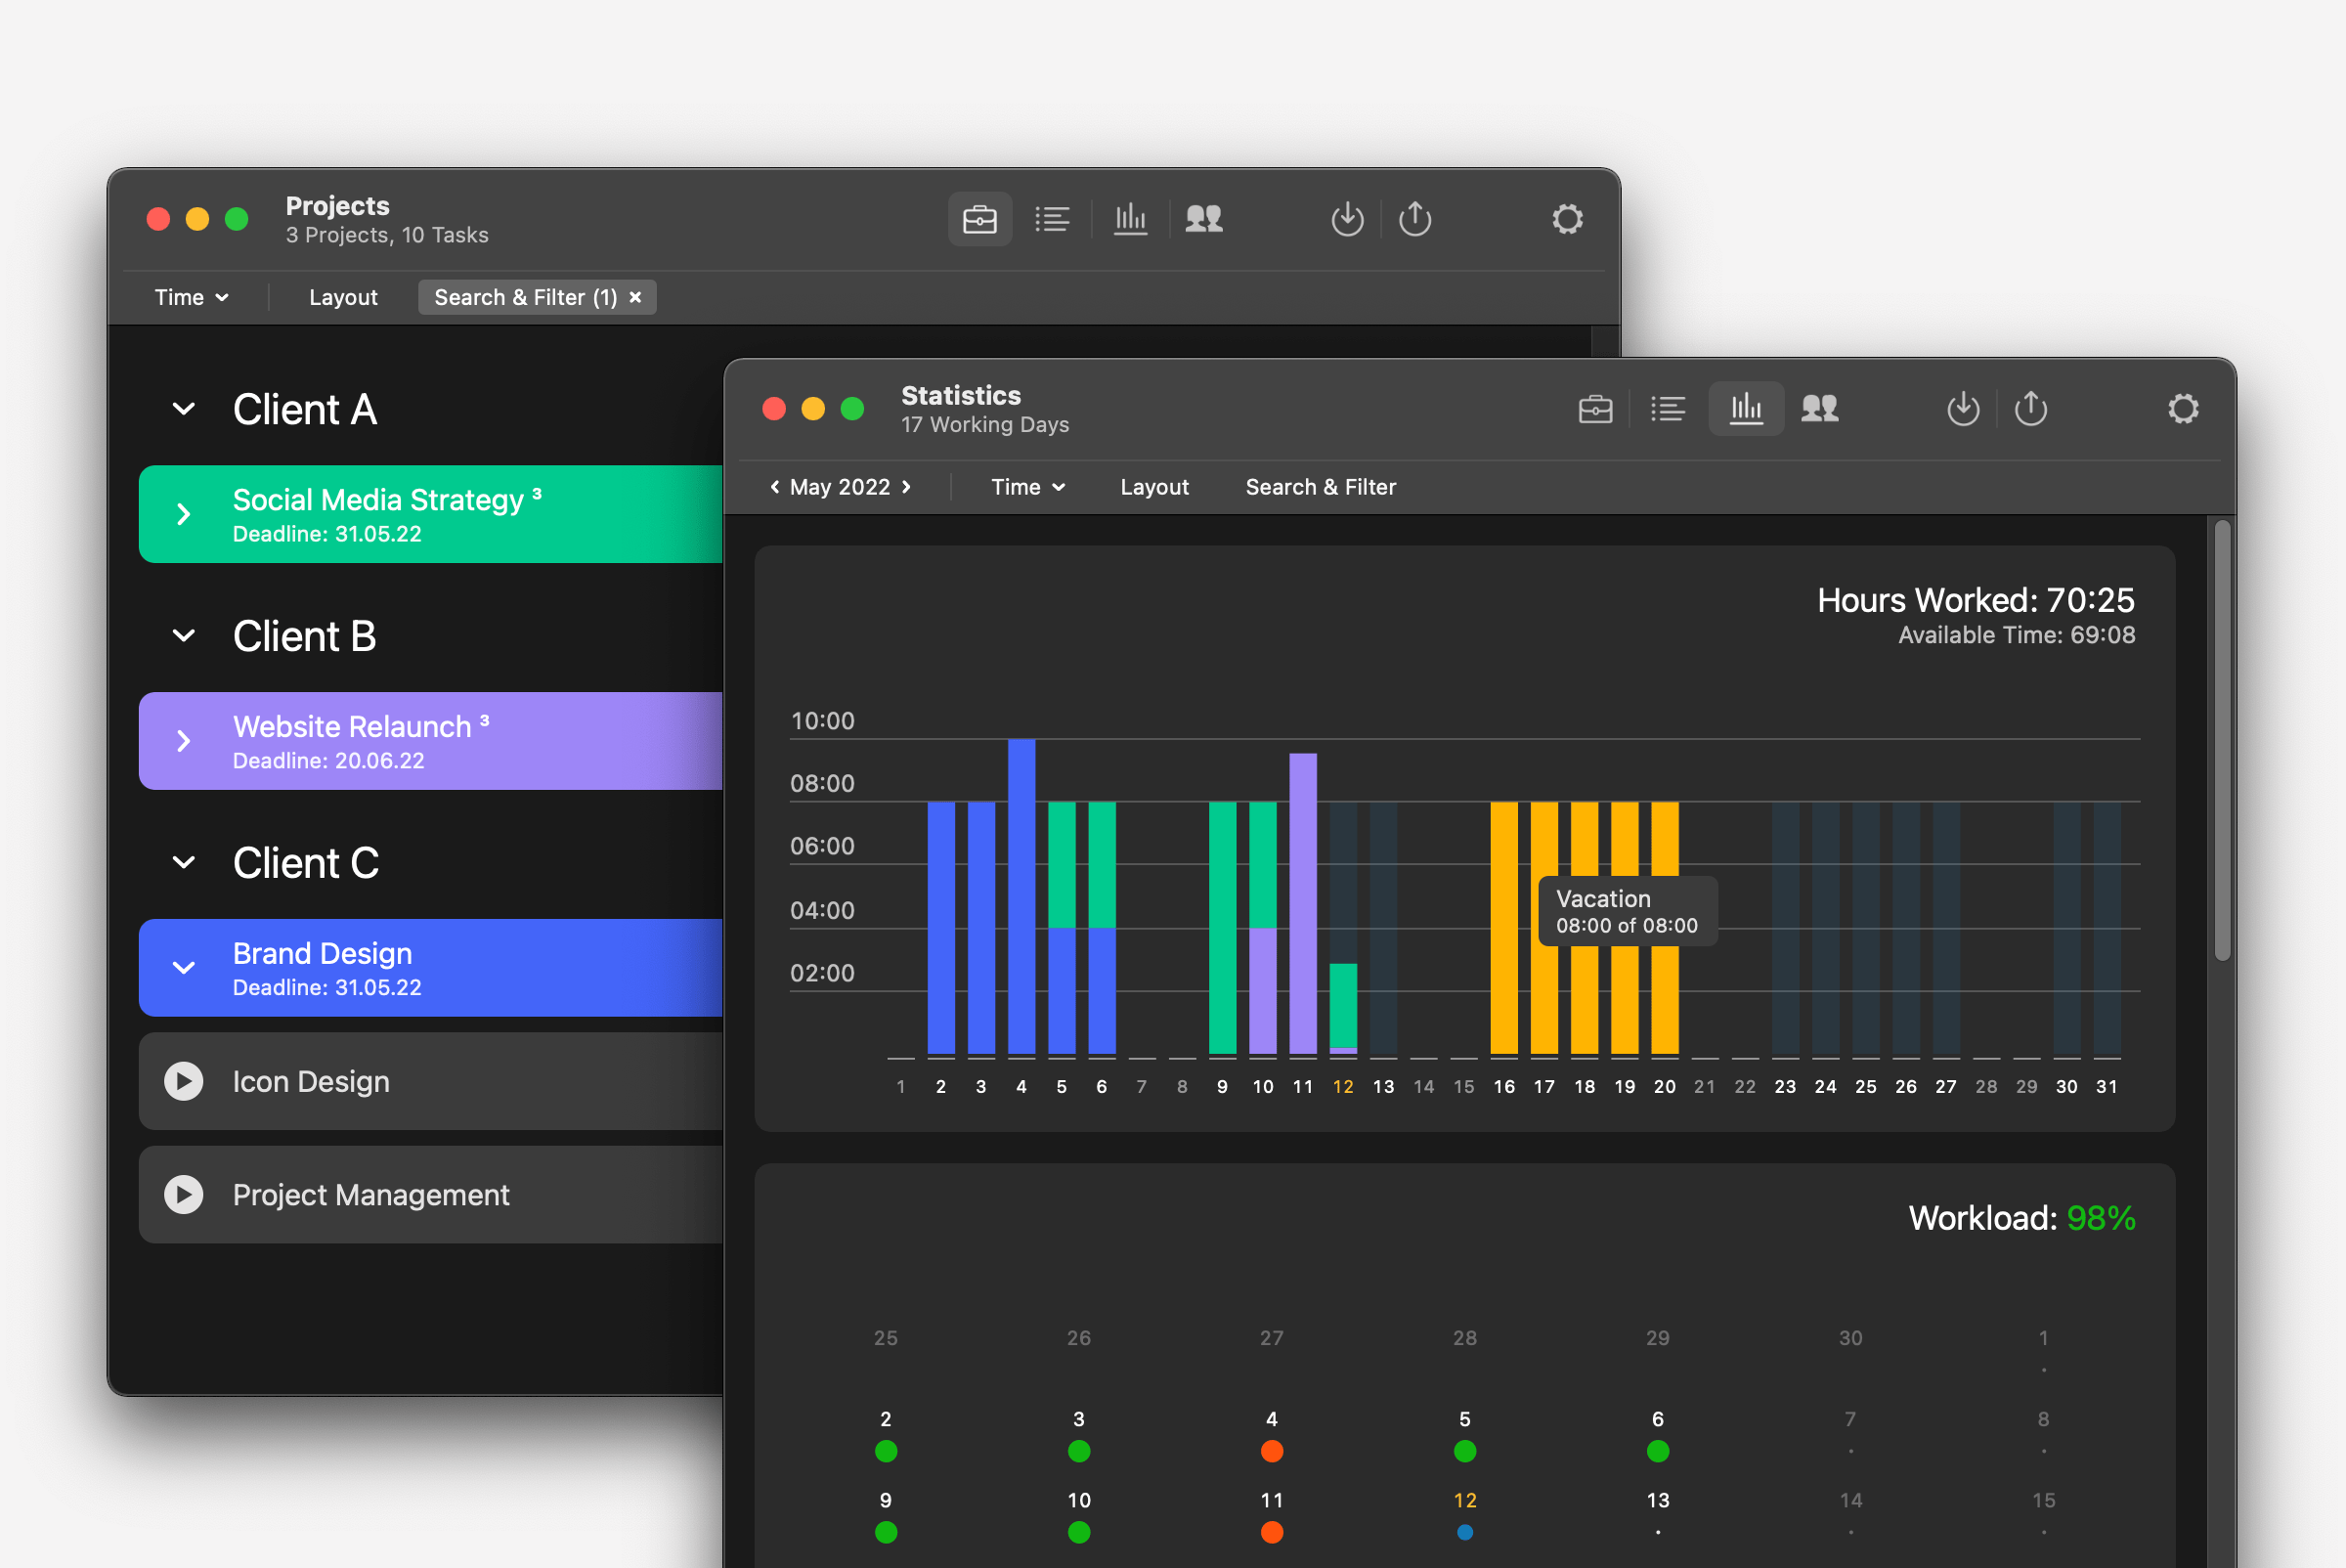
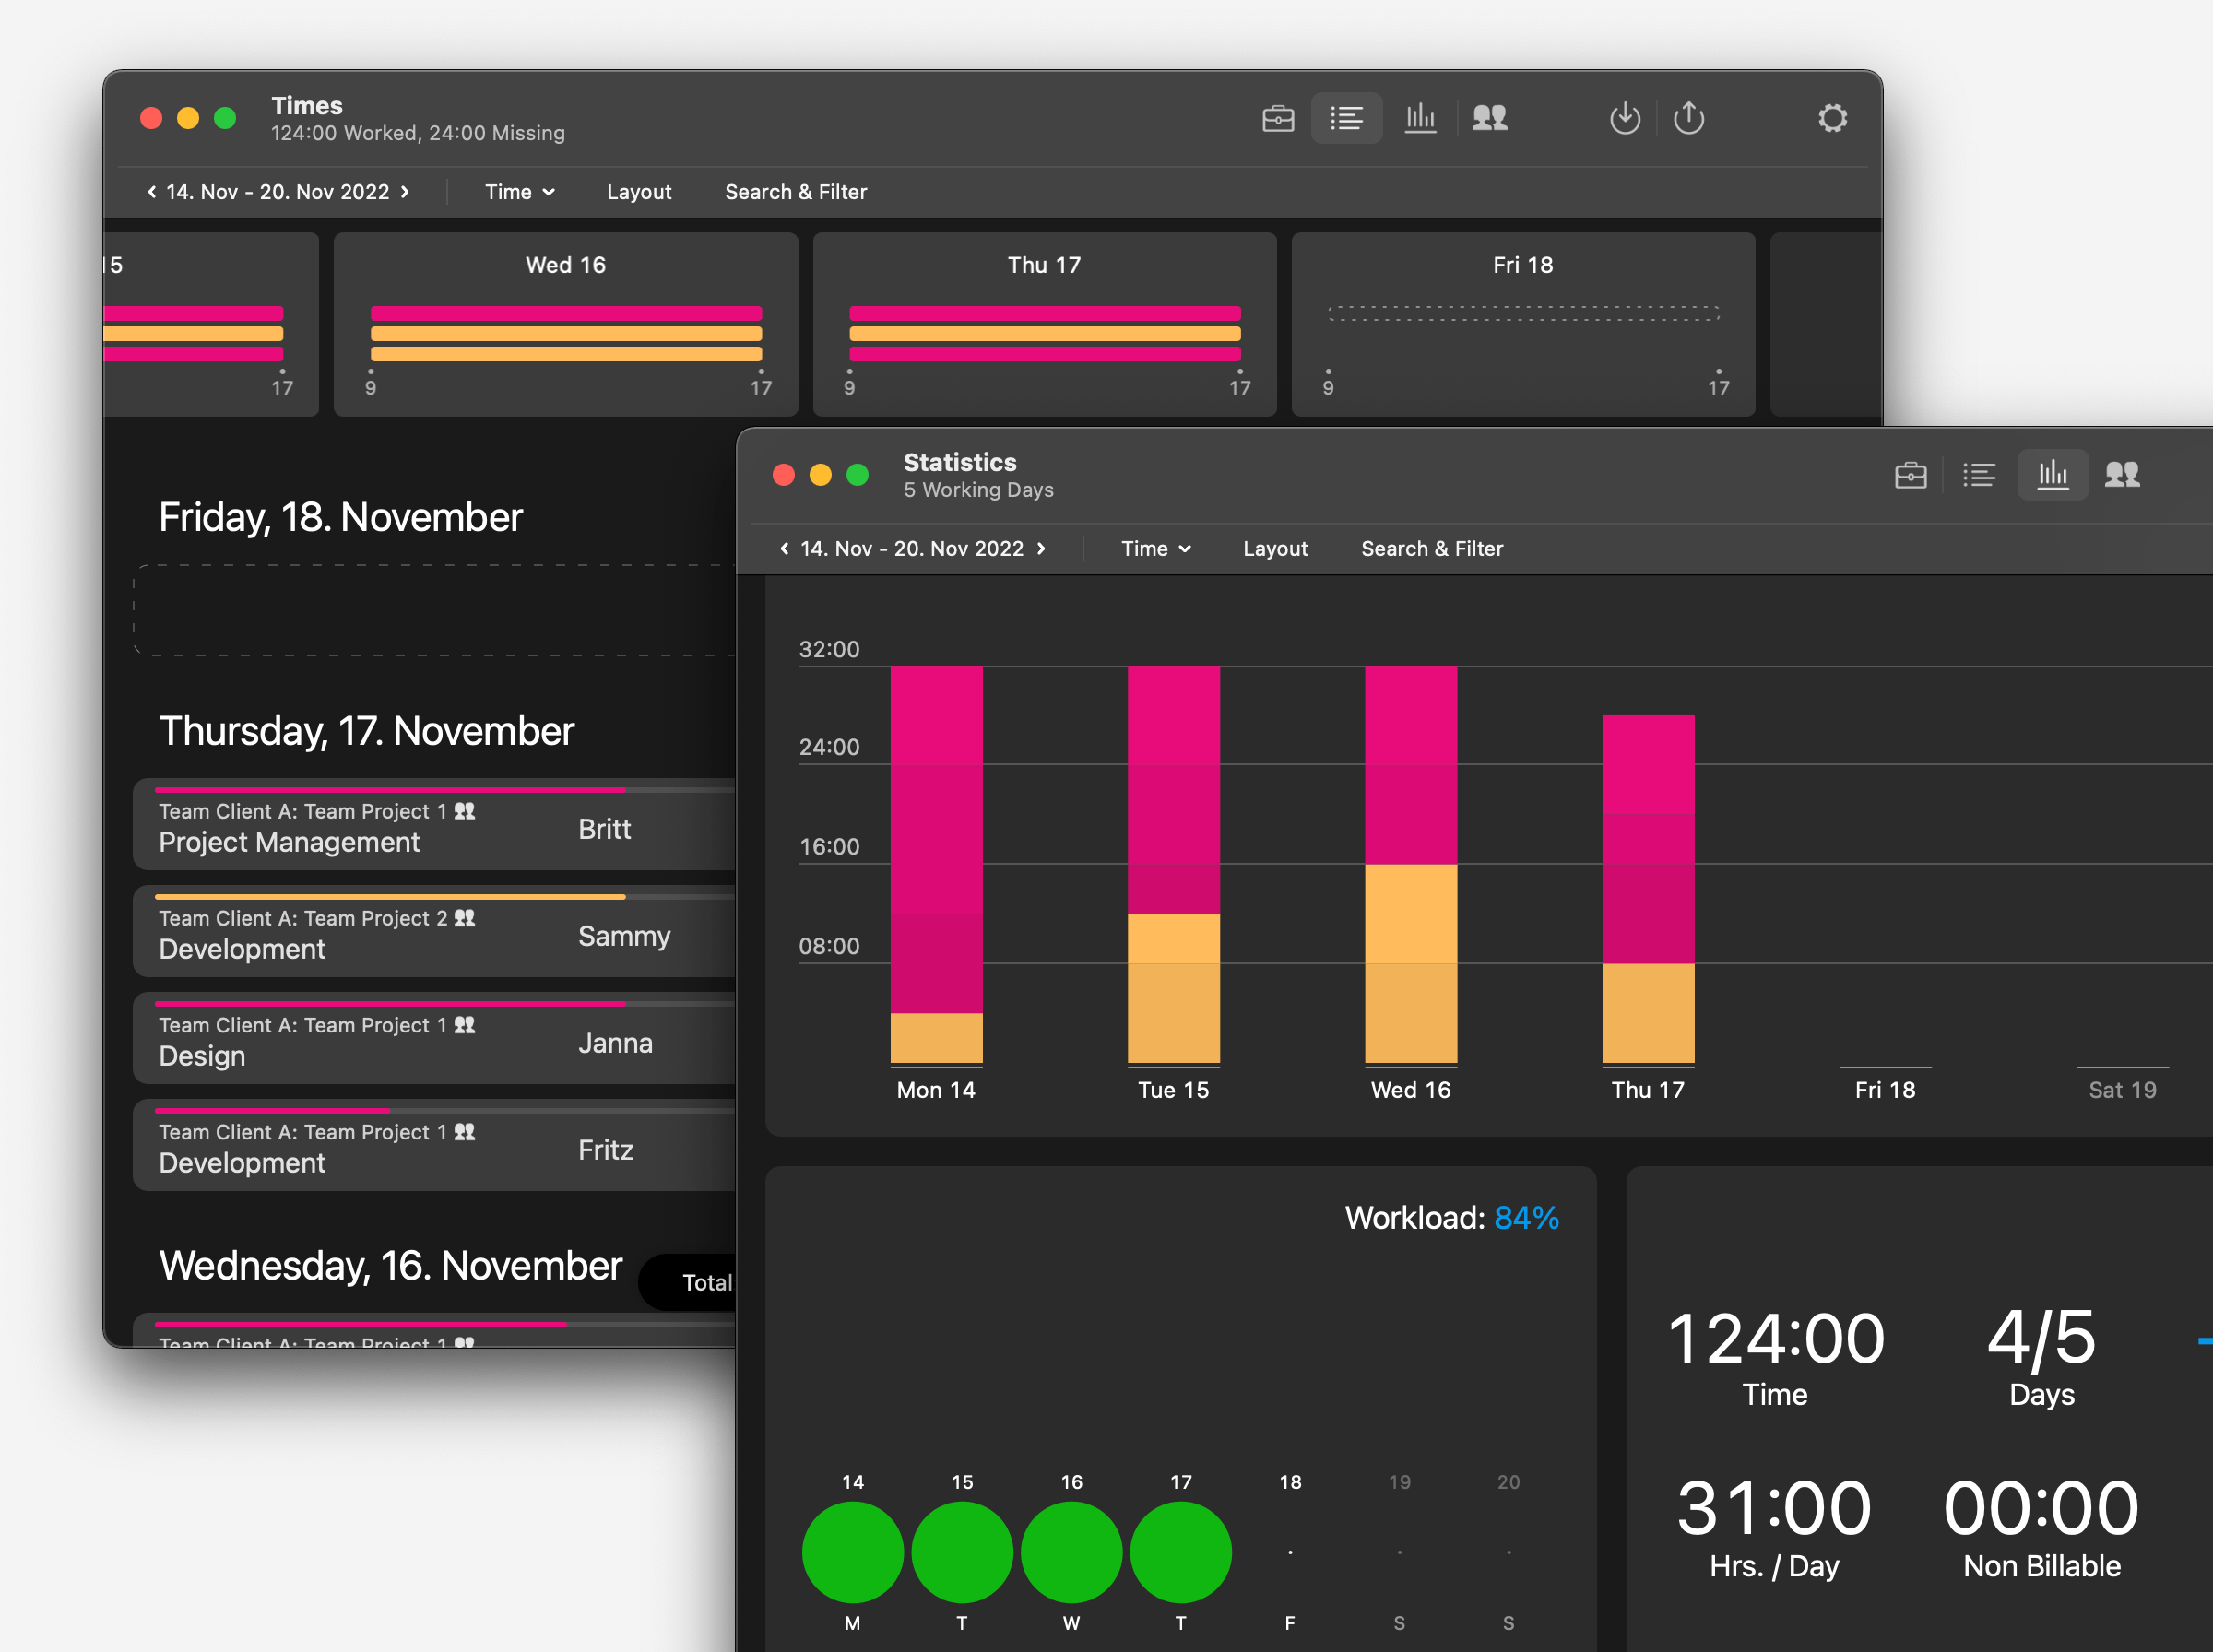
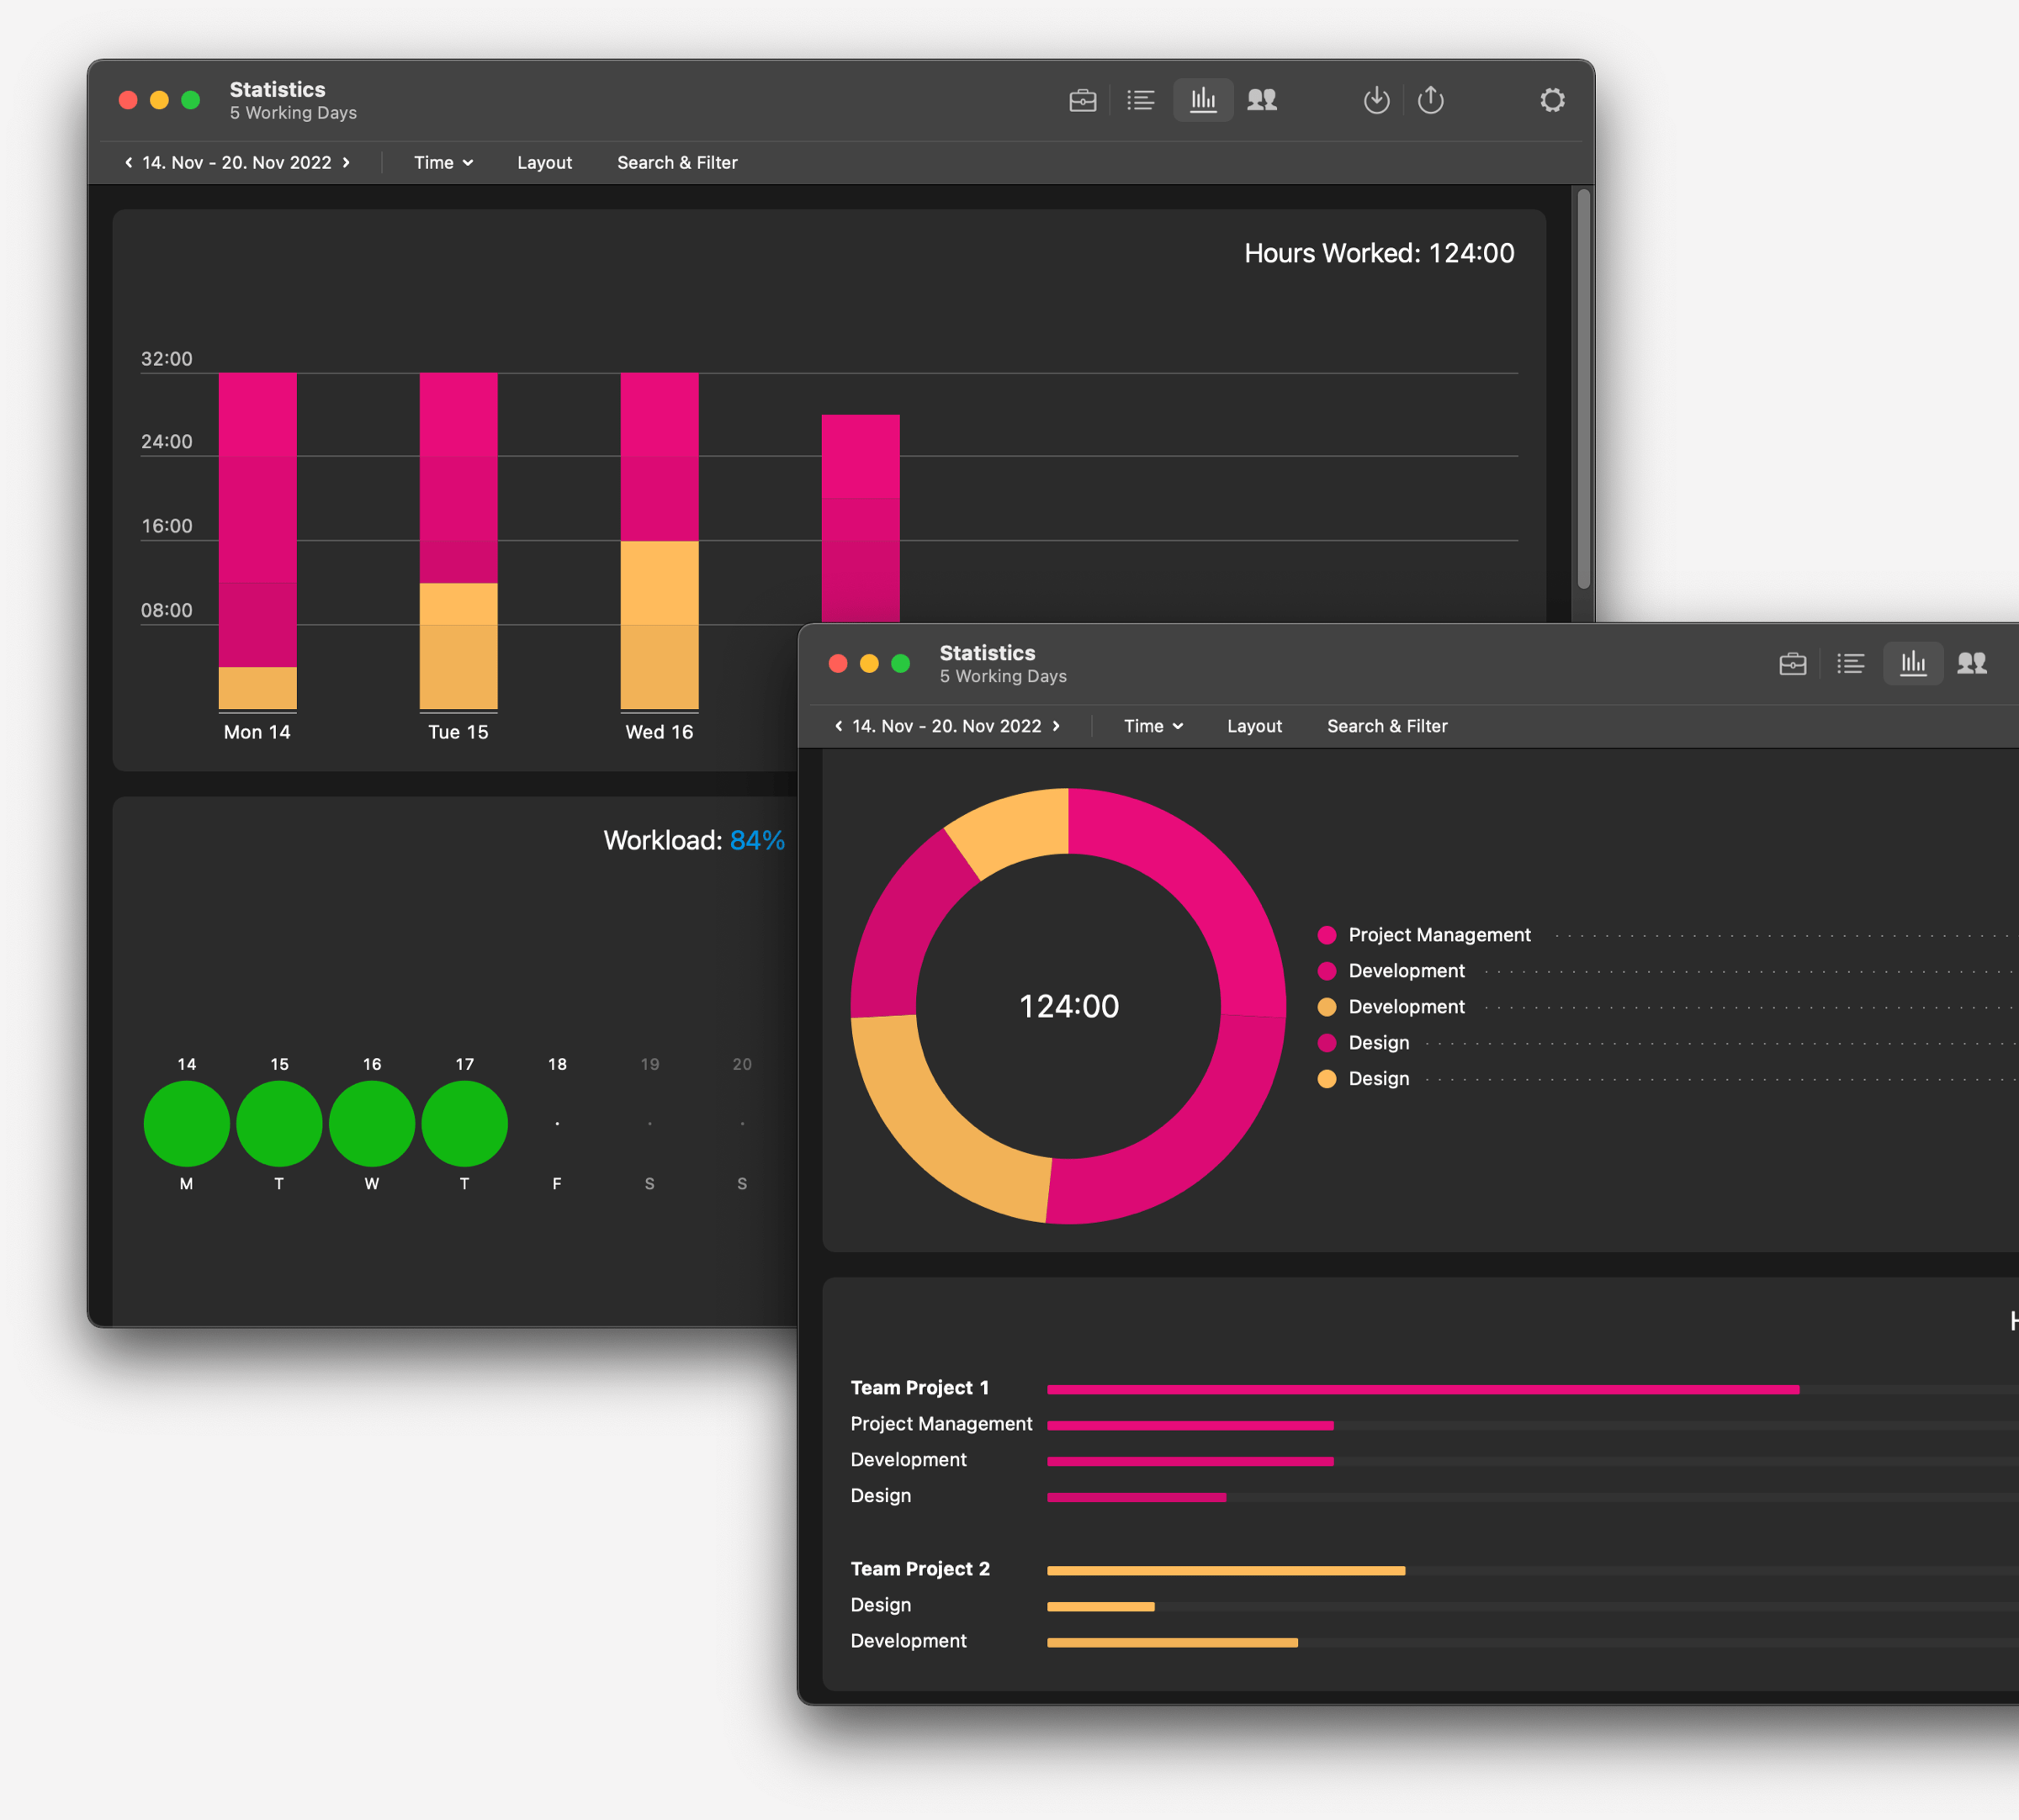
- Your Statistics
- Export Timesheets & Project Reports
- Importing Times From Other Applications
- Your Working Hours
- Reminders
Time Tracking With Tyme
With Tyme you can record your daily working time while you are working. This way you have an accurate overview of how long you worked on which task and what your workload is. Am I working overtime? Am I on schedule?
Setting up deadlines and budgets allows you to get an overview of the already spent budget or hours.
This way you get a feel for how long you need for tasks over time and enables you to create better estimates in the future.
Your worked hours and workload can be viewed in the visually clear statistics and exported in various formats, such as PDF timesheets.
Getting Started
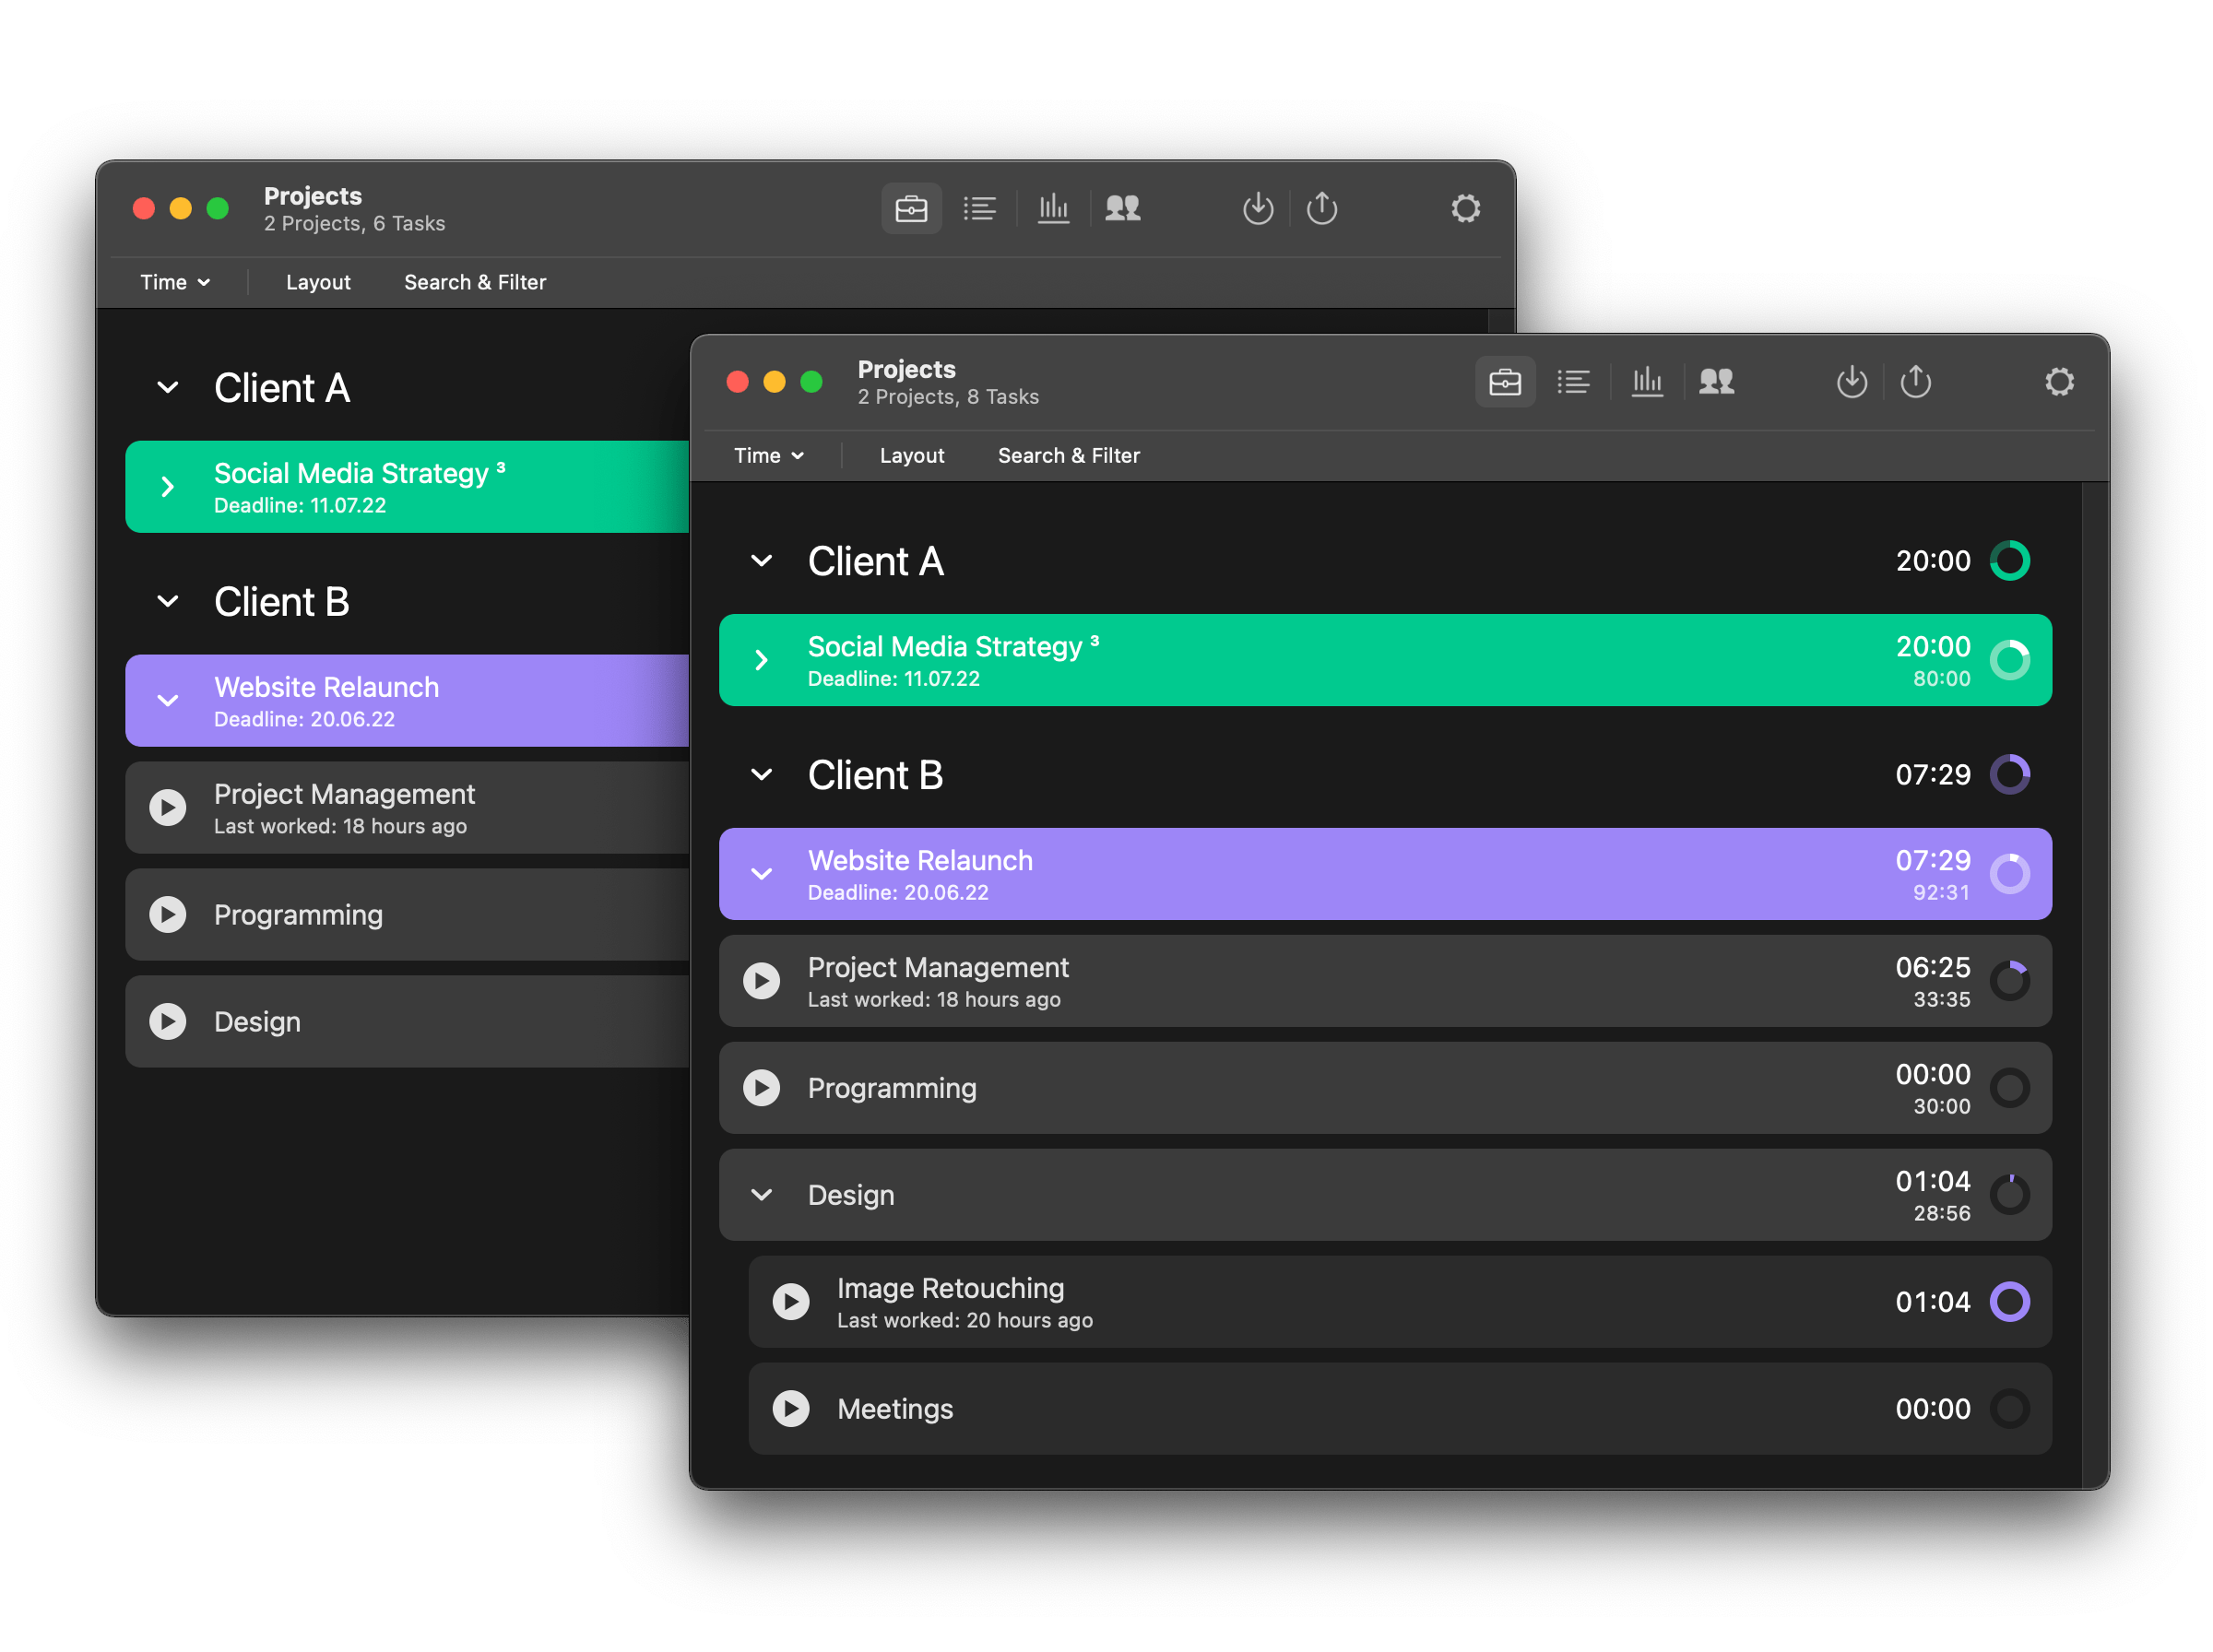
Setup and Structure
Your projects are displayed in the main screen of Tyme, the project list.
We recommend that you think about a structure for your projects before you start tracking your time.
You can create the structure e.g. analogous to the offer you made to your client. Your underlying effort estimation gives you an idea of the time you need to plan.
Tyme is structured into categories (optional), projects, tasks and sub-tasks (optional).
Sub-tasks can further break down a task.
Example 1:
Category:    Client B
Project:     Website Relaunch
Task:        Project Management
Task:        Programming
Task:        Design
Example 2 with sub-tasks:
Category:    Client B
Project:     Website Relaunch
Task:        Project Management
Task:        Programming
Task:        Design
Sub-task:    Image Retouching
Sub-task:    Meetings
A less complex structure without categories could be:
Example 3 without categories:
Project: Client B - Website Relaunch
Task:    Project Management
Task:    Programming
Task:    Design
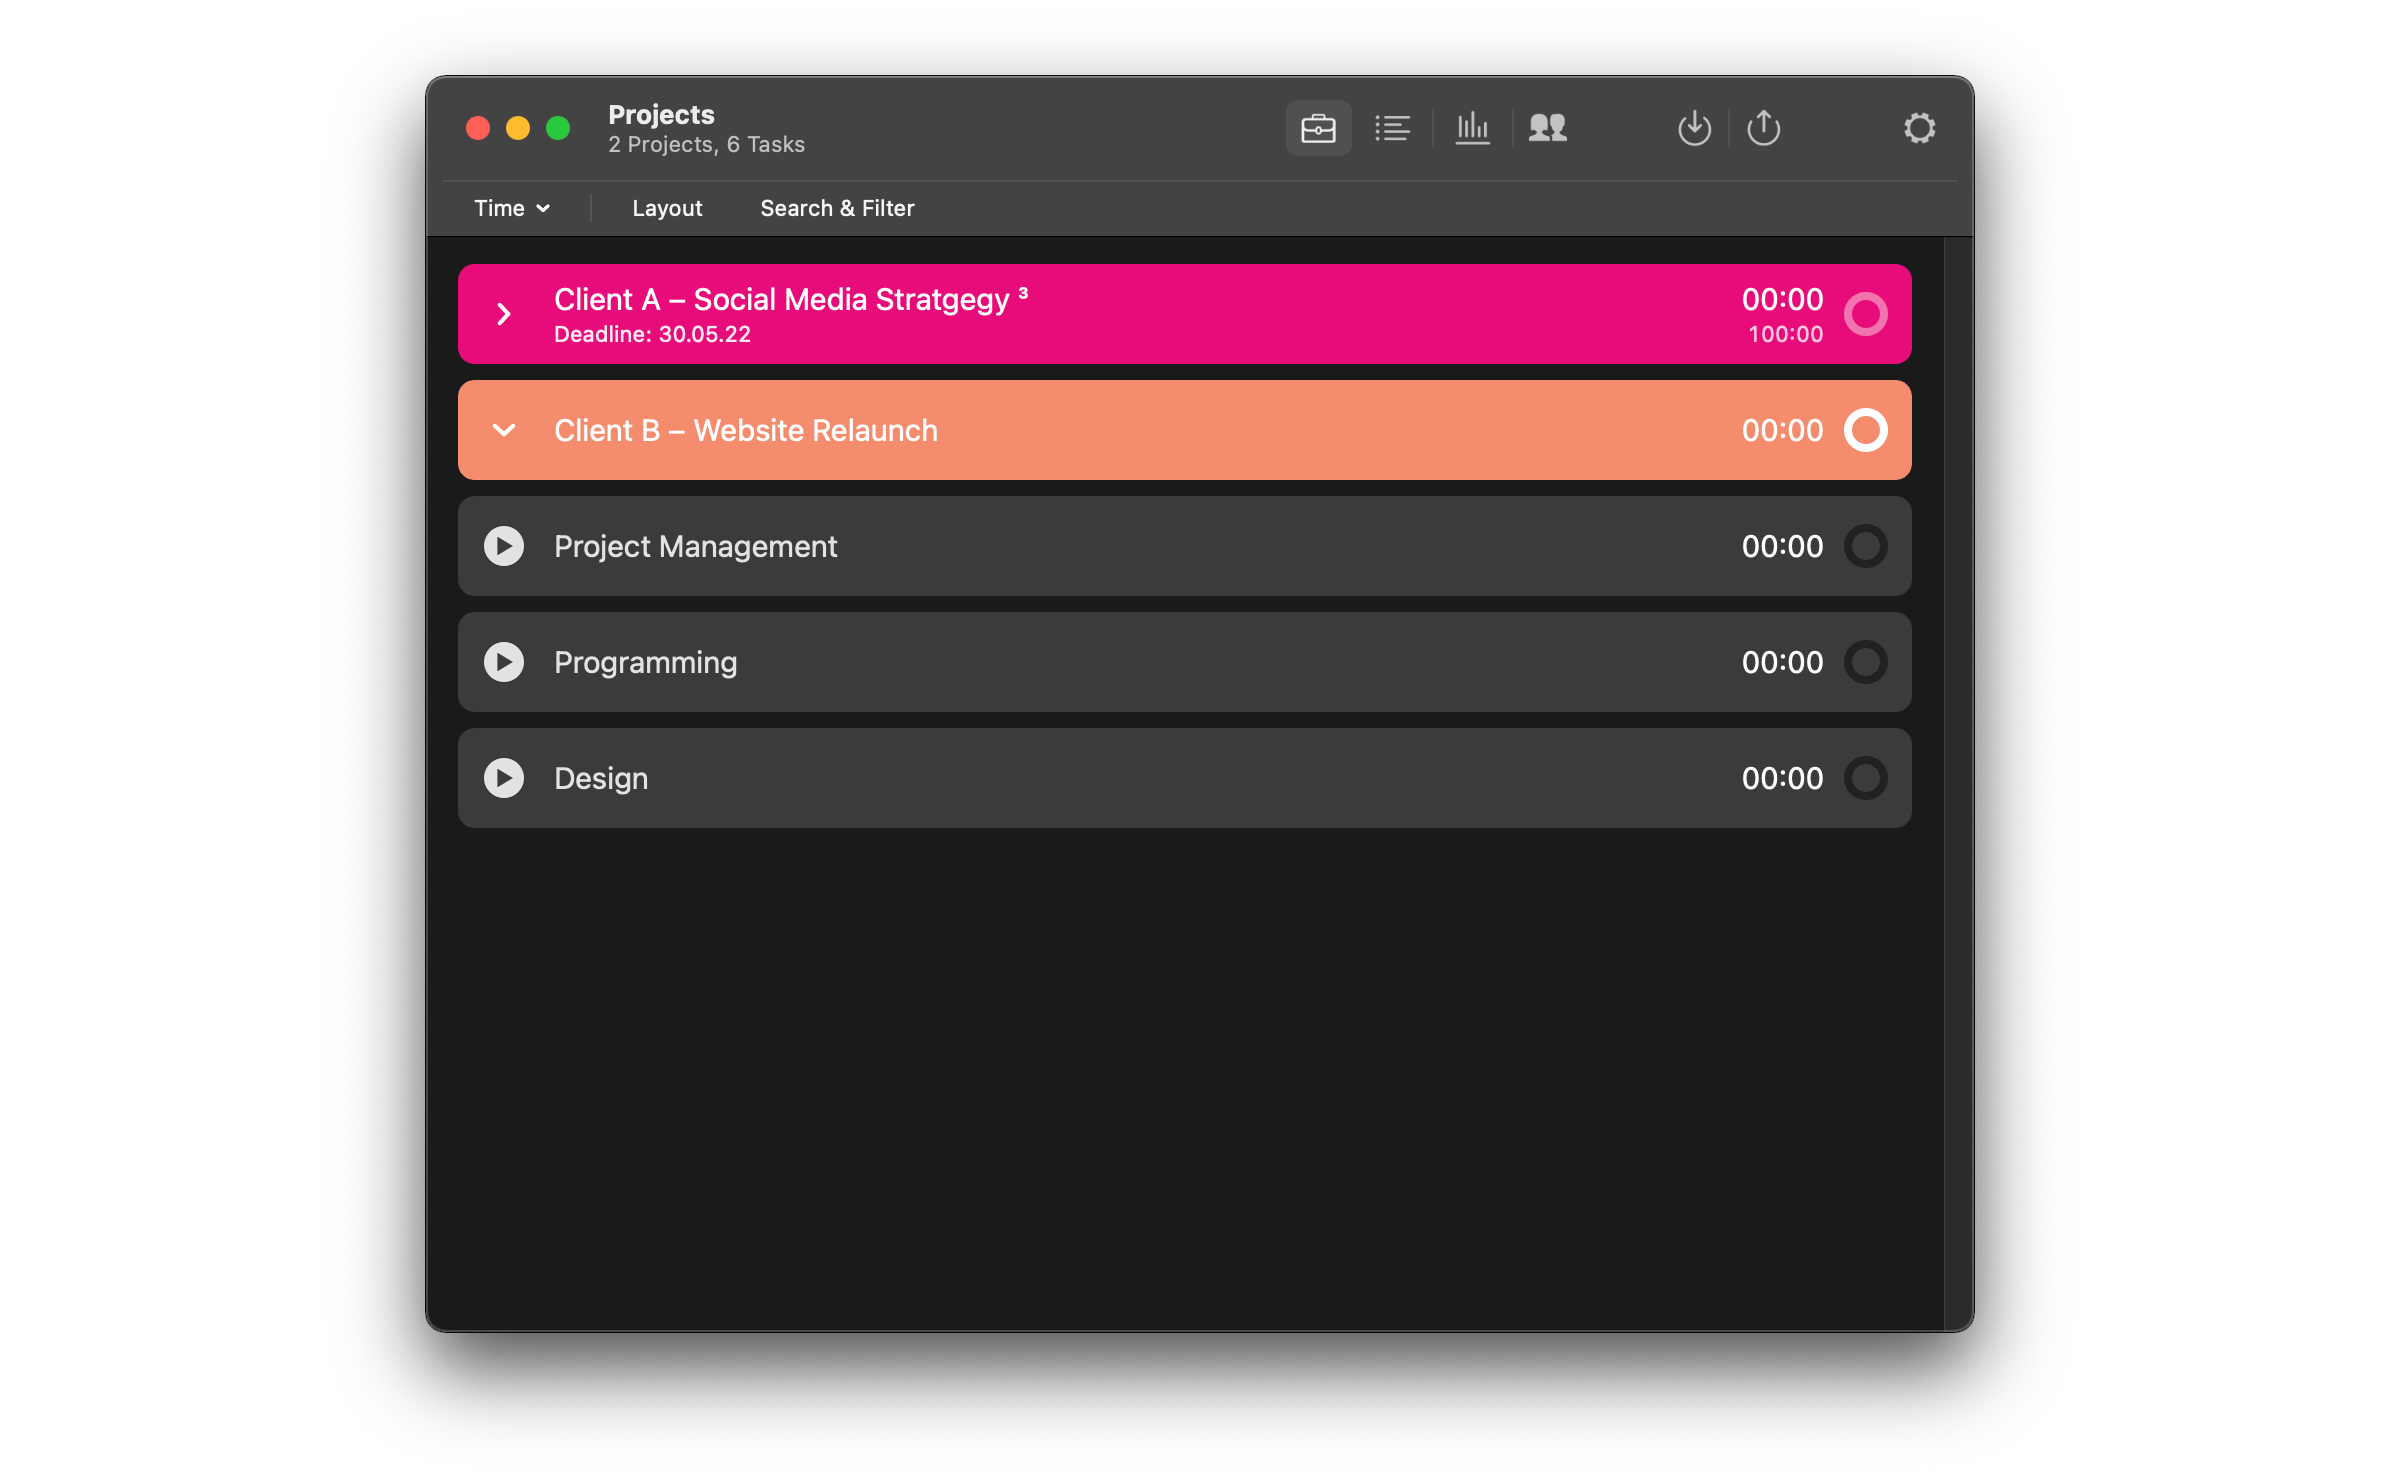
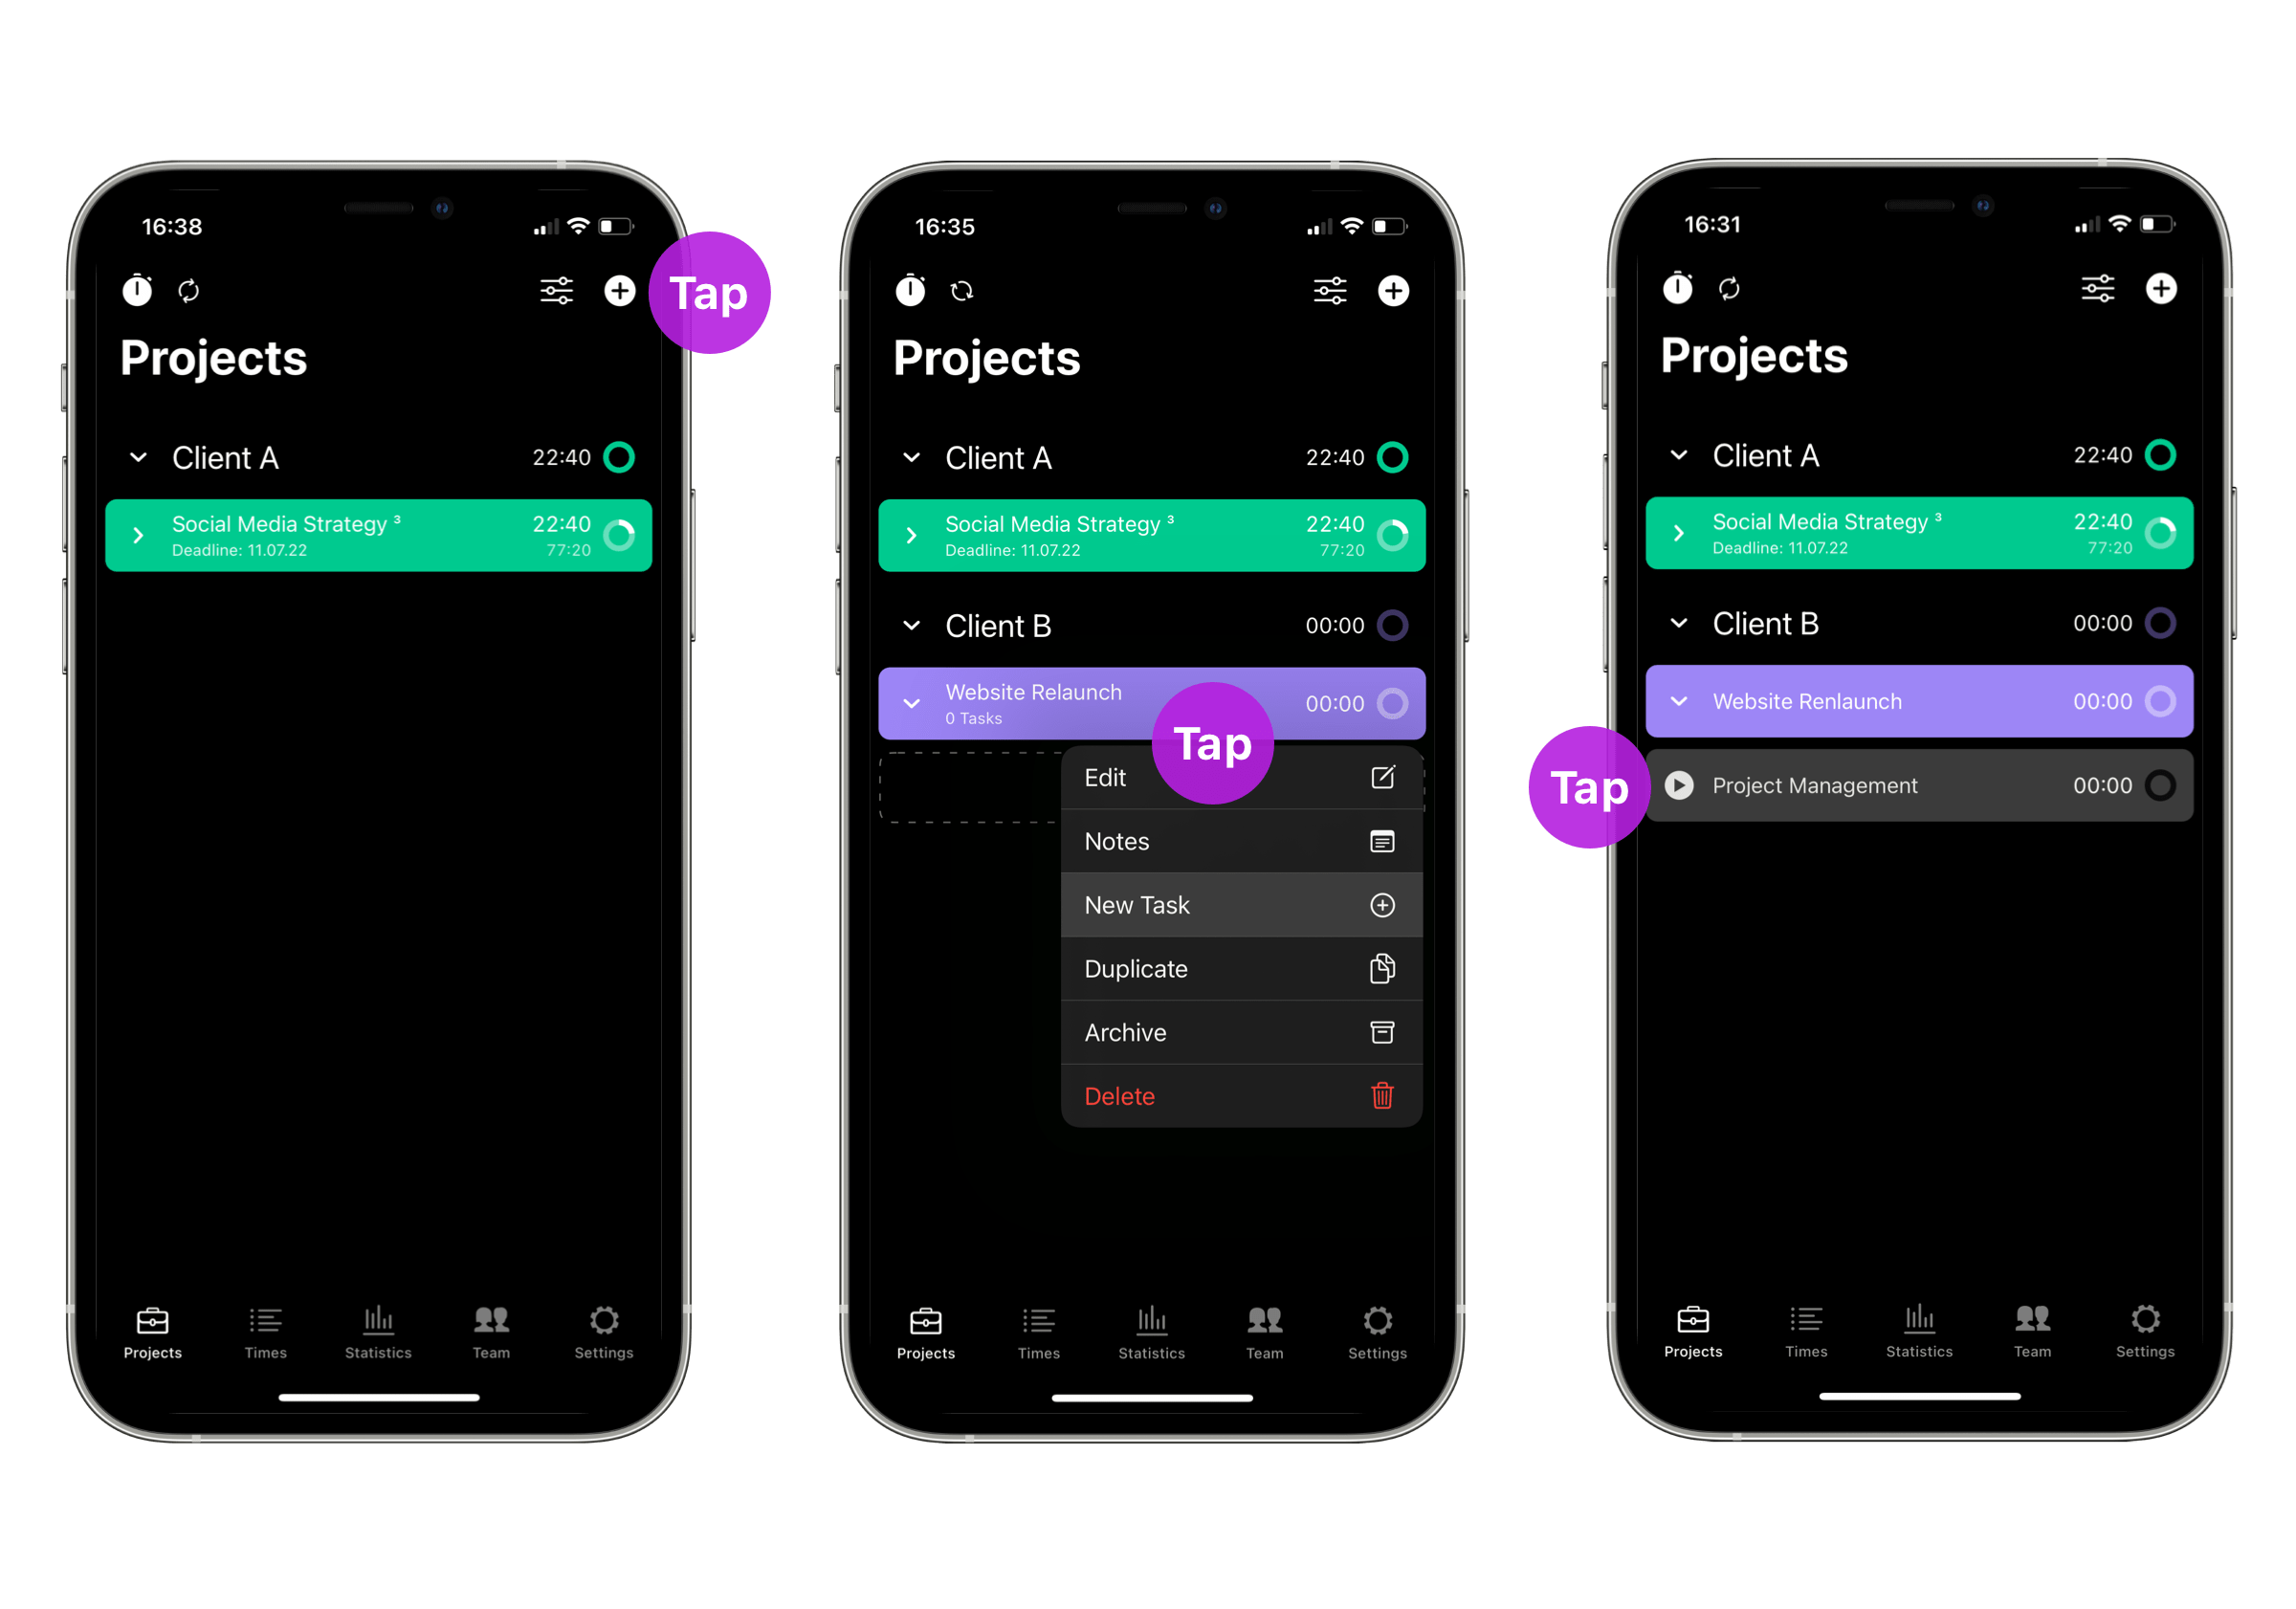
Time Tracking and Project List
To track your work times, you must first create at least one project and one task in the project list. categories (e.g. Client XY) and sub-tasks are optional, but can be helpful in structuring your project list.
Times are always recorded on tasks or sub-tasks in Tyme.
On the Mac:
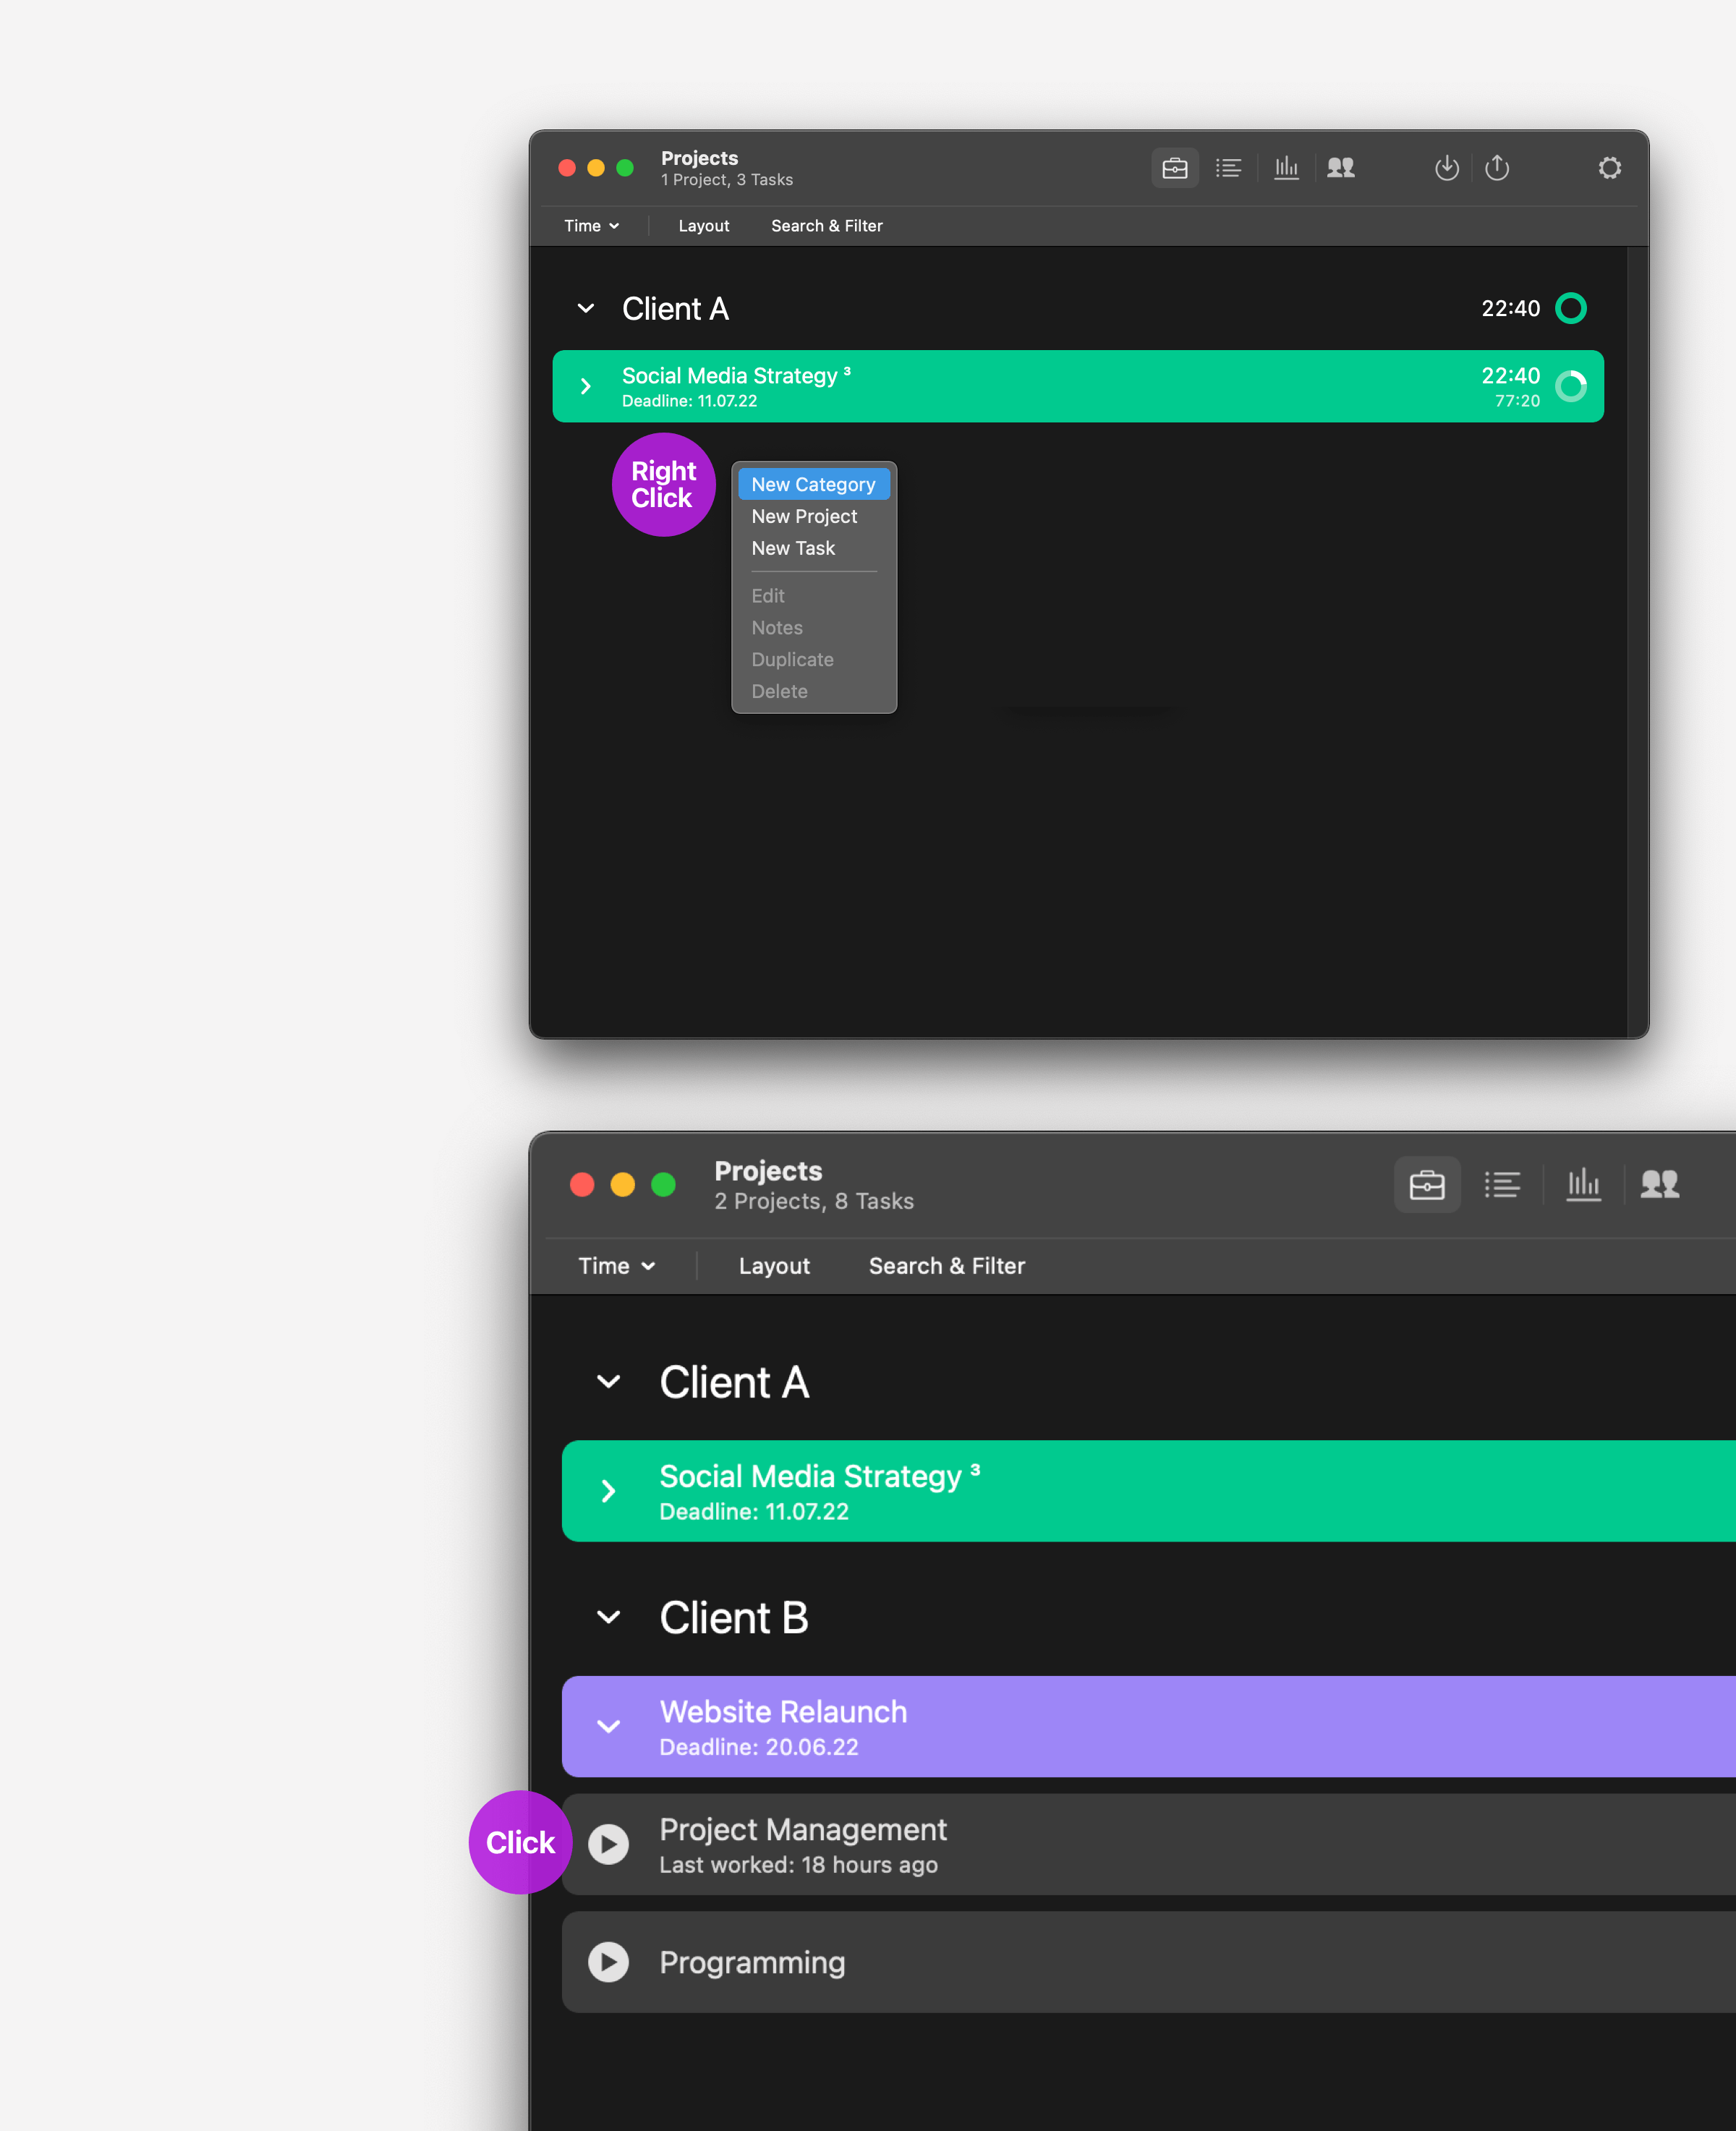
Via secondary click on the screen (Keyboard shortcut: ⌘+n) choose "Add Category" or "Add Project" and then
via secondary click (Keyboard shortcut: ⌘+t) on the project choose "Add Task".
You start tracking your time on tasks or sub-tasks by clicking on the play button.
On the iPhone:
Tap on the + button to add a project. Then, tap on the new project and select "New Task".
You start tracking your time on tasks or sub-tasks by clicking on the play button.
You can also start your last used tasks from the menubar of your Mac.
On the iPhone you can see your last used tasks by tapping on the stopwatch icon.
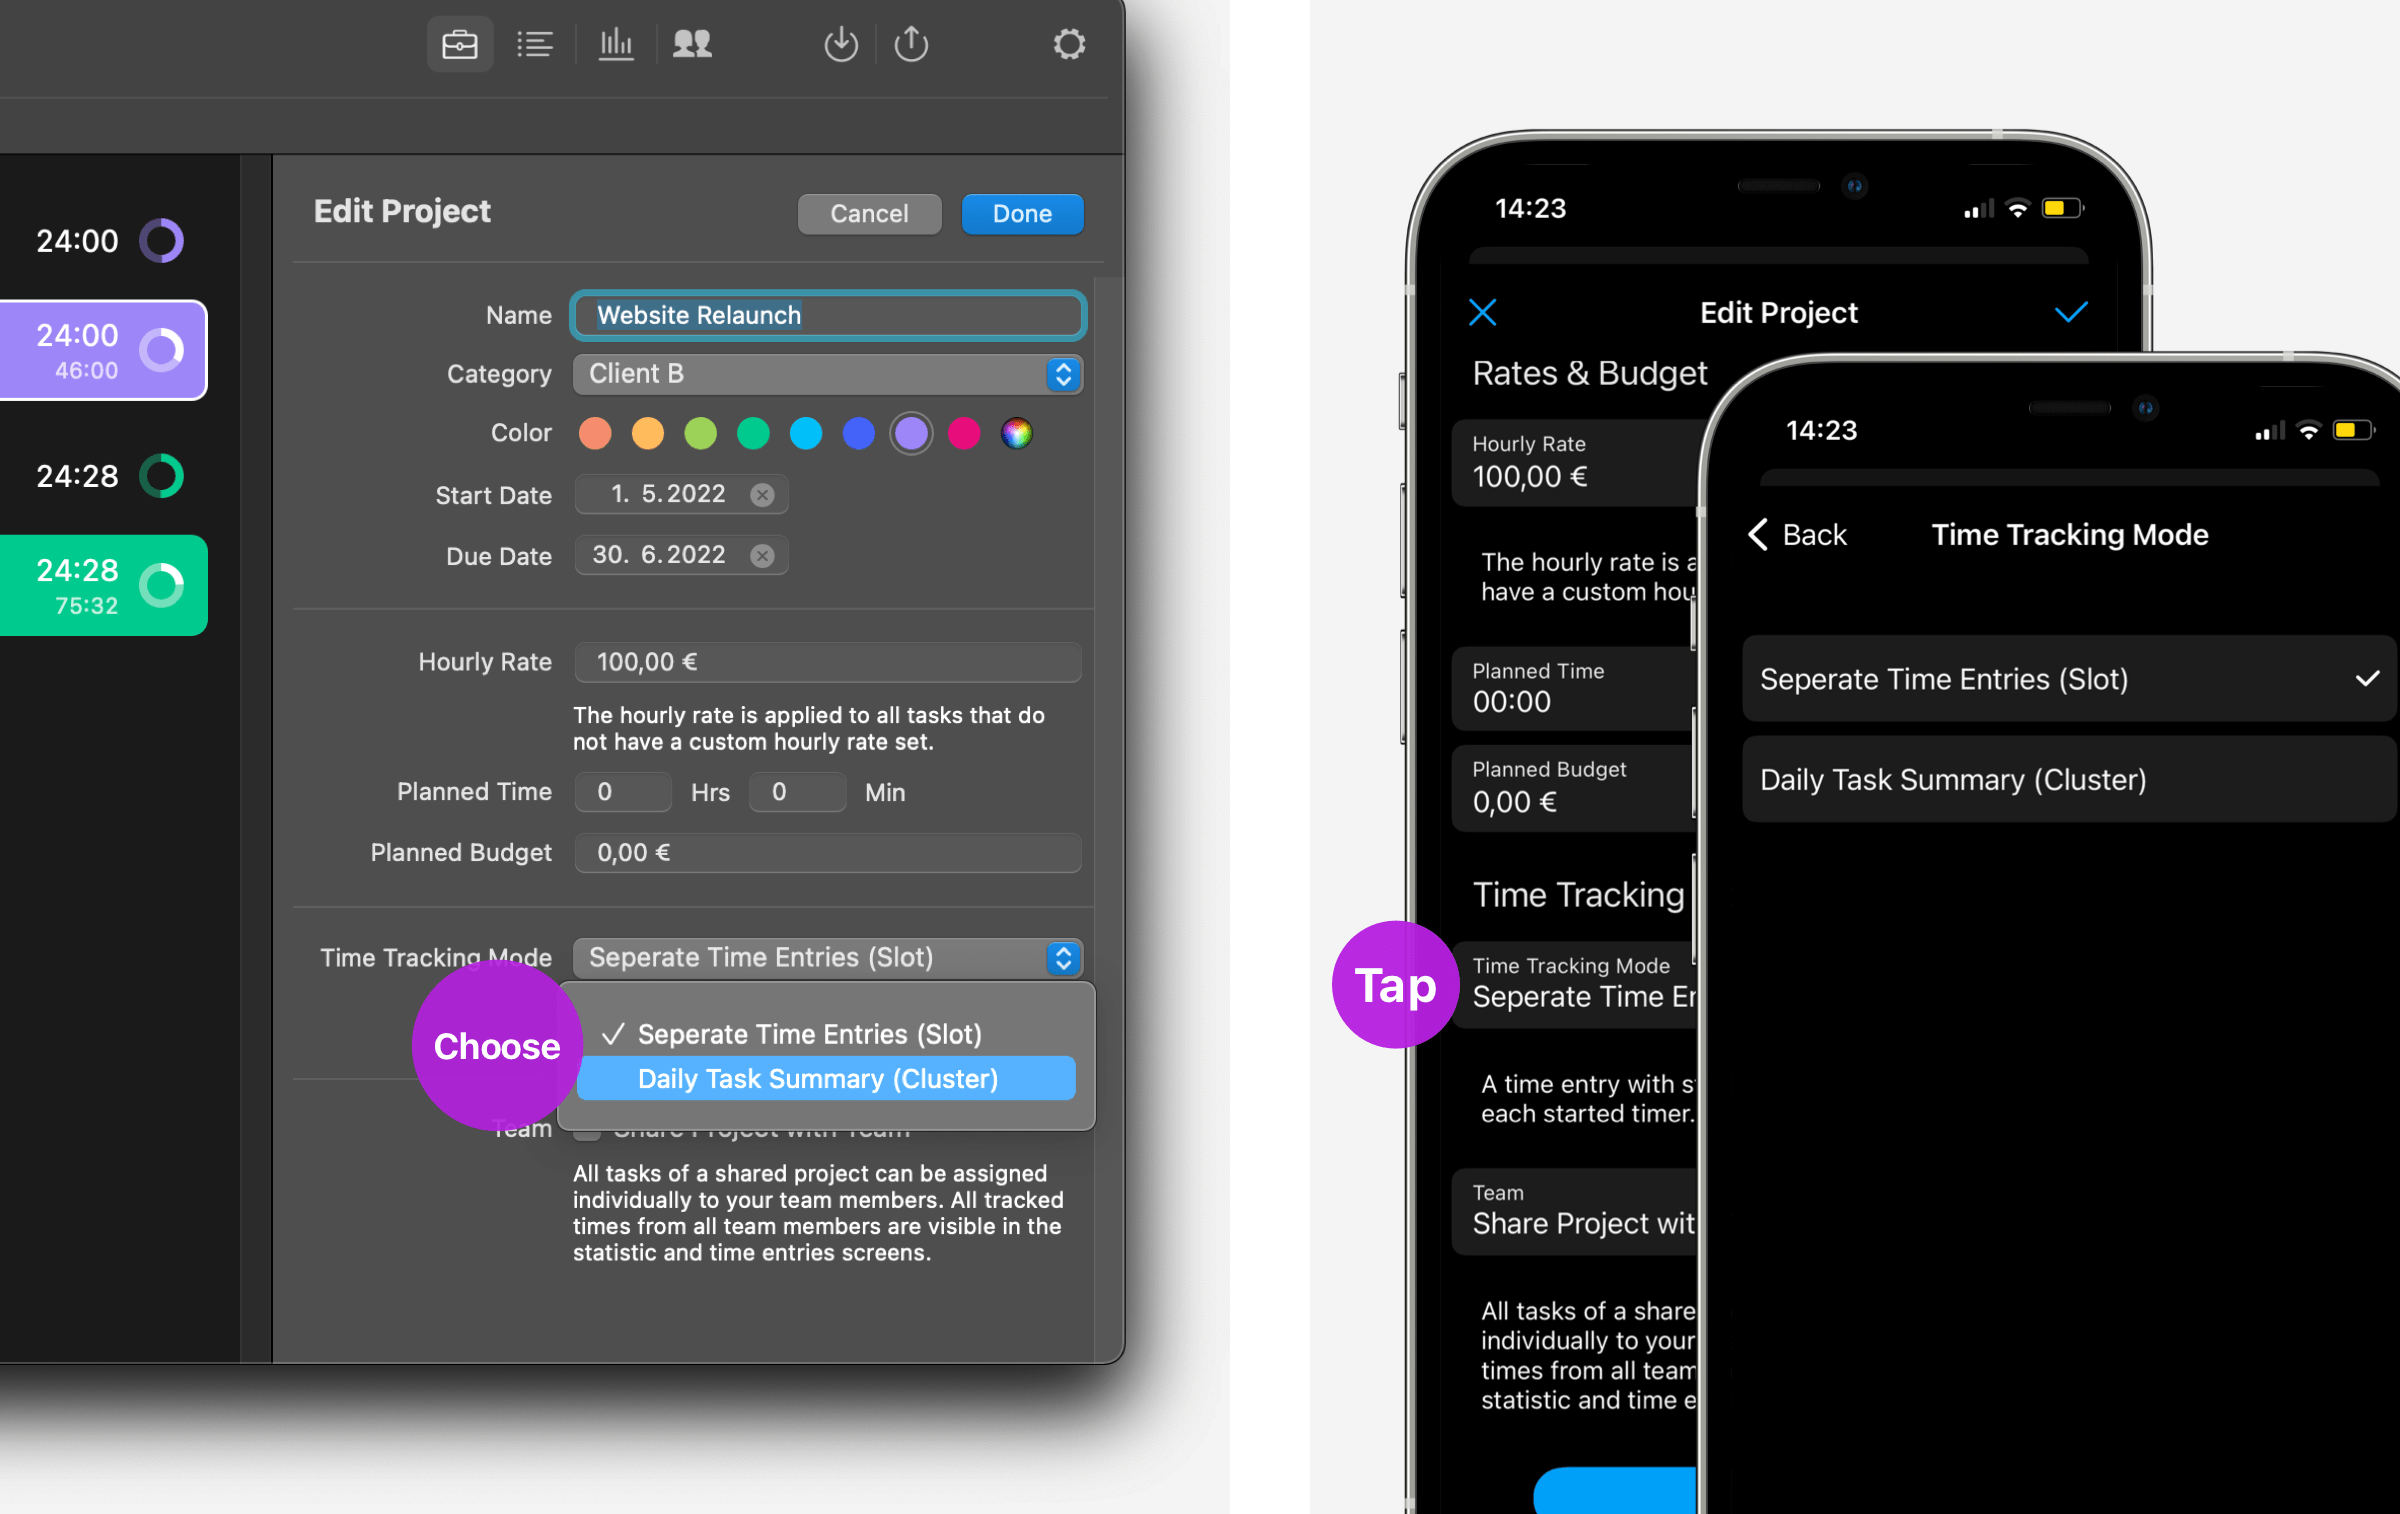
Time Tracking Mode - Slot or Cluster?
You can configure in your projects if you want to record "Separate Time Entries (Slots)" or the "Daily Task Summary (Cluster)".
In Slot Mode a separate time entry with start and end time is generated for each started timer.
In Cluster Mode all times of a task per day are summarized to one entry. The total hours are recorded - without start and end time.
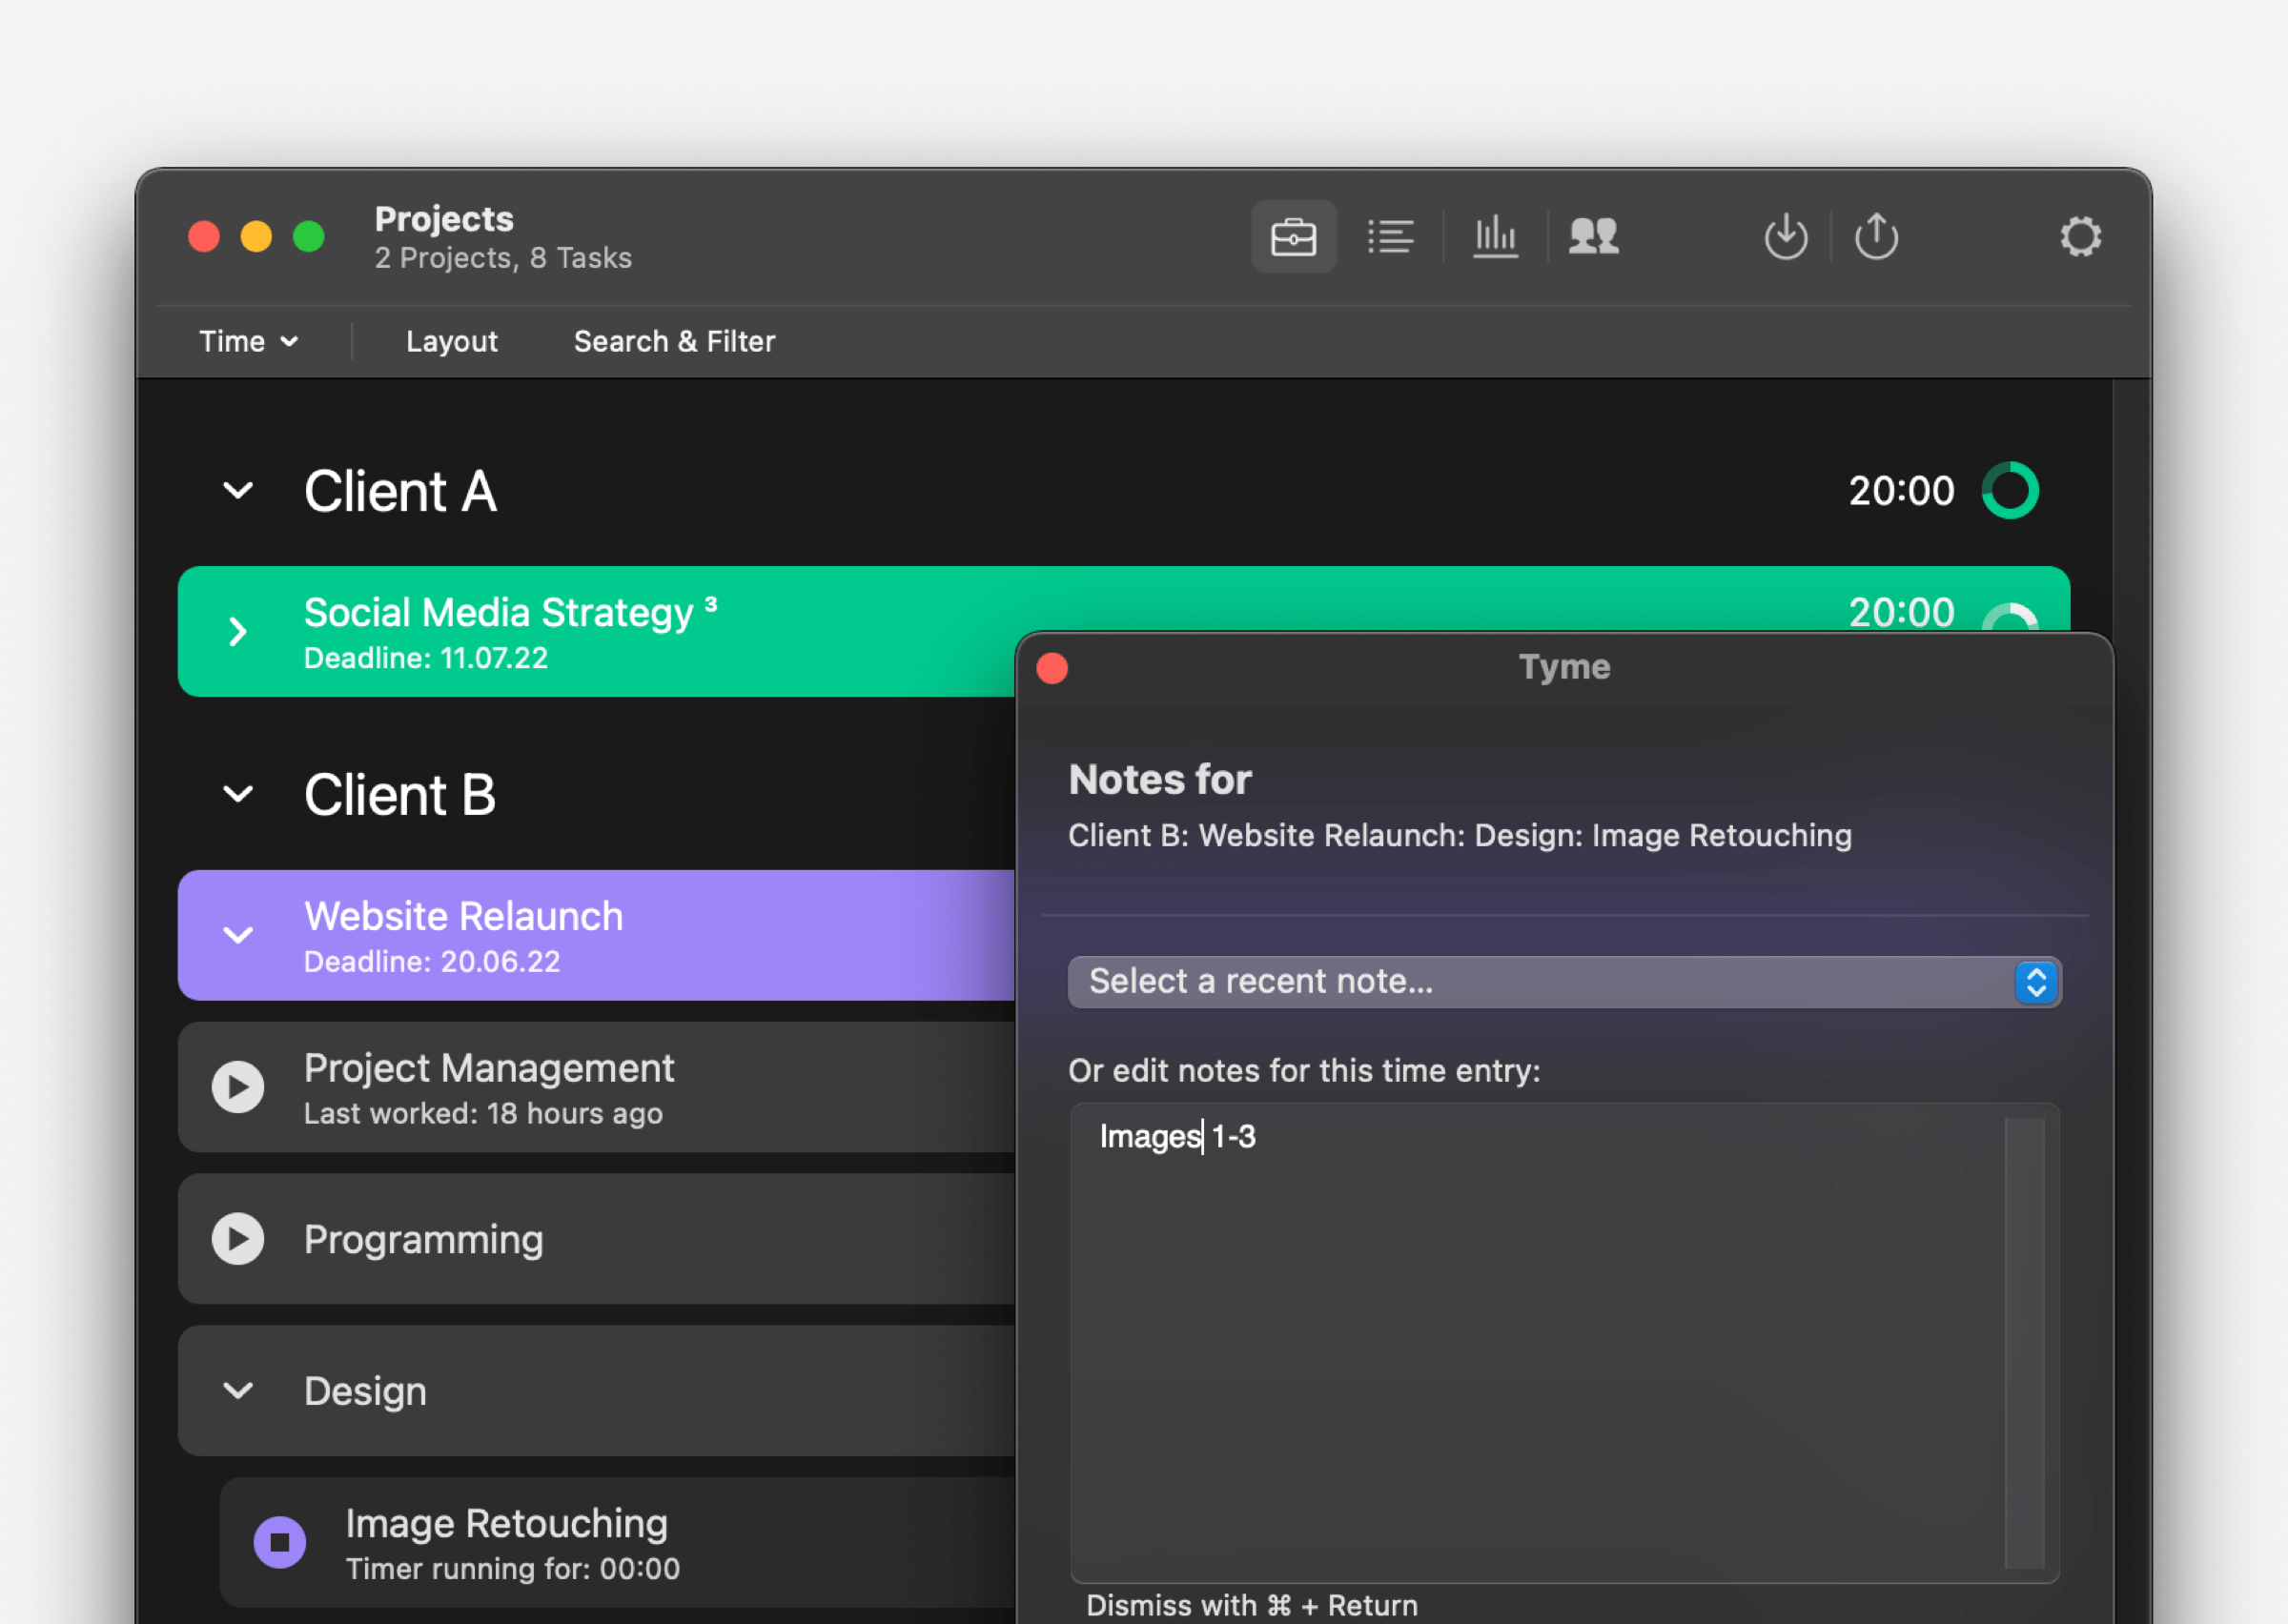
Notes
Notes in the time entries document what exactly you worked on during the time period.
You can display the note dialog at "Start", "Stop" or "Start and Stop" of a task - configurable in "Settings" → "Reminders".
The Main Navigation
In the main navigation you will find your project list, your time entries, your statistics, your team information, the Import, the Export, View Options and Search & Filter.
On the iPhone, you can find the import and export options in the "Times" menu item.
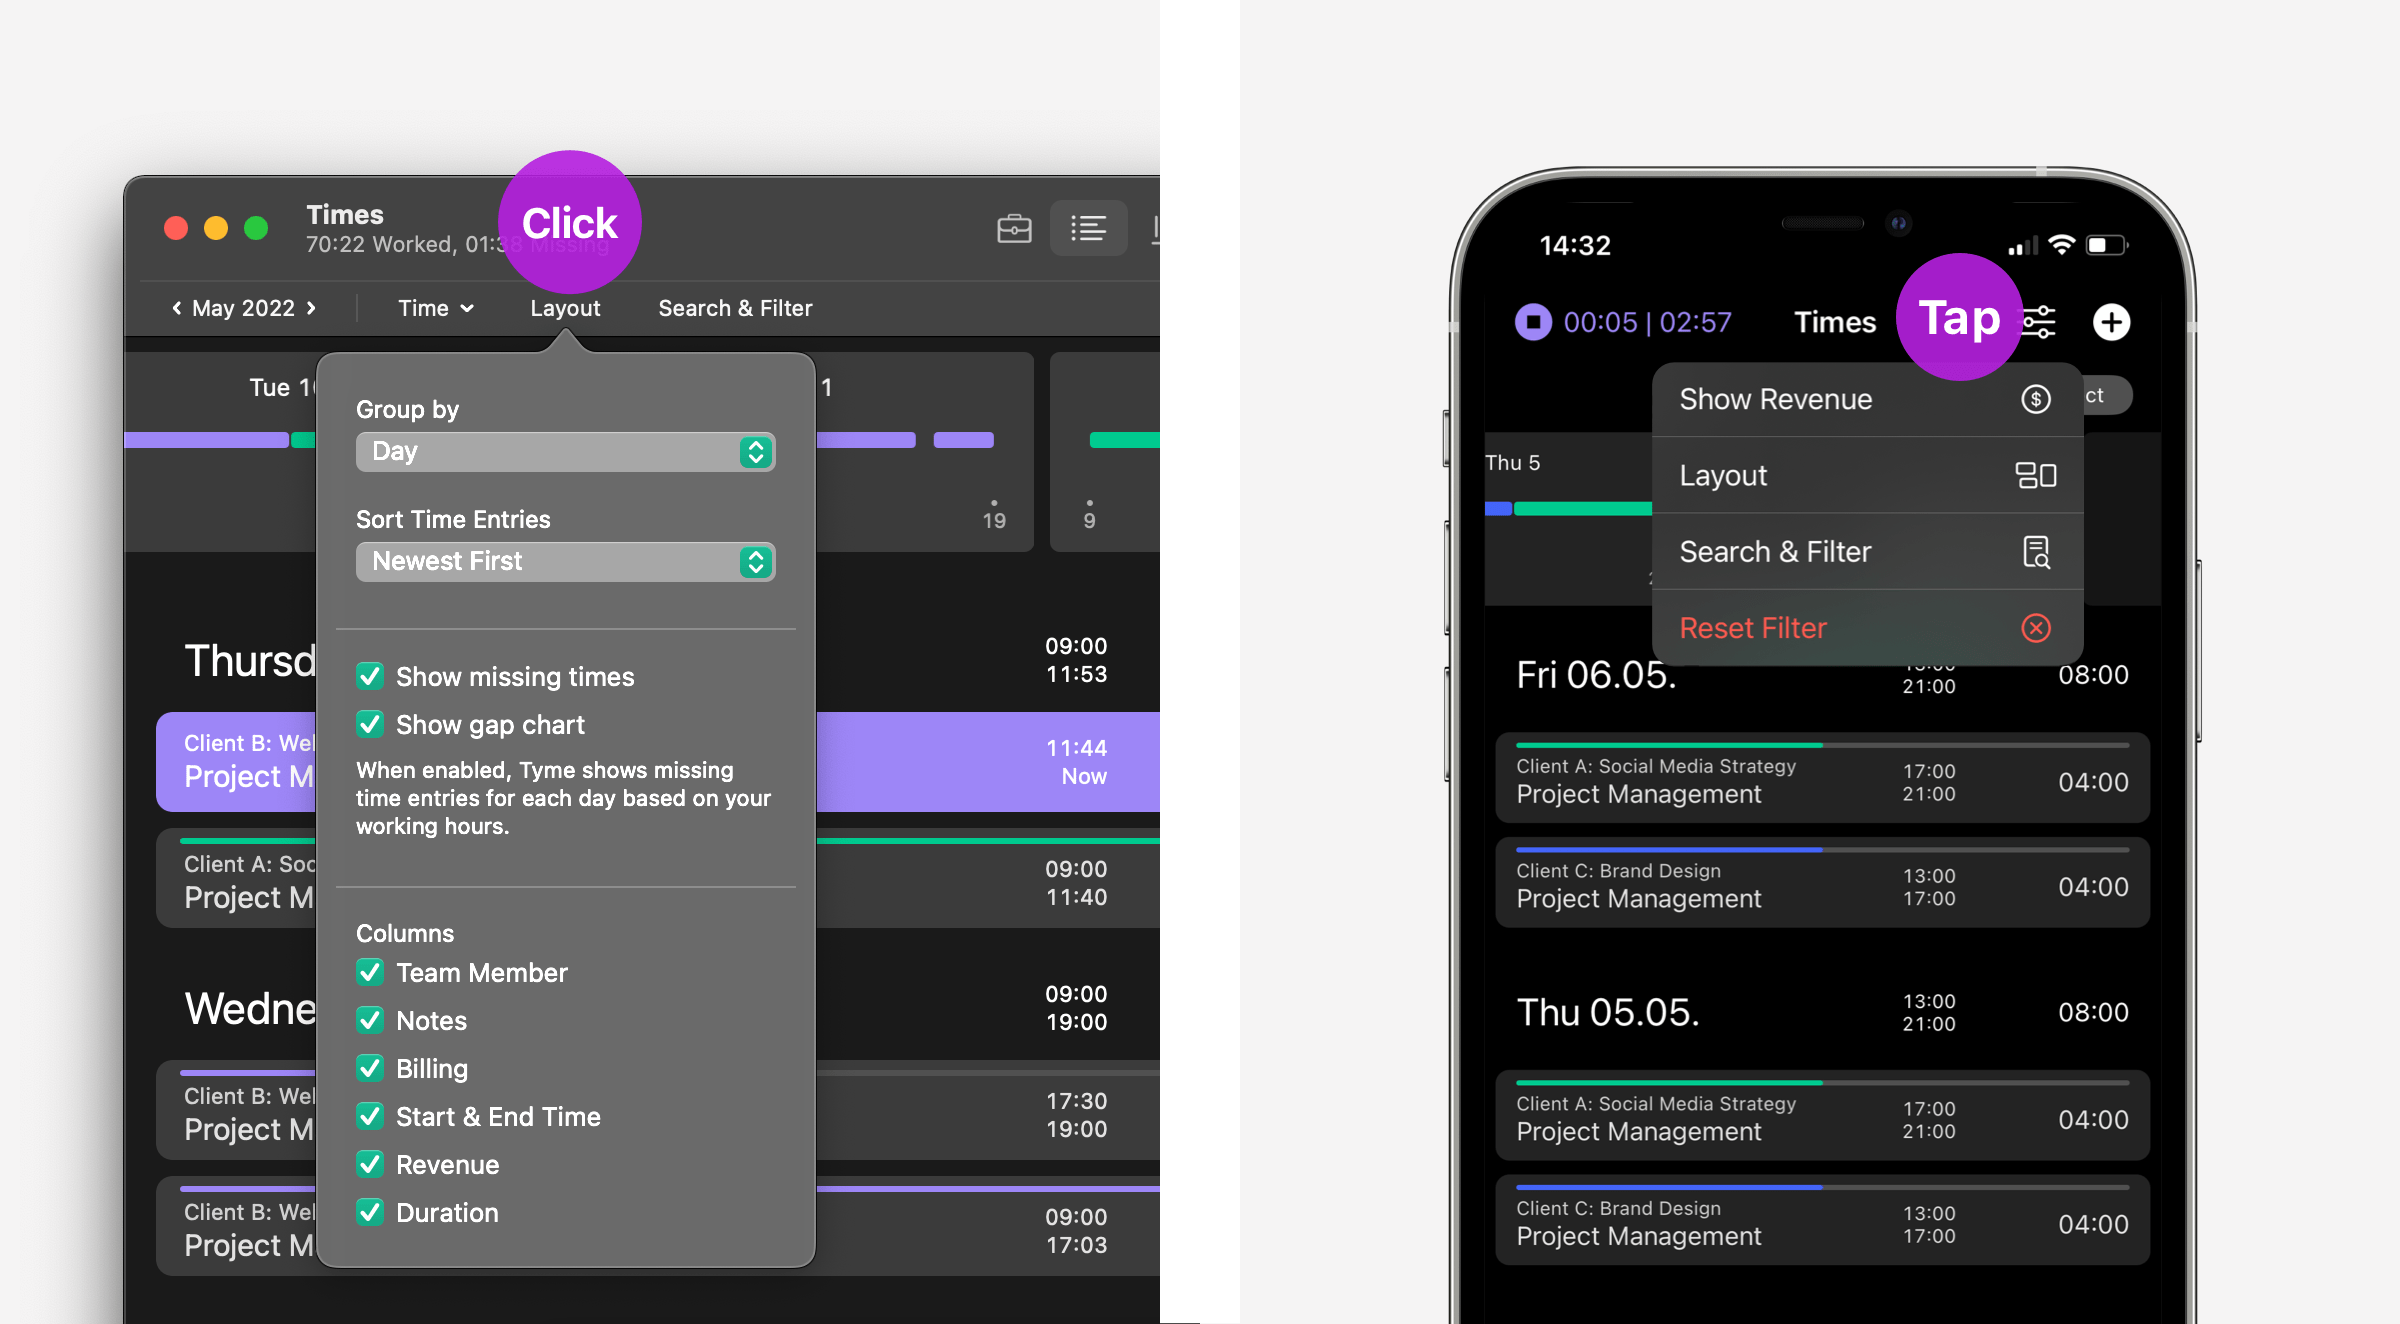
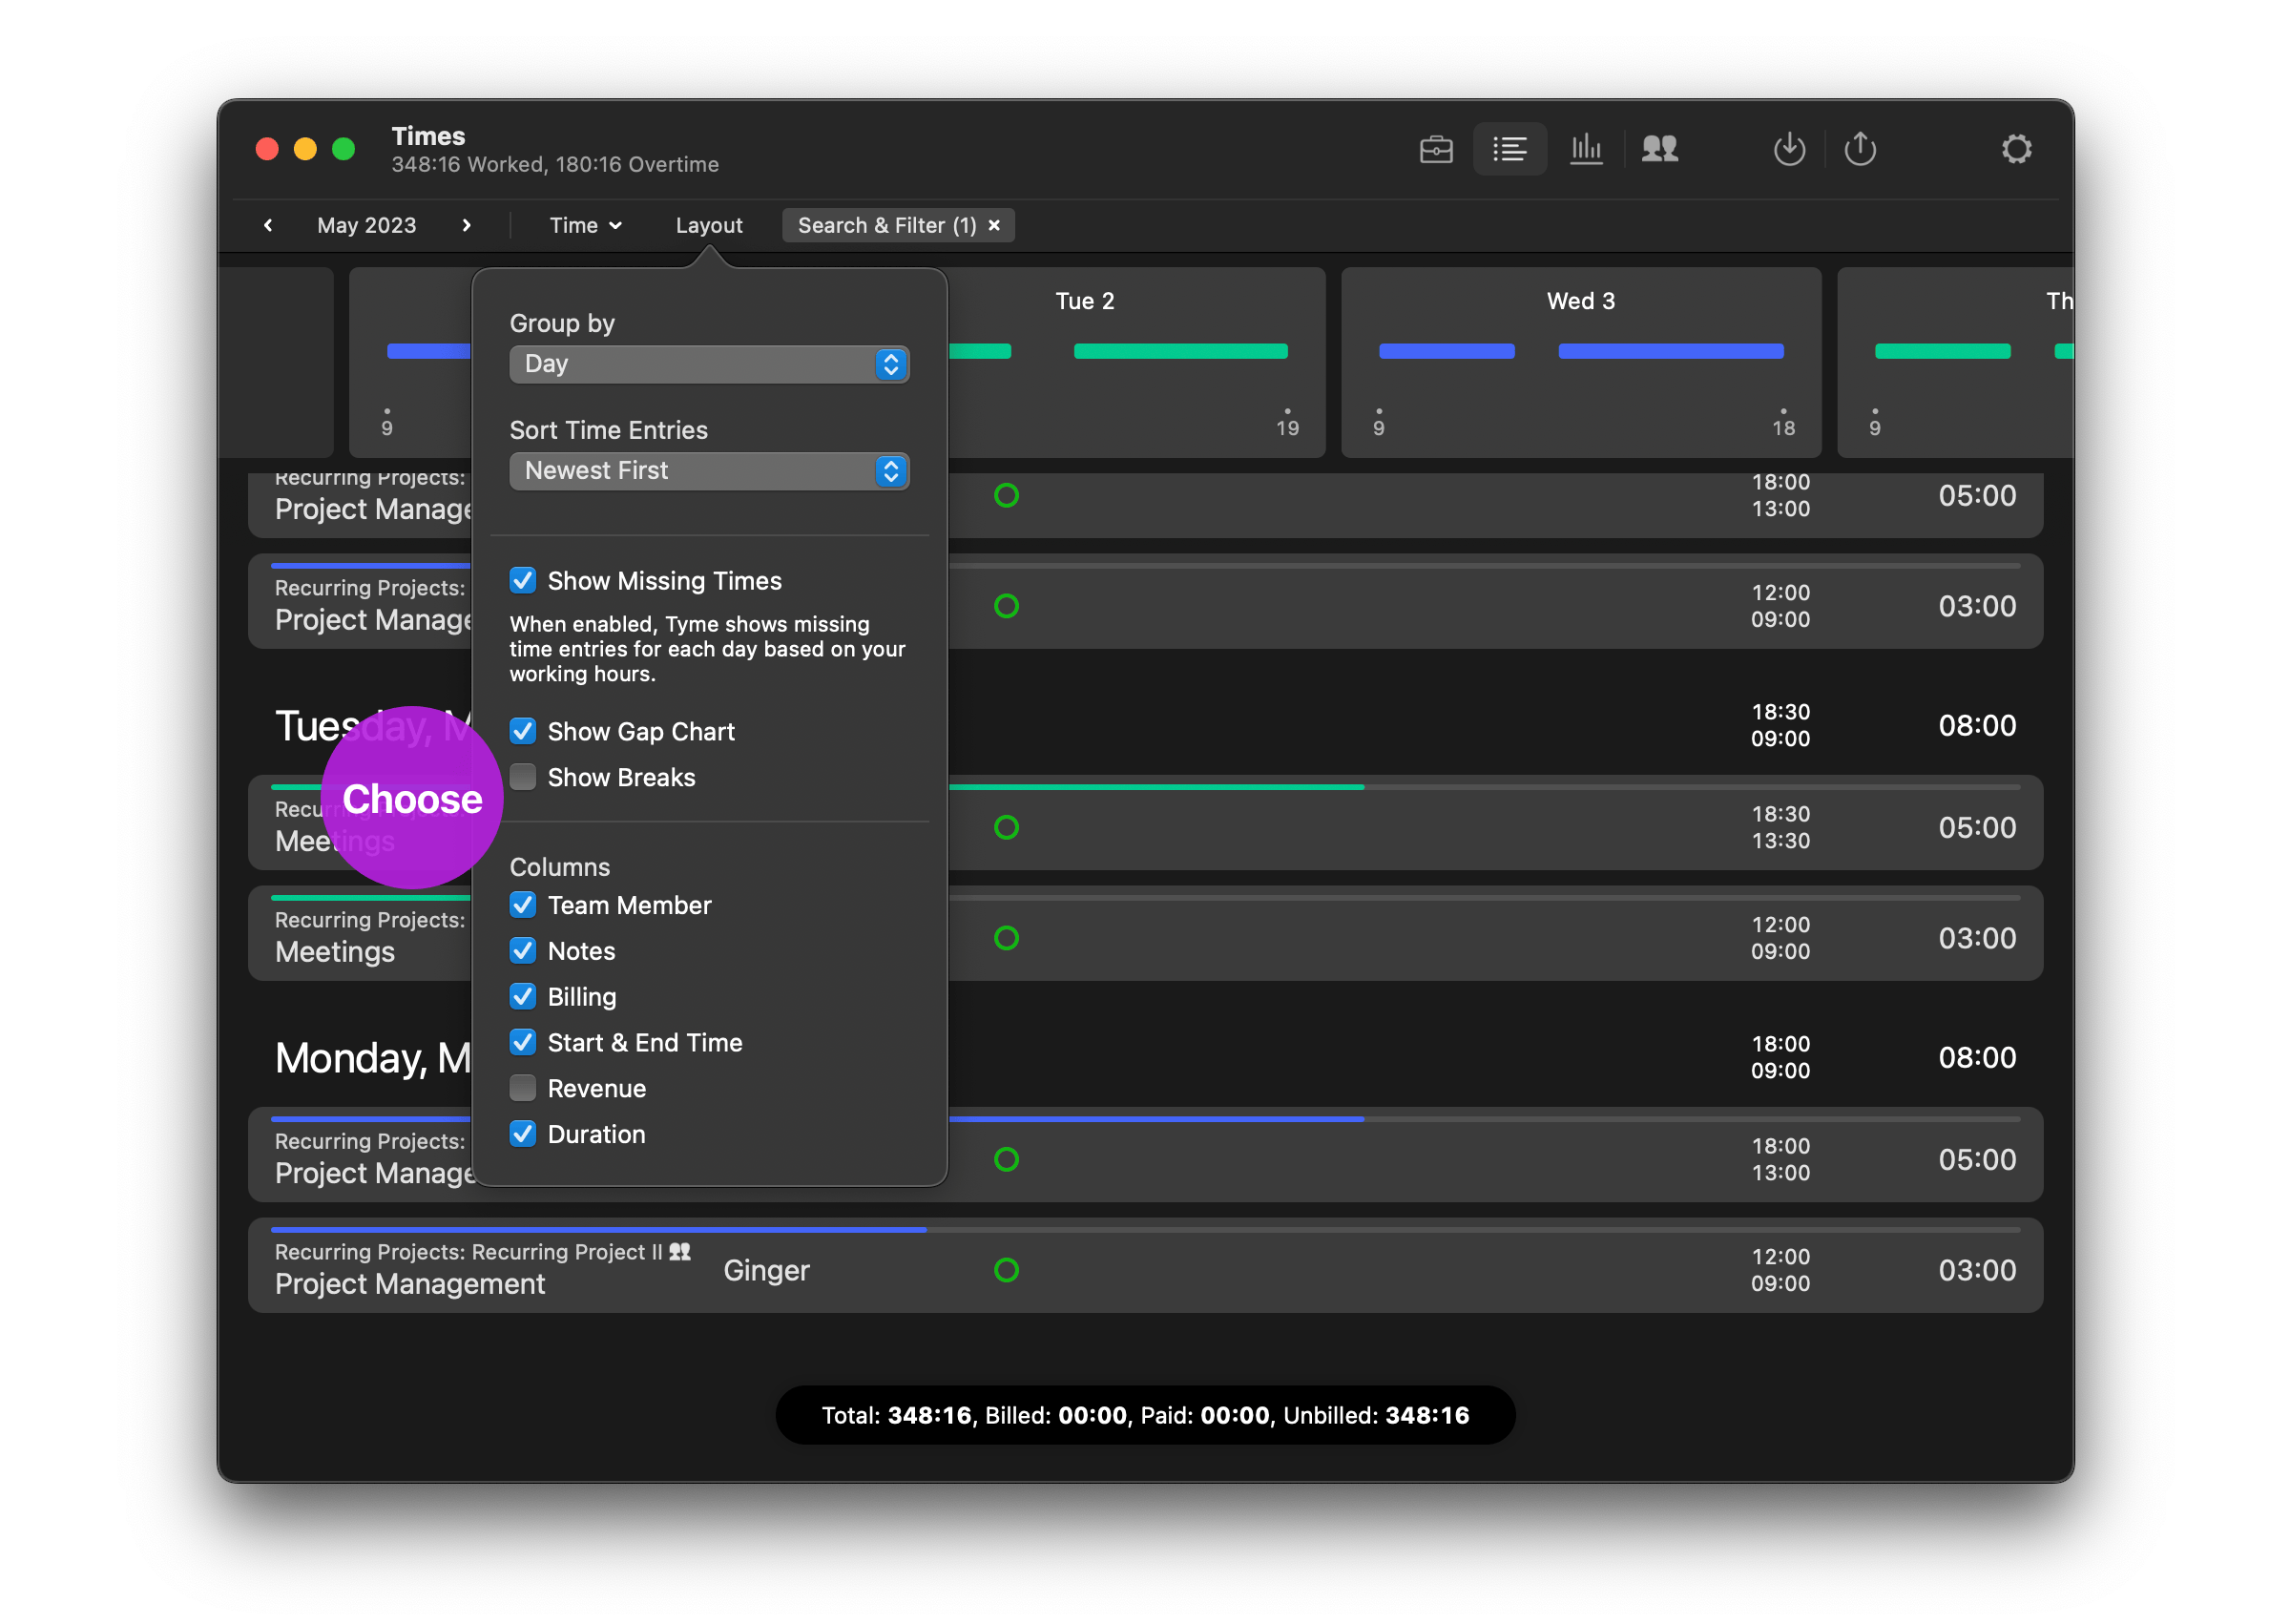
View Options
Each screen in Tyme offers various options for customizing the screen in the “View Options” menu item.
On the iPhone, the view options appear by tapping the “…” icon in the upper right corner of the display.
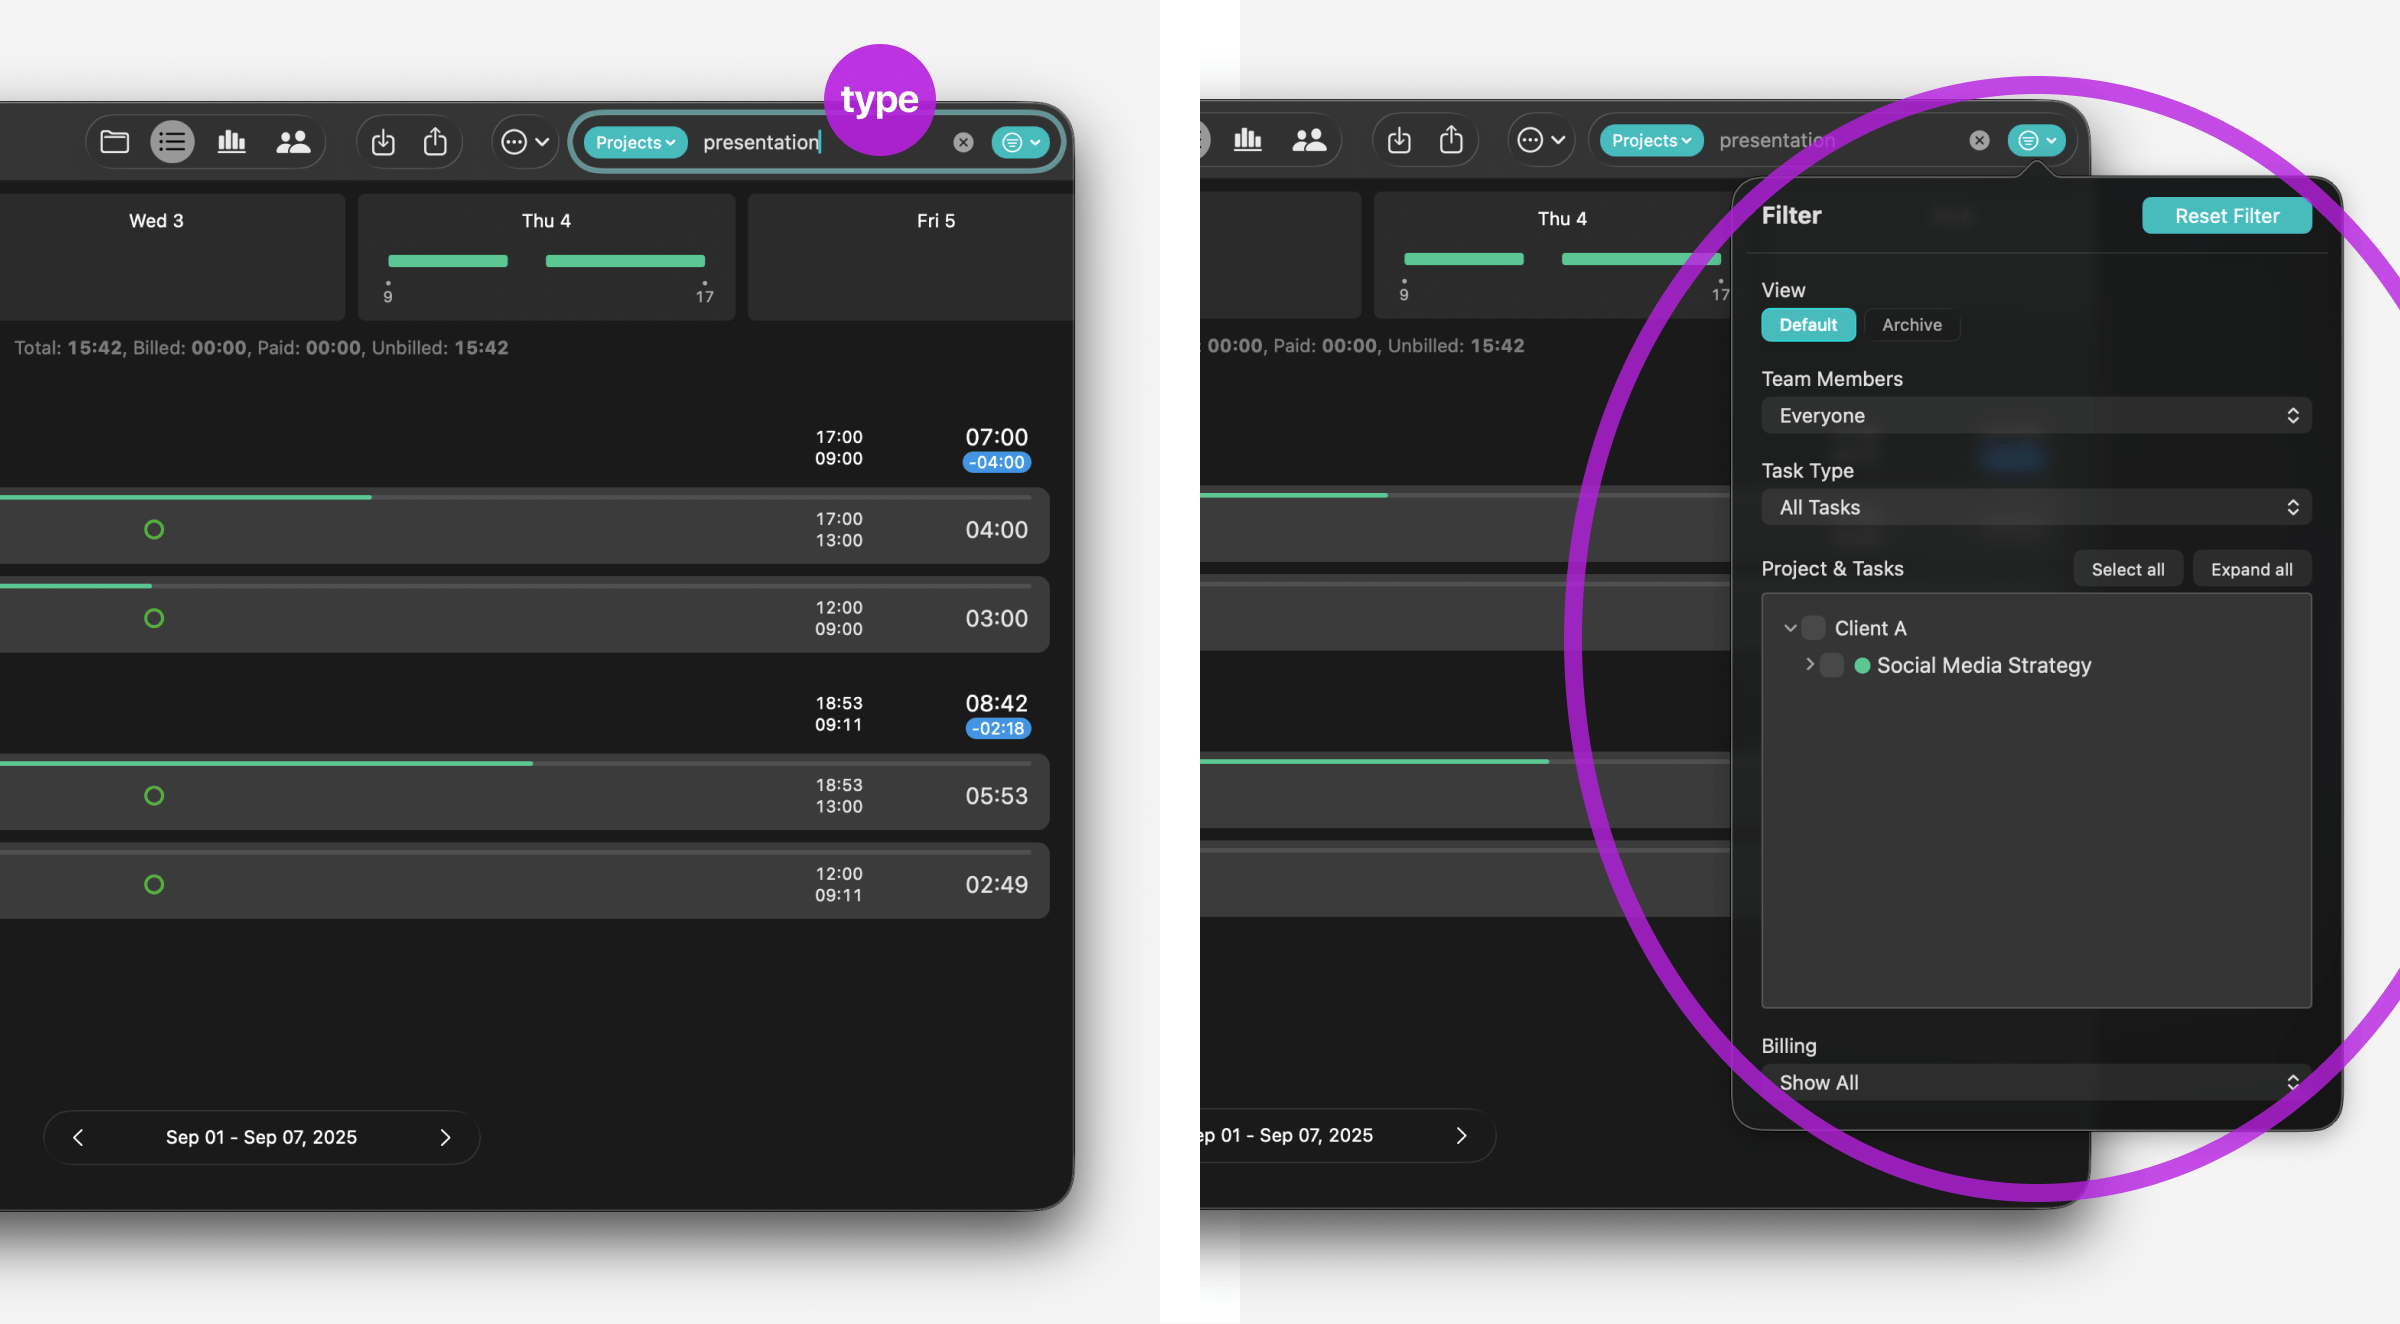
Search, Filter & Archive
The search function can be found on every Tyme screen. Here, you can search for projects or notes, for example.
The search field also contains the filter. Use this to narrow down your search results or filter directly, e.g. by projects and tasks.
You will also find the archive here.
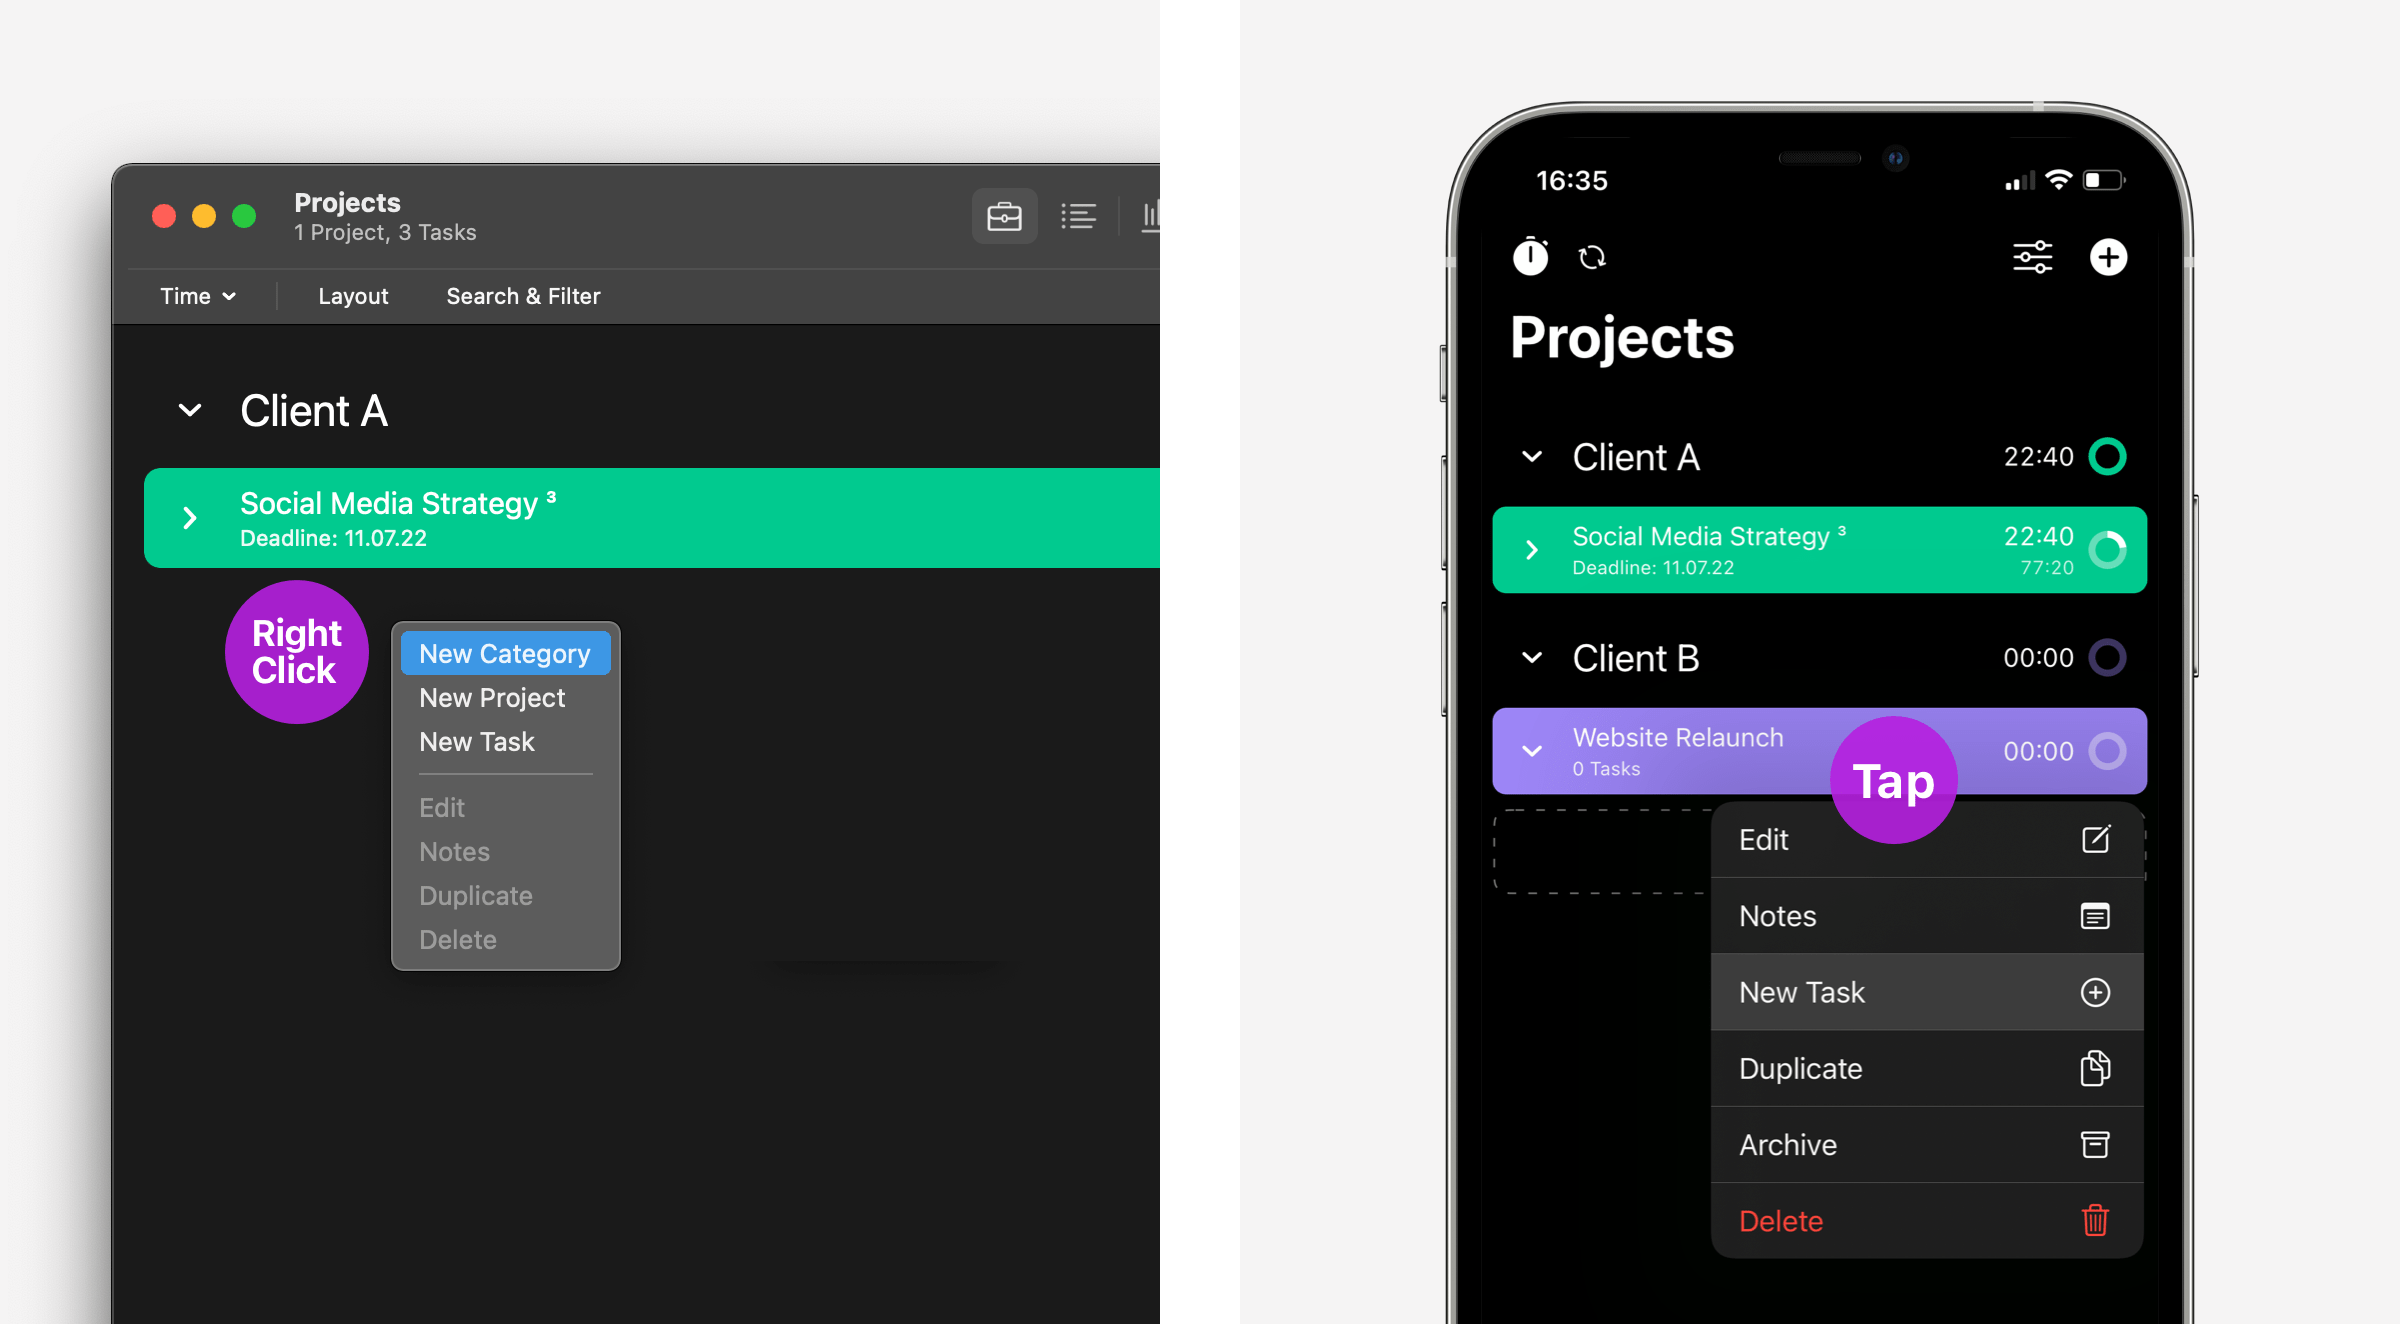
Action Menu
Tyme follows the Apple navigation principles.
On the Mac the Action Menu can be found via a secondary click on the respective item and alternatively in your Mac’s menu bar.
On the iPhone the action menu appears by tapping on the respective element.
Enter Times Manually
In the times screen you can add, edit or delete time entries manually via a secondary click on the screen (keyboard shortcut: ⌘+n).
In addition, you can also create trips, fixed costs (or expenses or flat rates) and absence (e.g. sickness, vacation) instead of a time entry.
On the iPhone you can add times by tap on the + button. Edit or delete times by tapping on the respective time entry (the tap always opens the action menu).
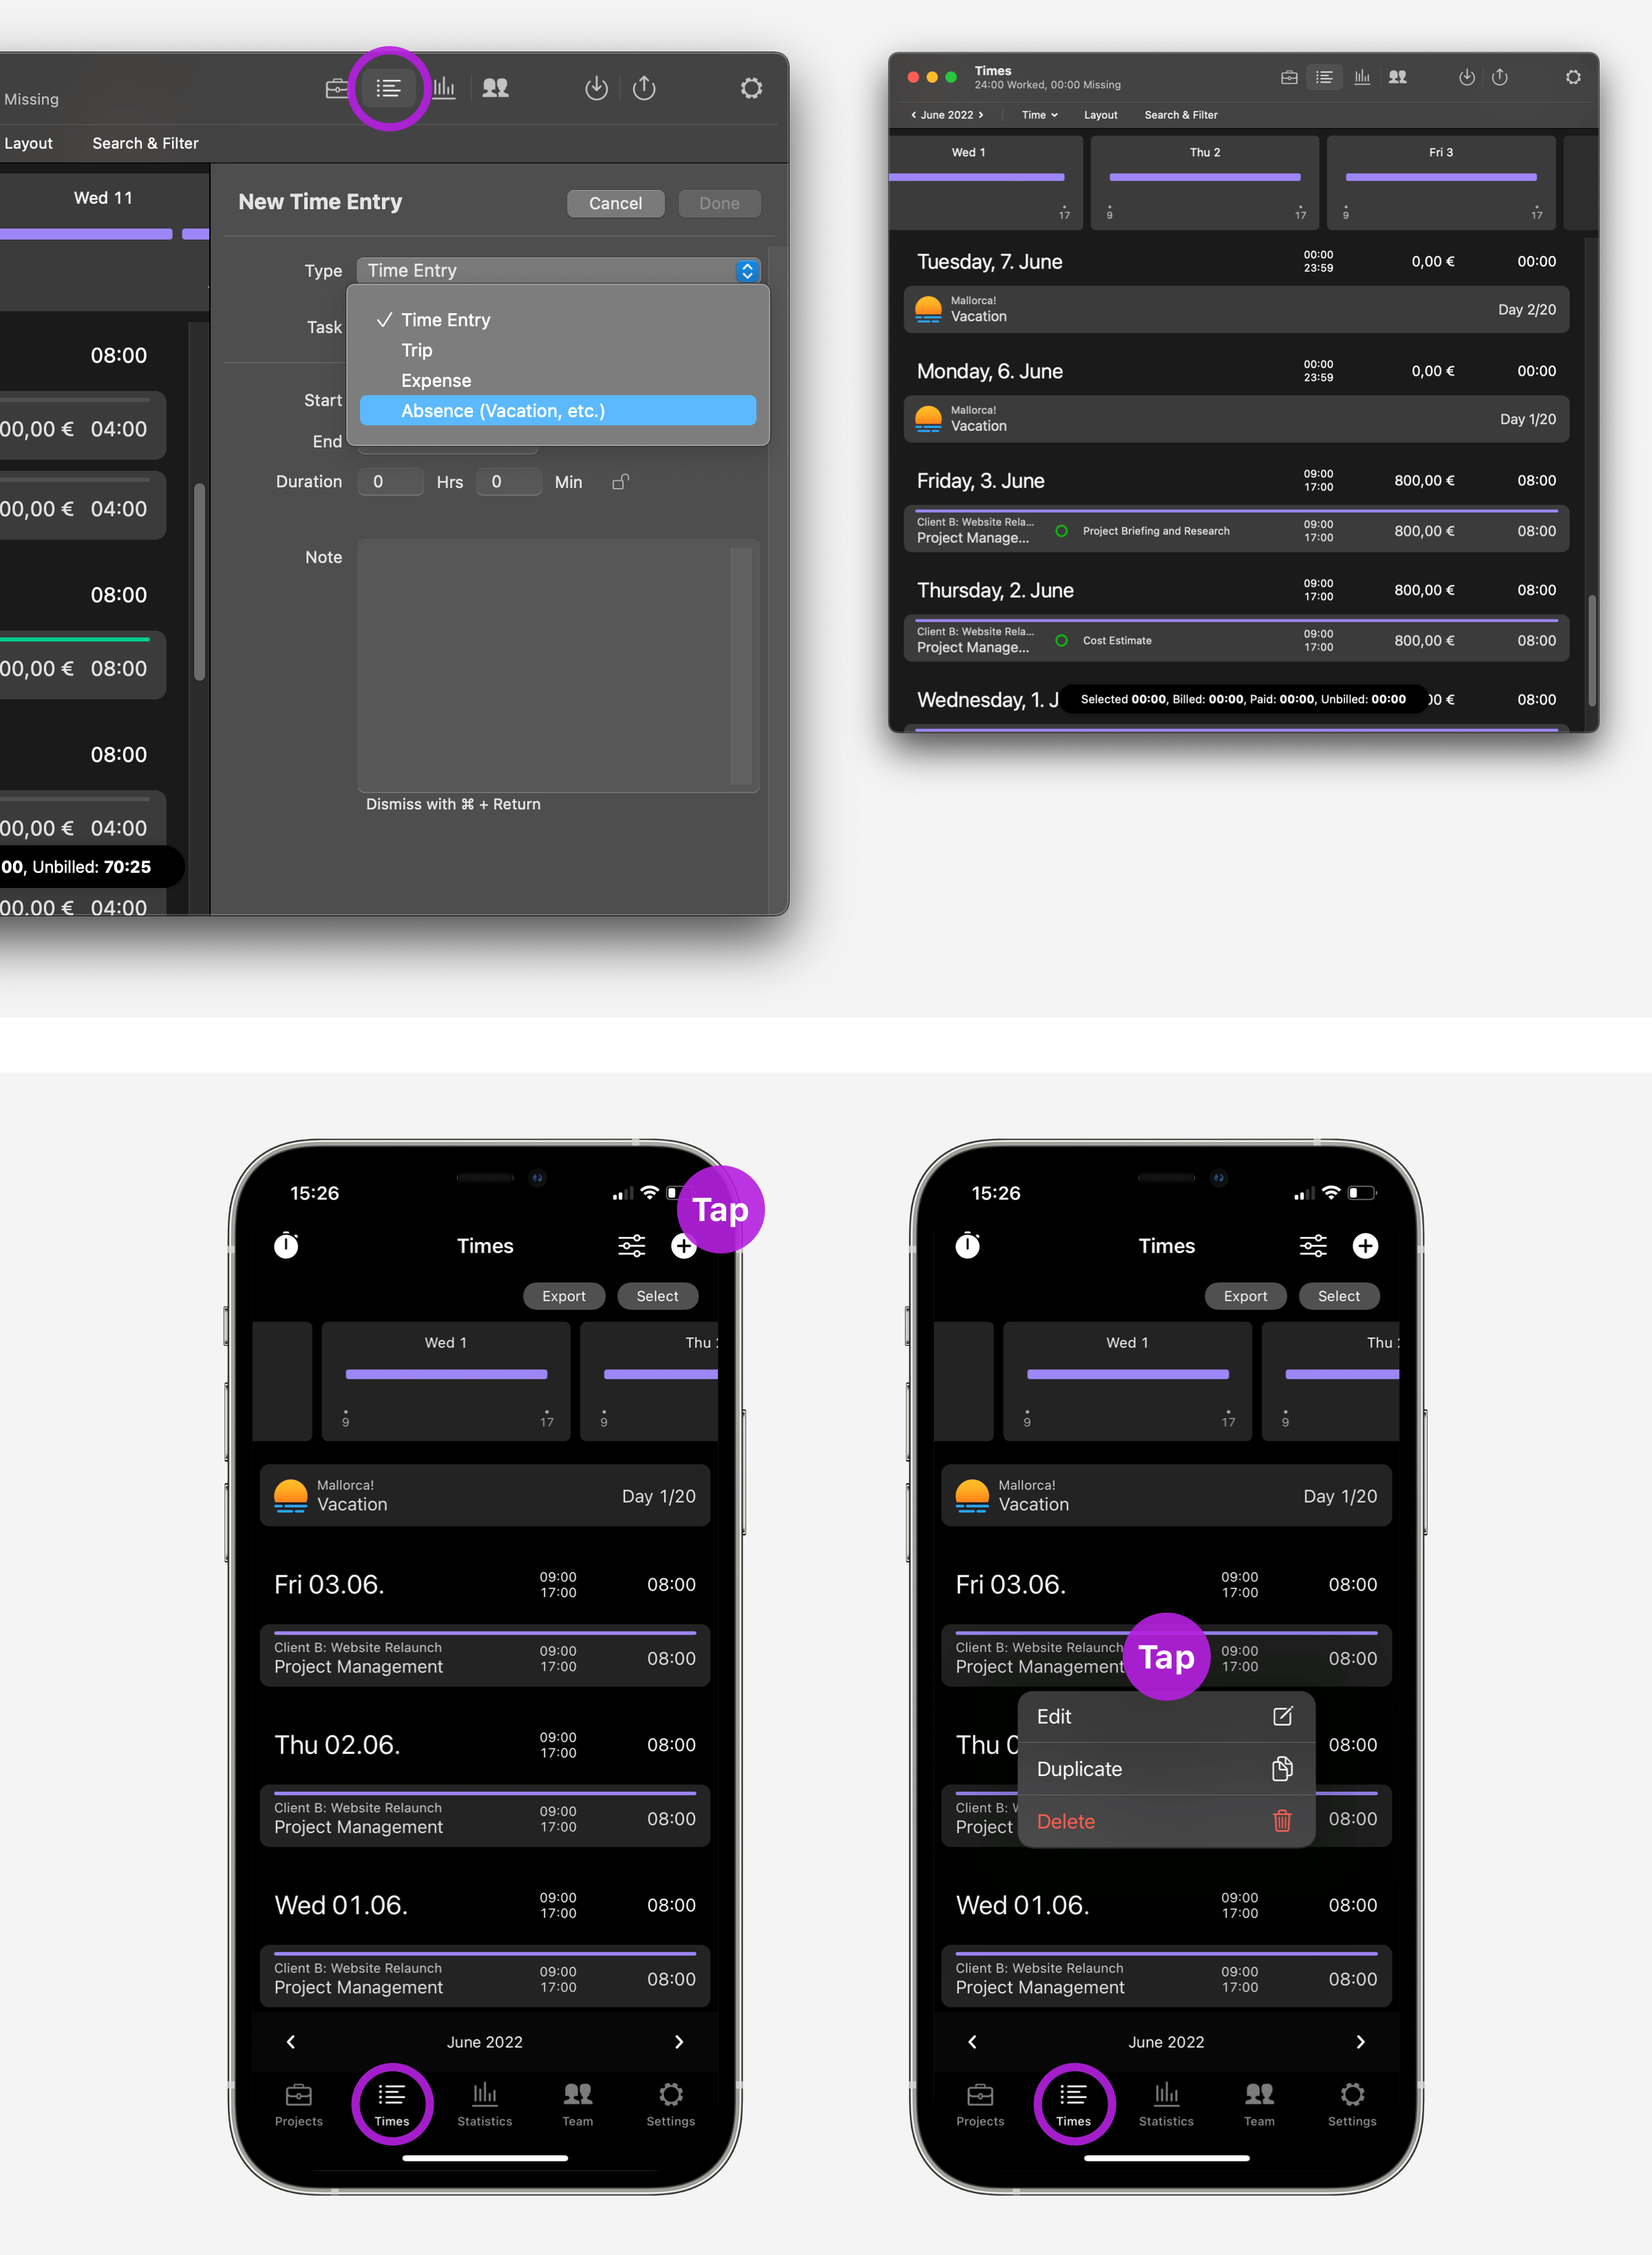
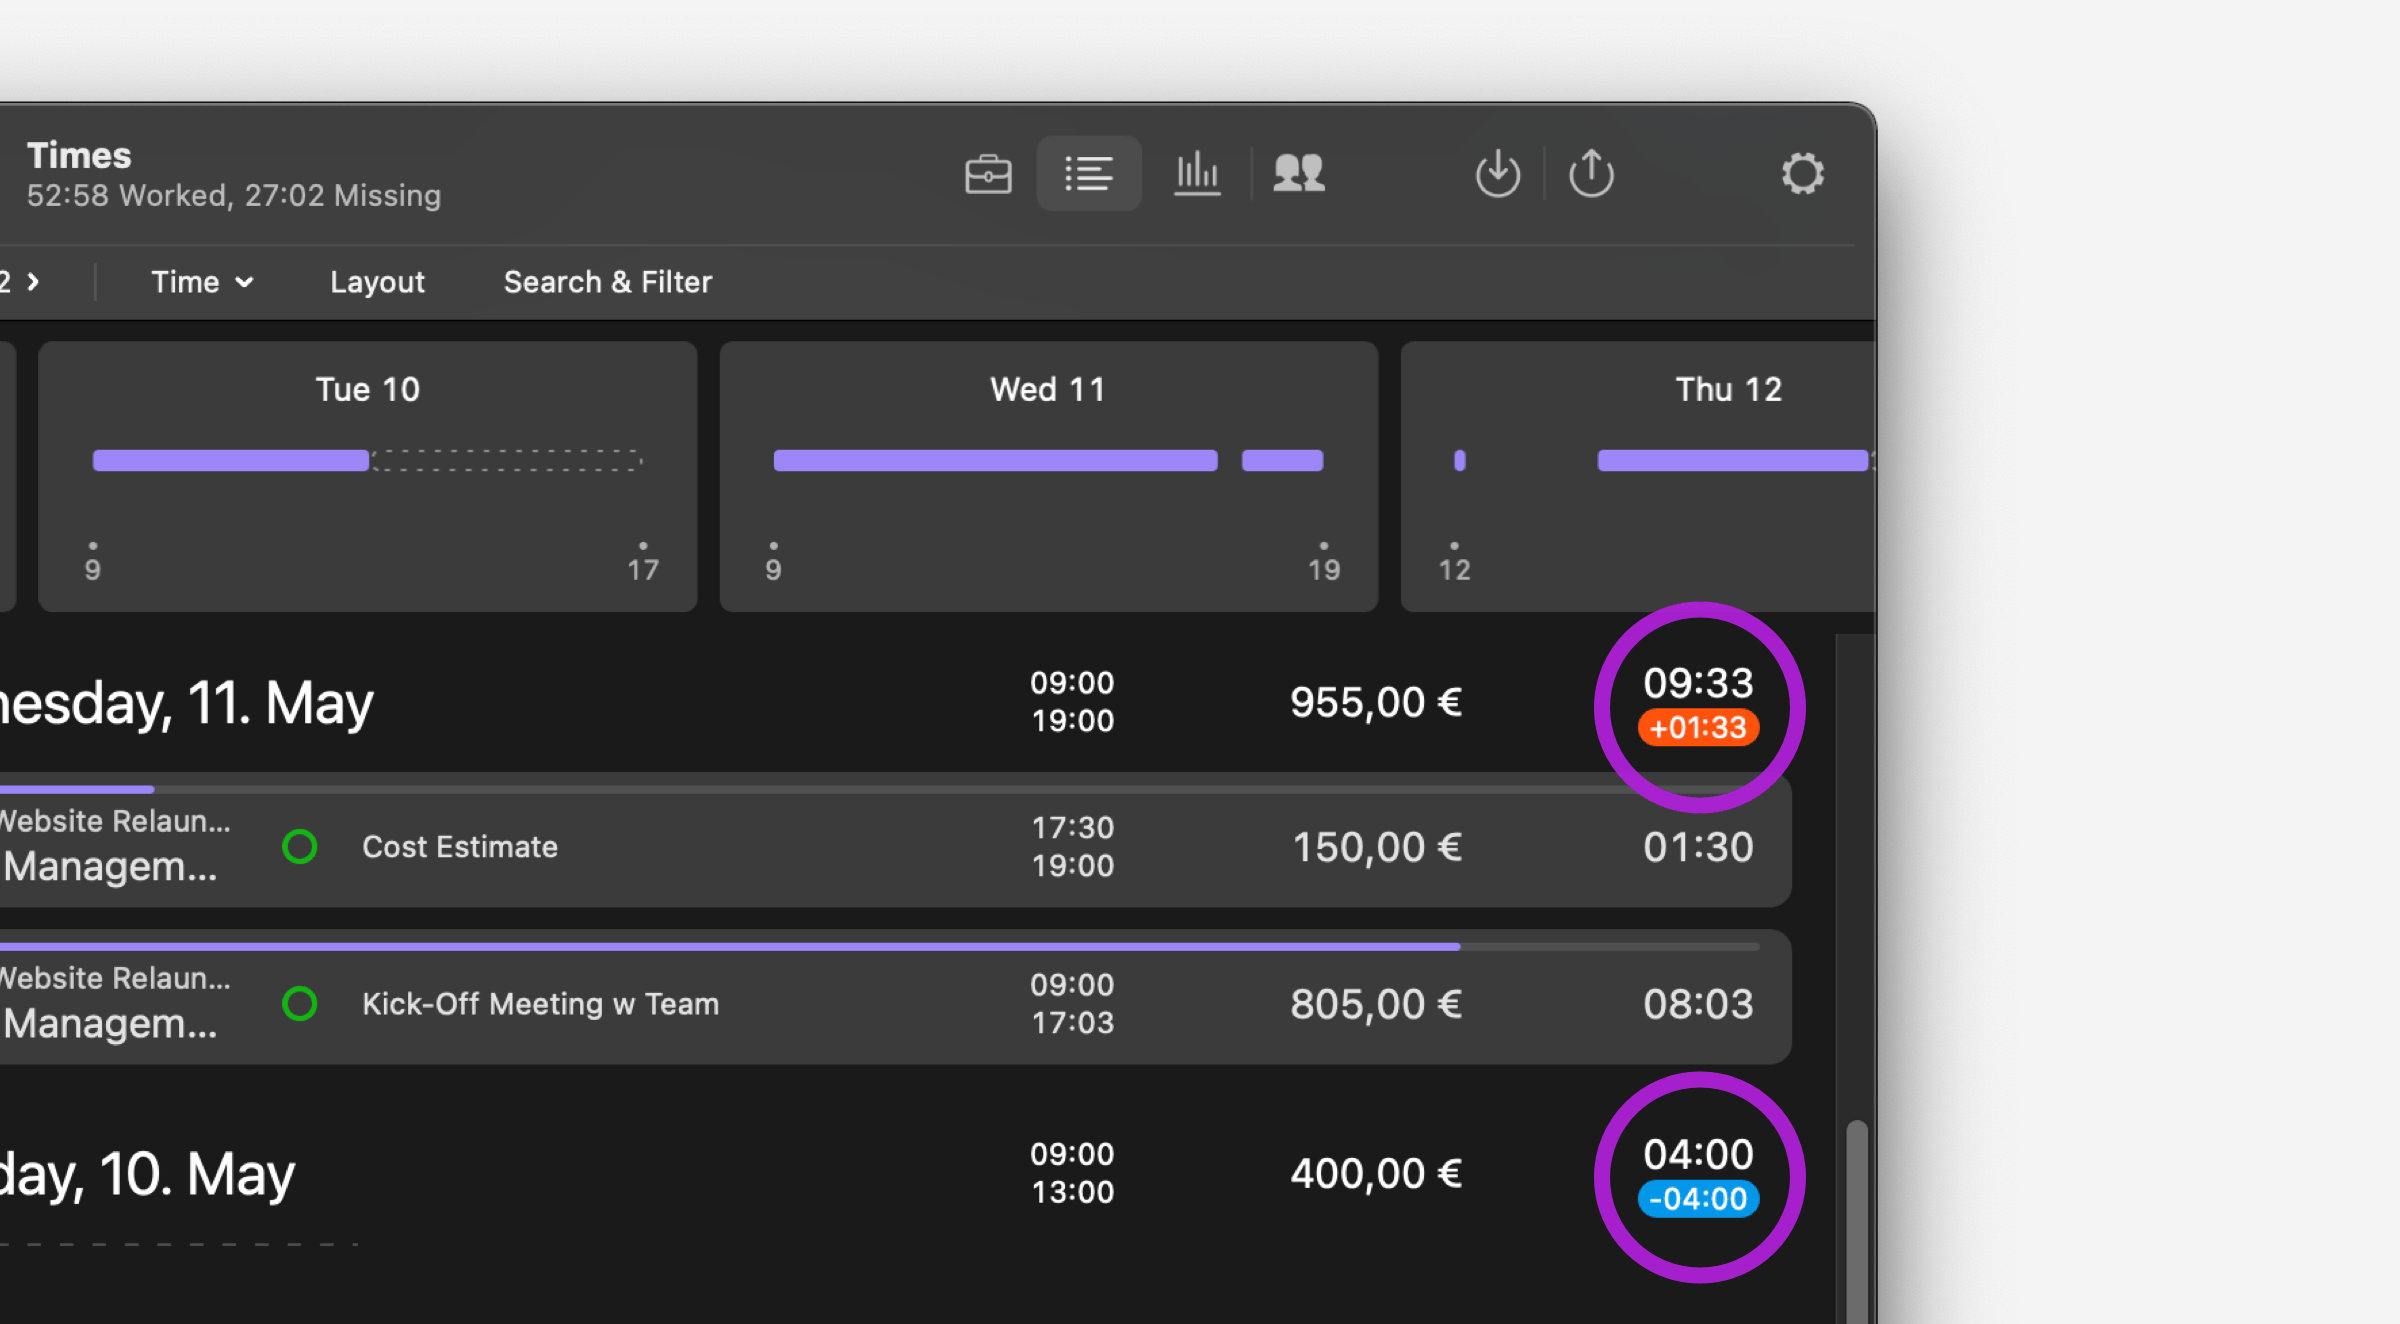
The times screen will also show you missing times and daily overtime and undertime.
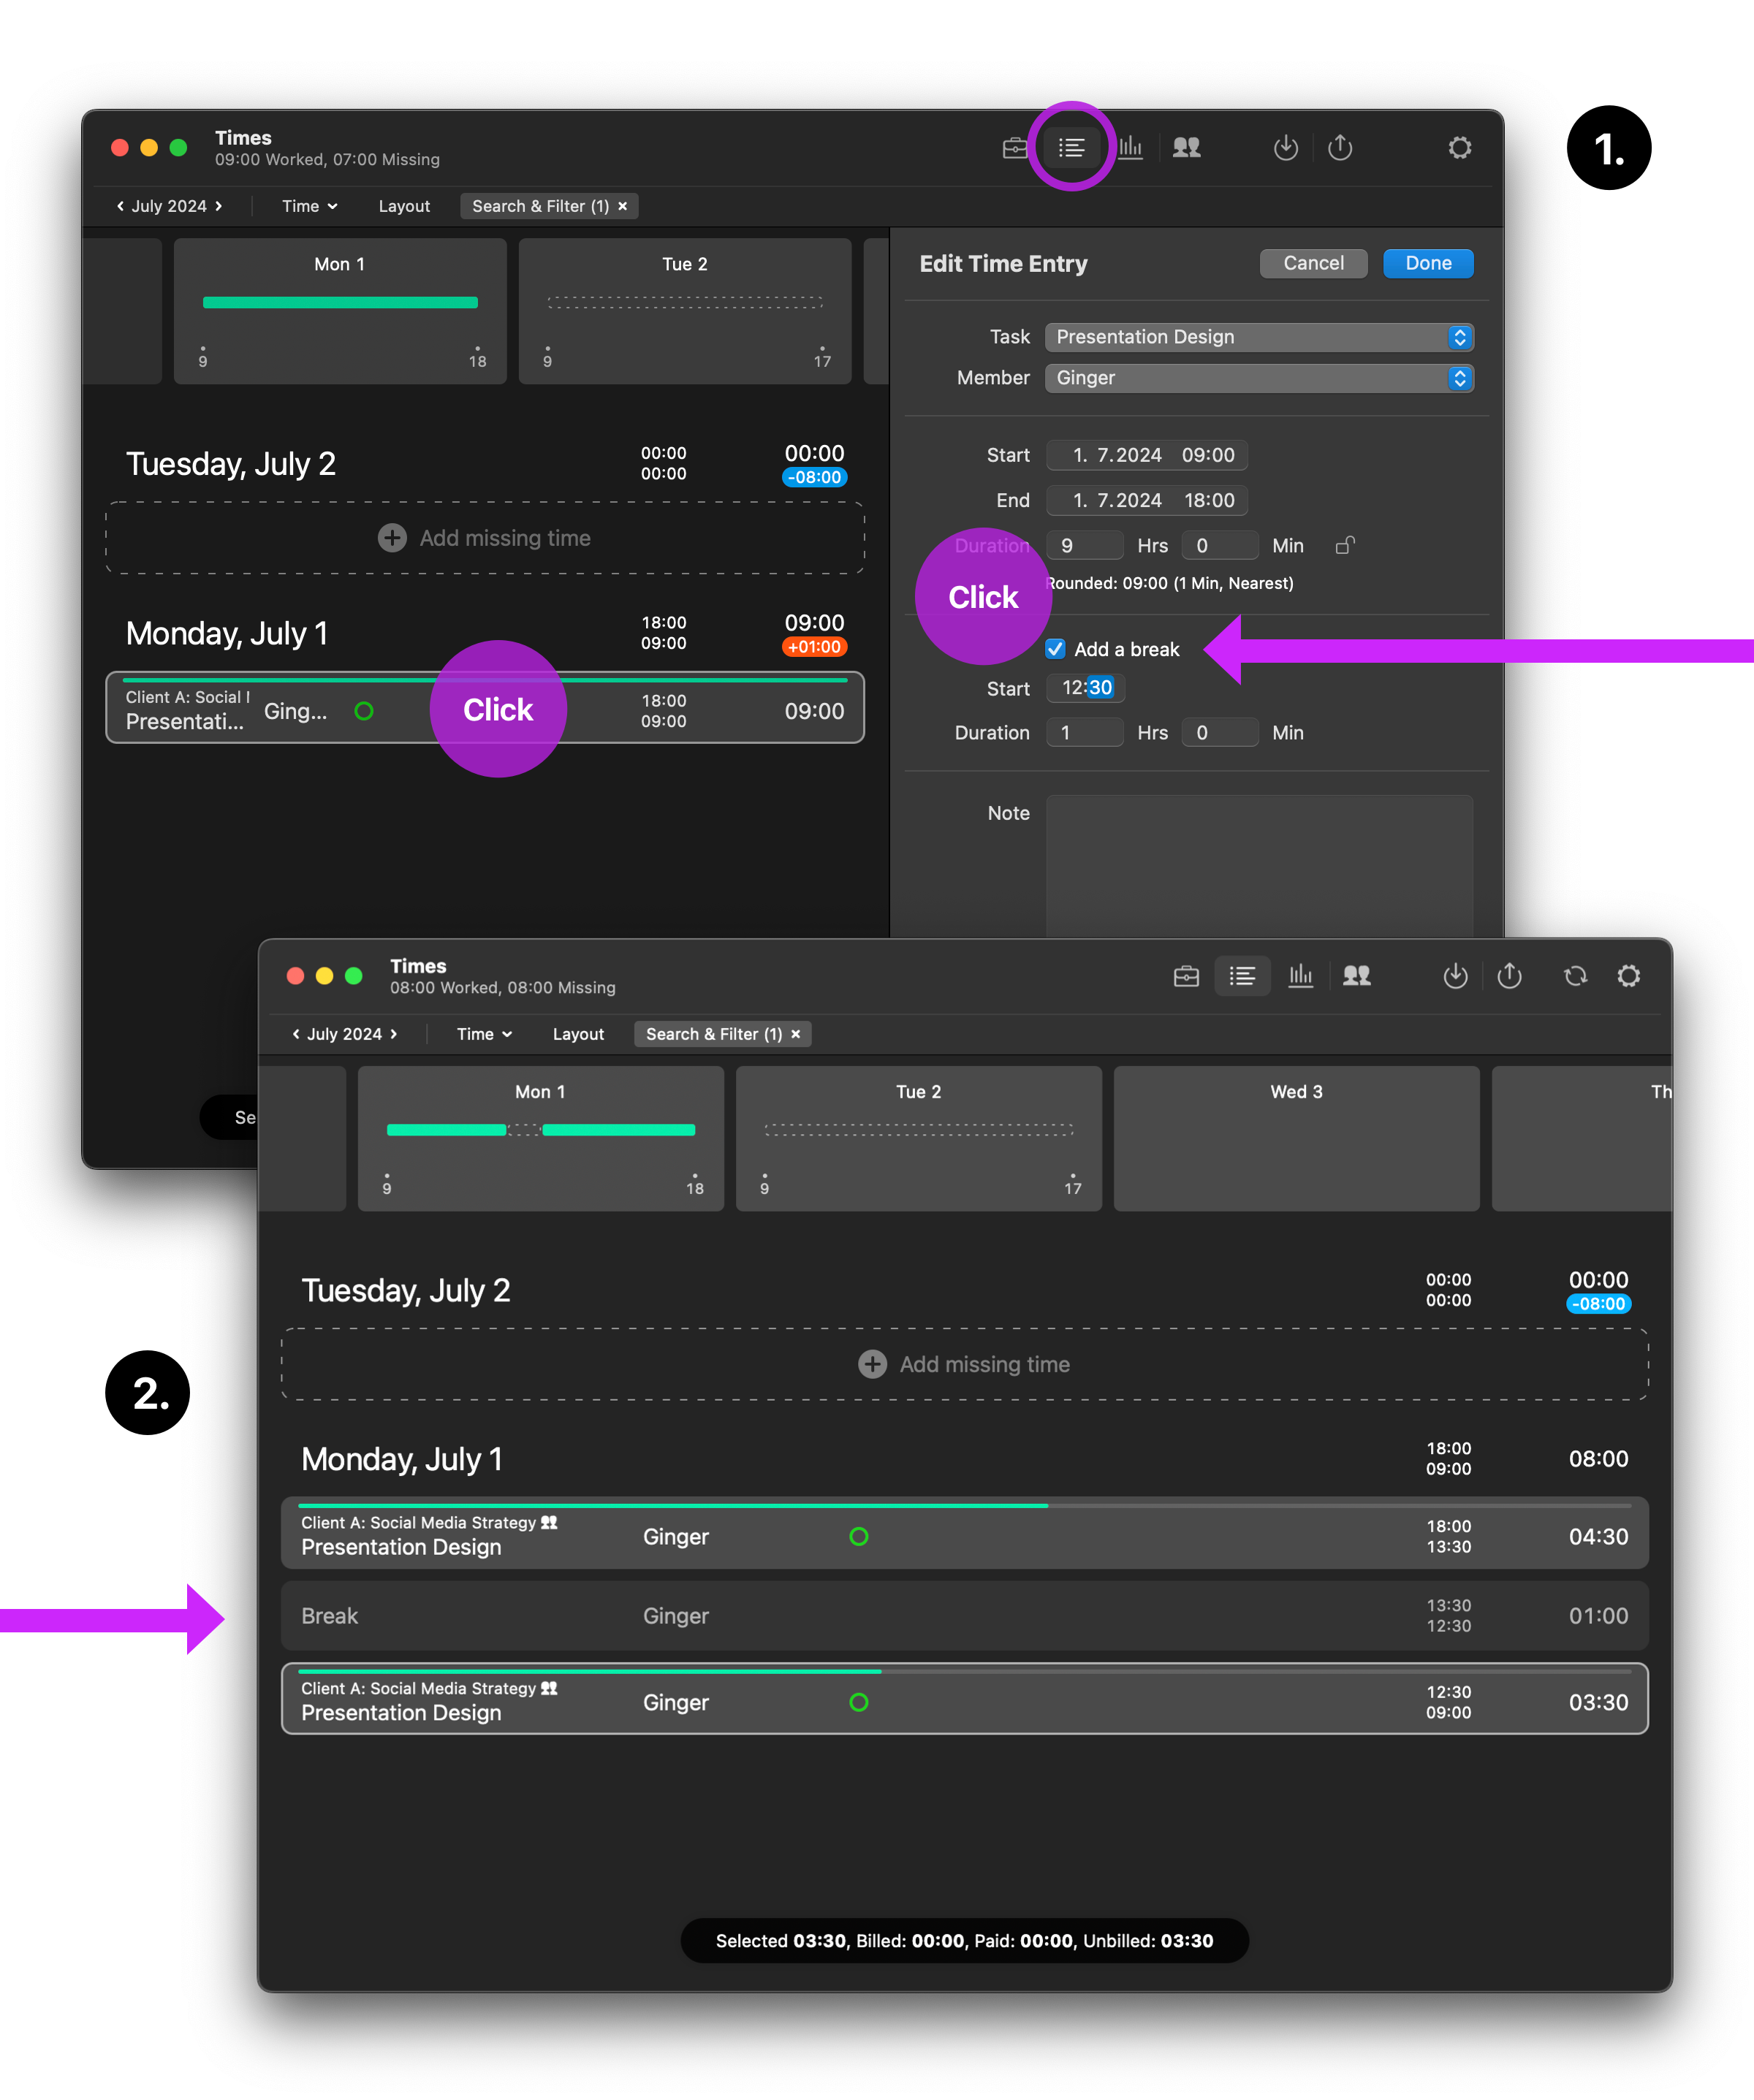
When creating a new time entry, you can add a break if required.
Breaks
Tyme automatically displays gaps between time entries as breaks. See them in the Times menu among your time entries.
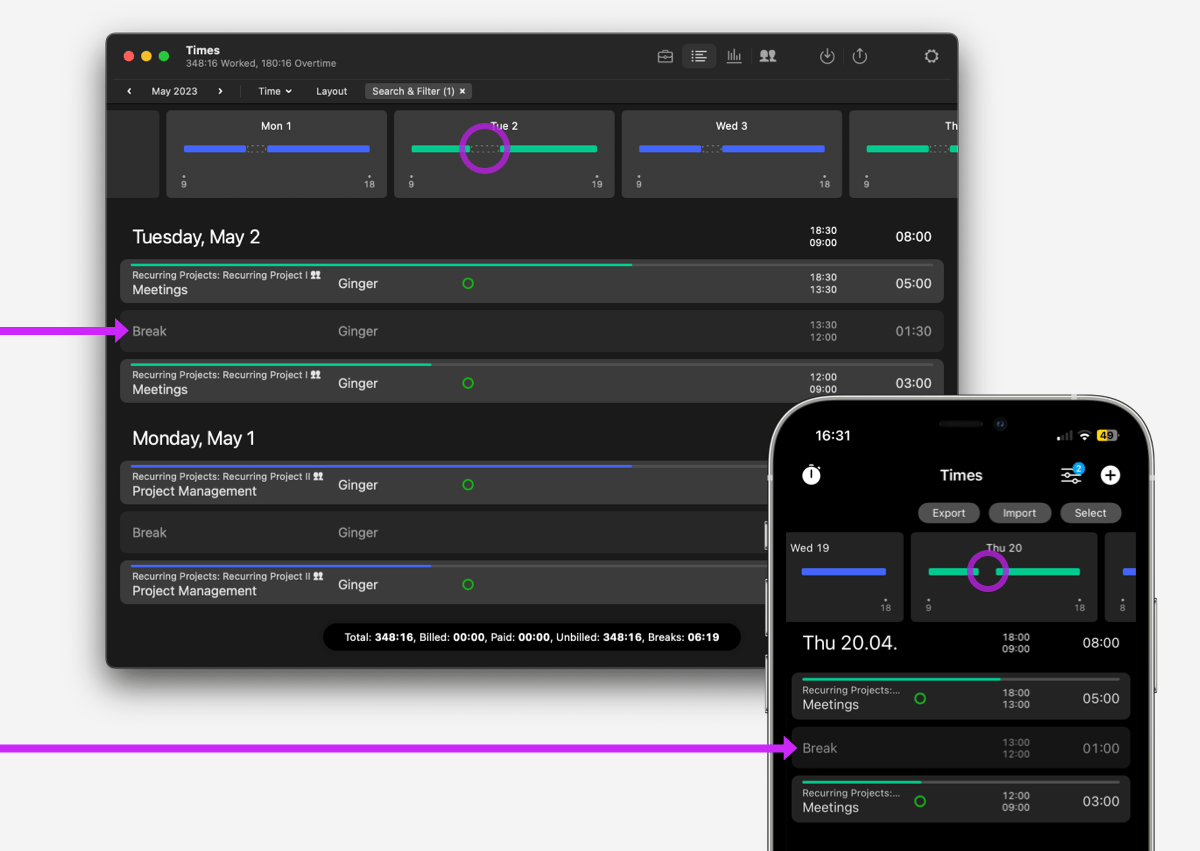
It is possible to change or delete break entries afterwards. You can also convert them to time entries.

Breaks can also be added manually to a time entry at any time.
If necessary, you can define which time periods should be counted as breaks here: Settings > Working Hours > Breaks
This prevents short gaps (e.g. 5 minutes) or long interruptions to your work (e.g. > 4 hours) from being counted as breaks.
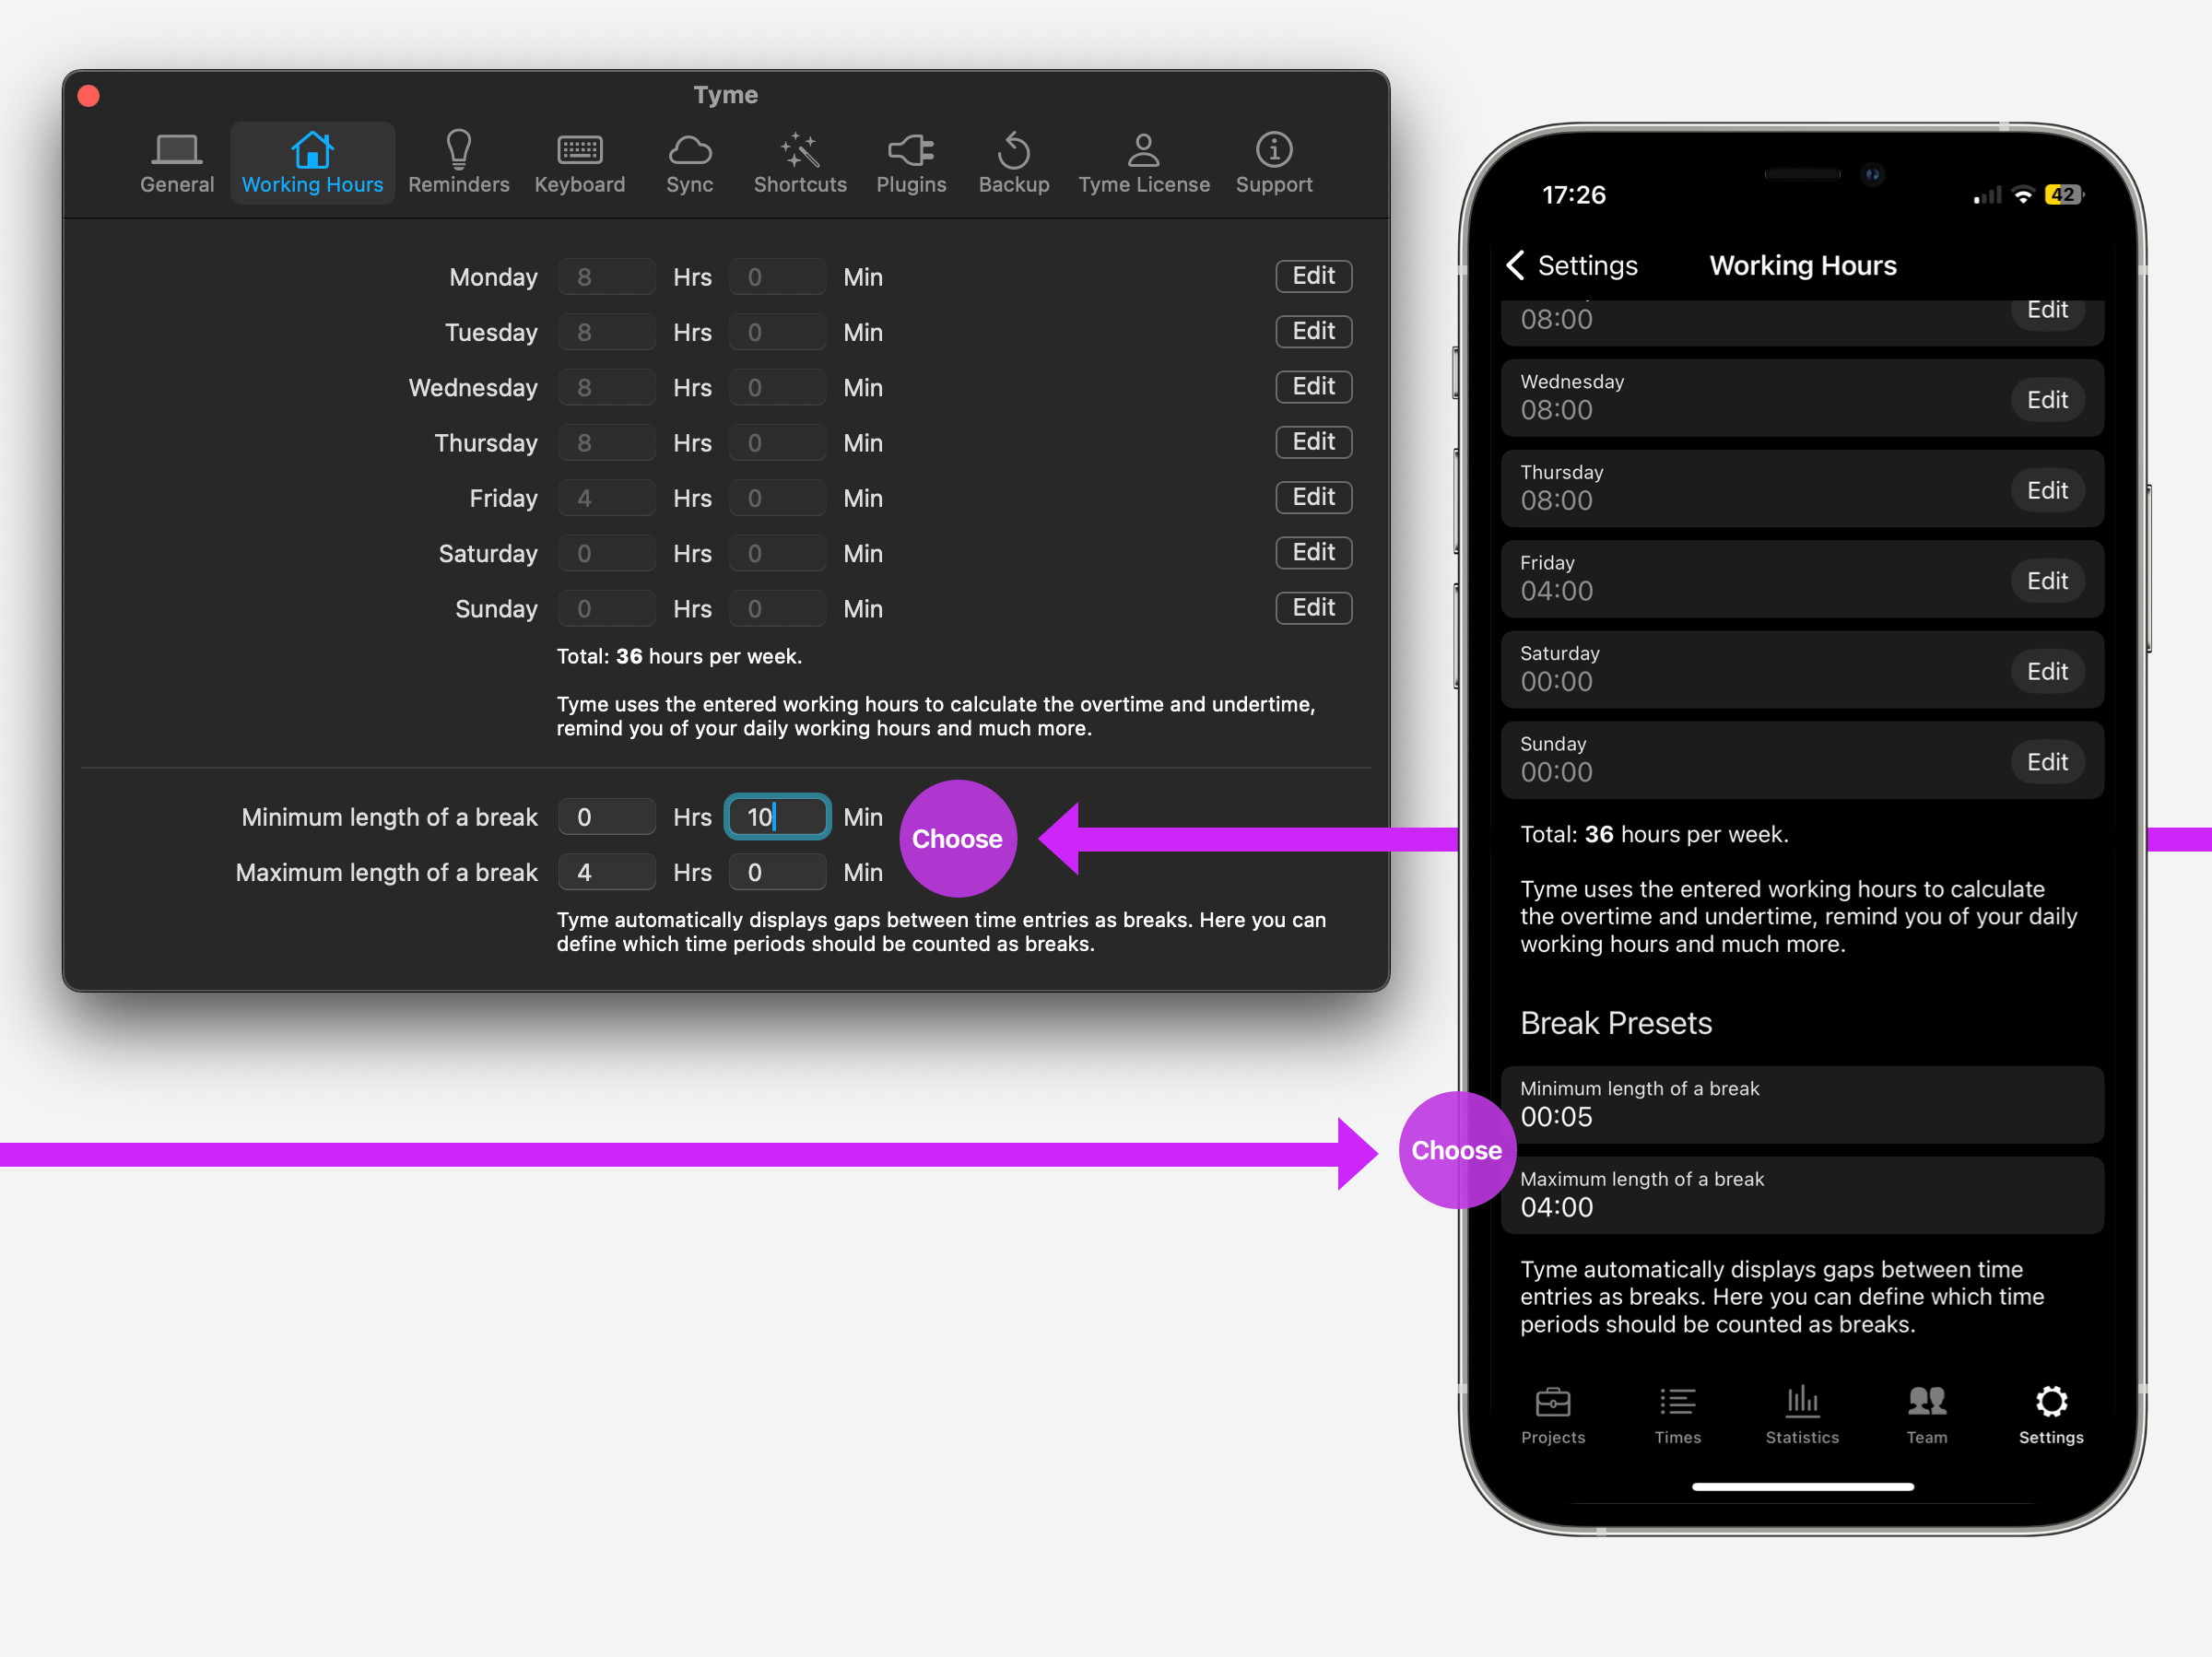
You can disable the display of breaks in Layout > Show Breaks.
The statistics screen also shows an overview of your daily breaks.
And your daily breaks are also displayed in the export "PDF Timesheet (Work, Absence, Breaks)".
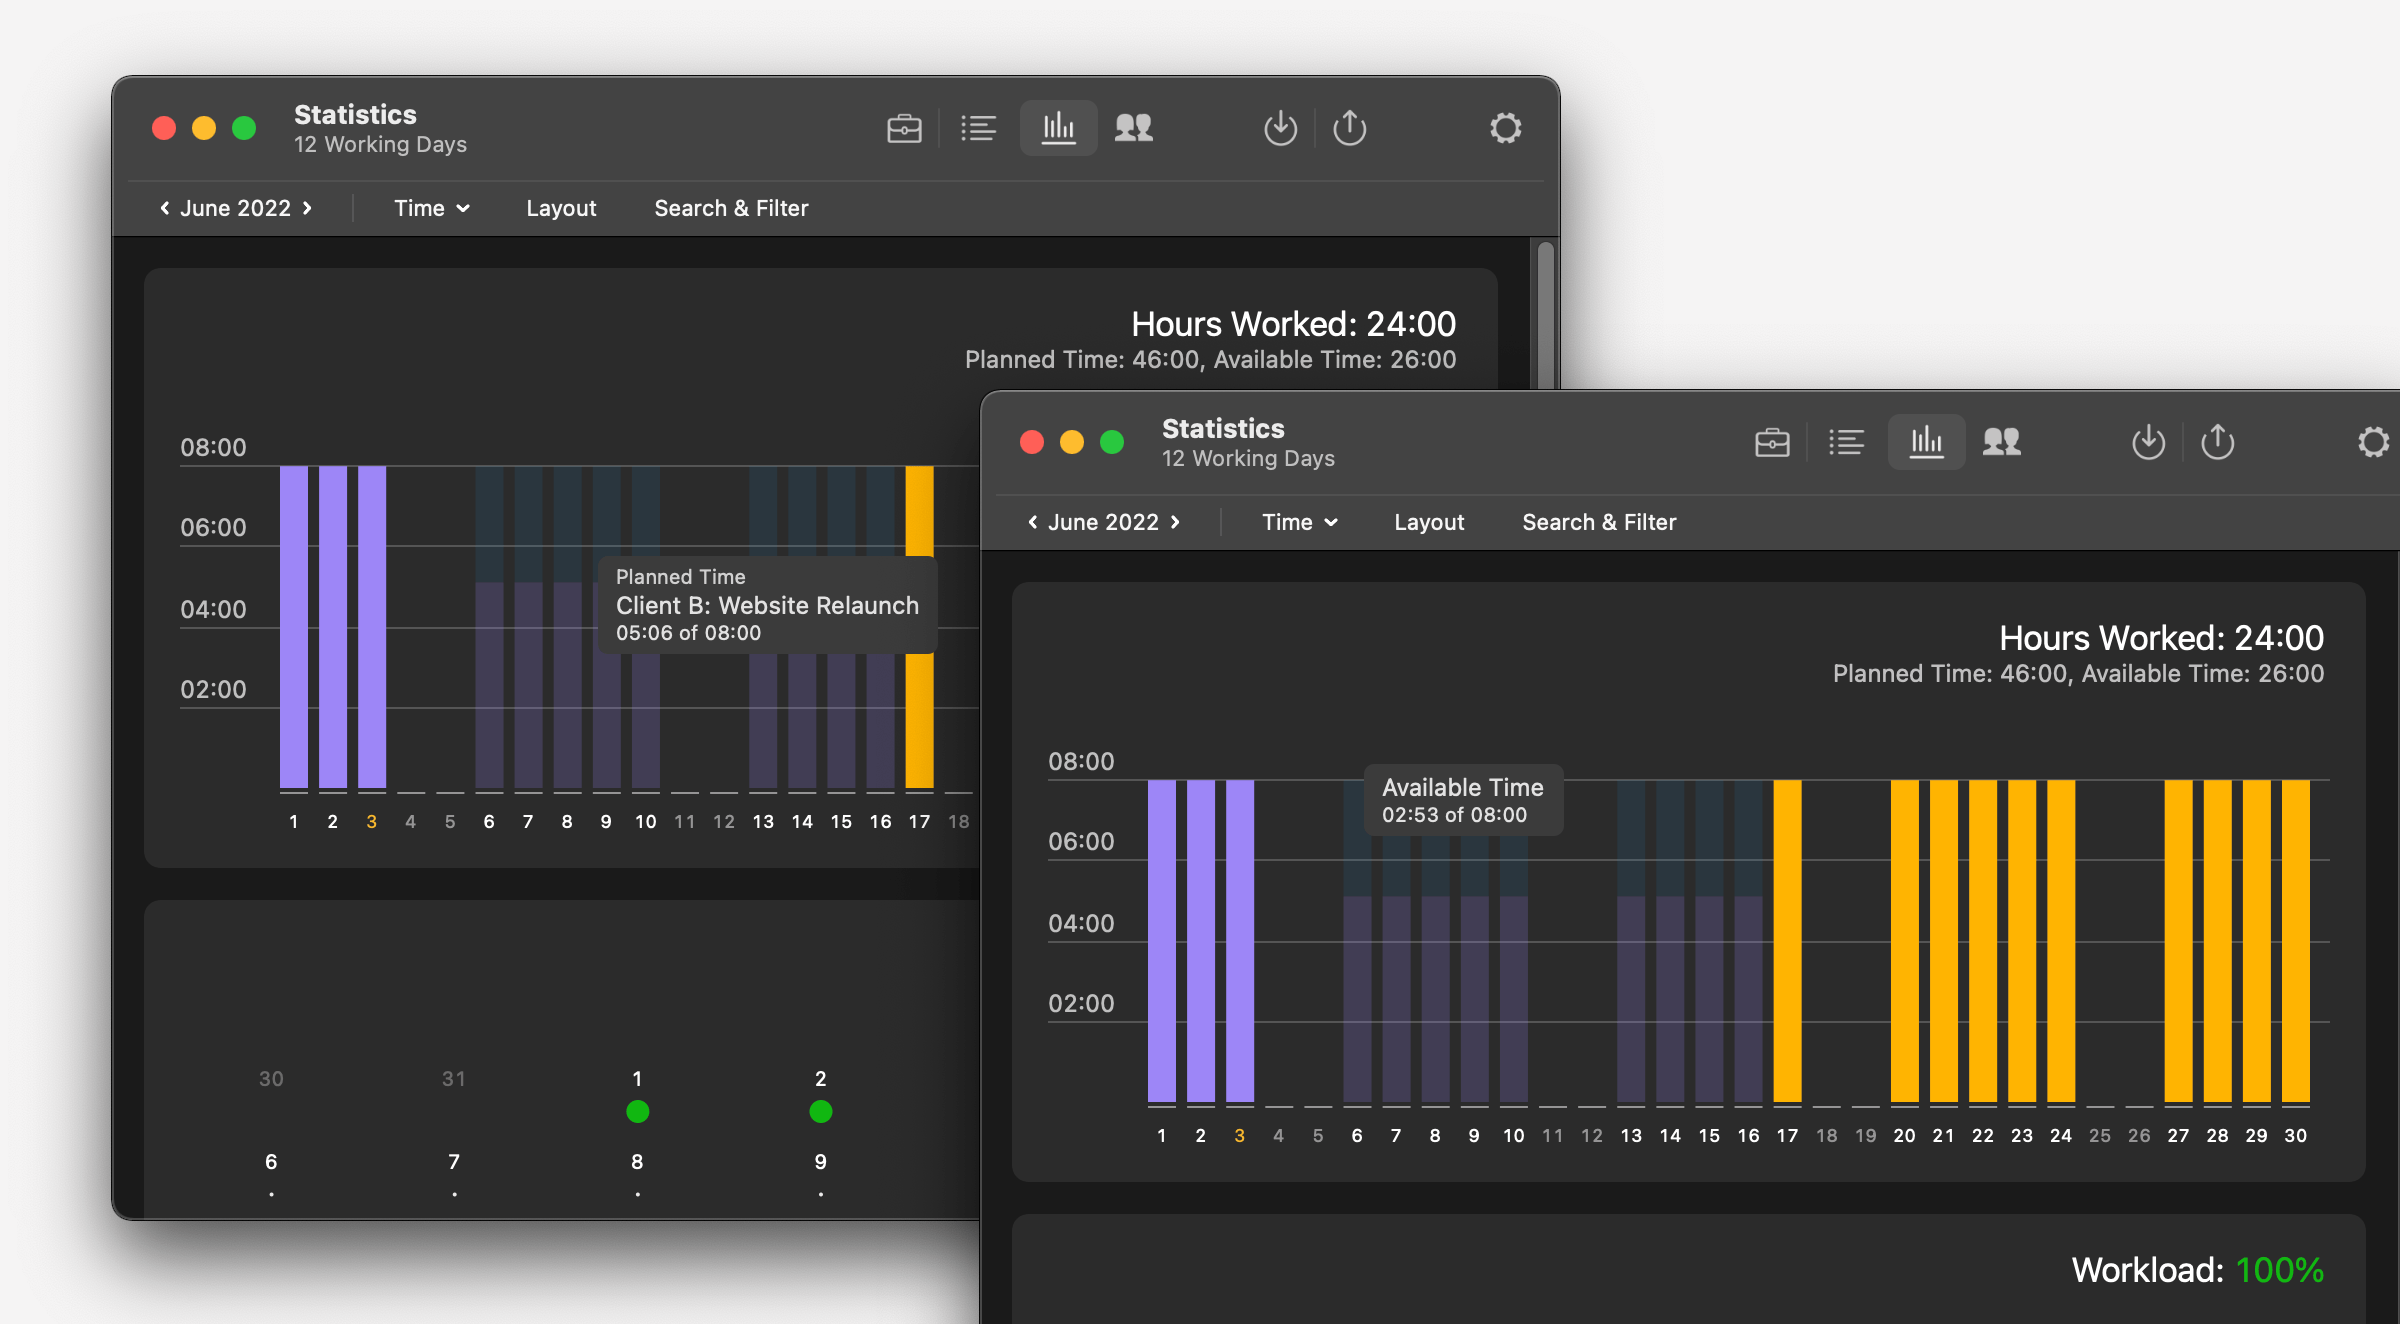
Your Statistics
Visually prepared, easy to understand statistics allow you to quickly check your total hours, time-intensive projects and your workload. For example, if you set "Revenue" instead of "Time" in the screen options, you will see how much revenue you have already generated.
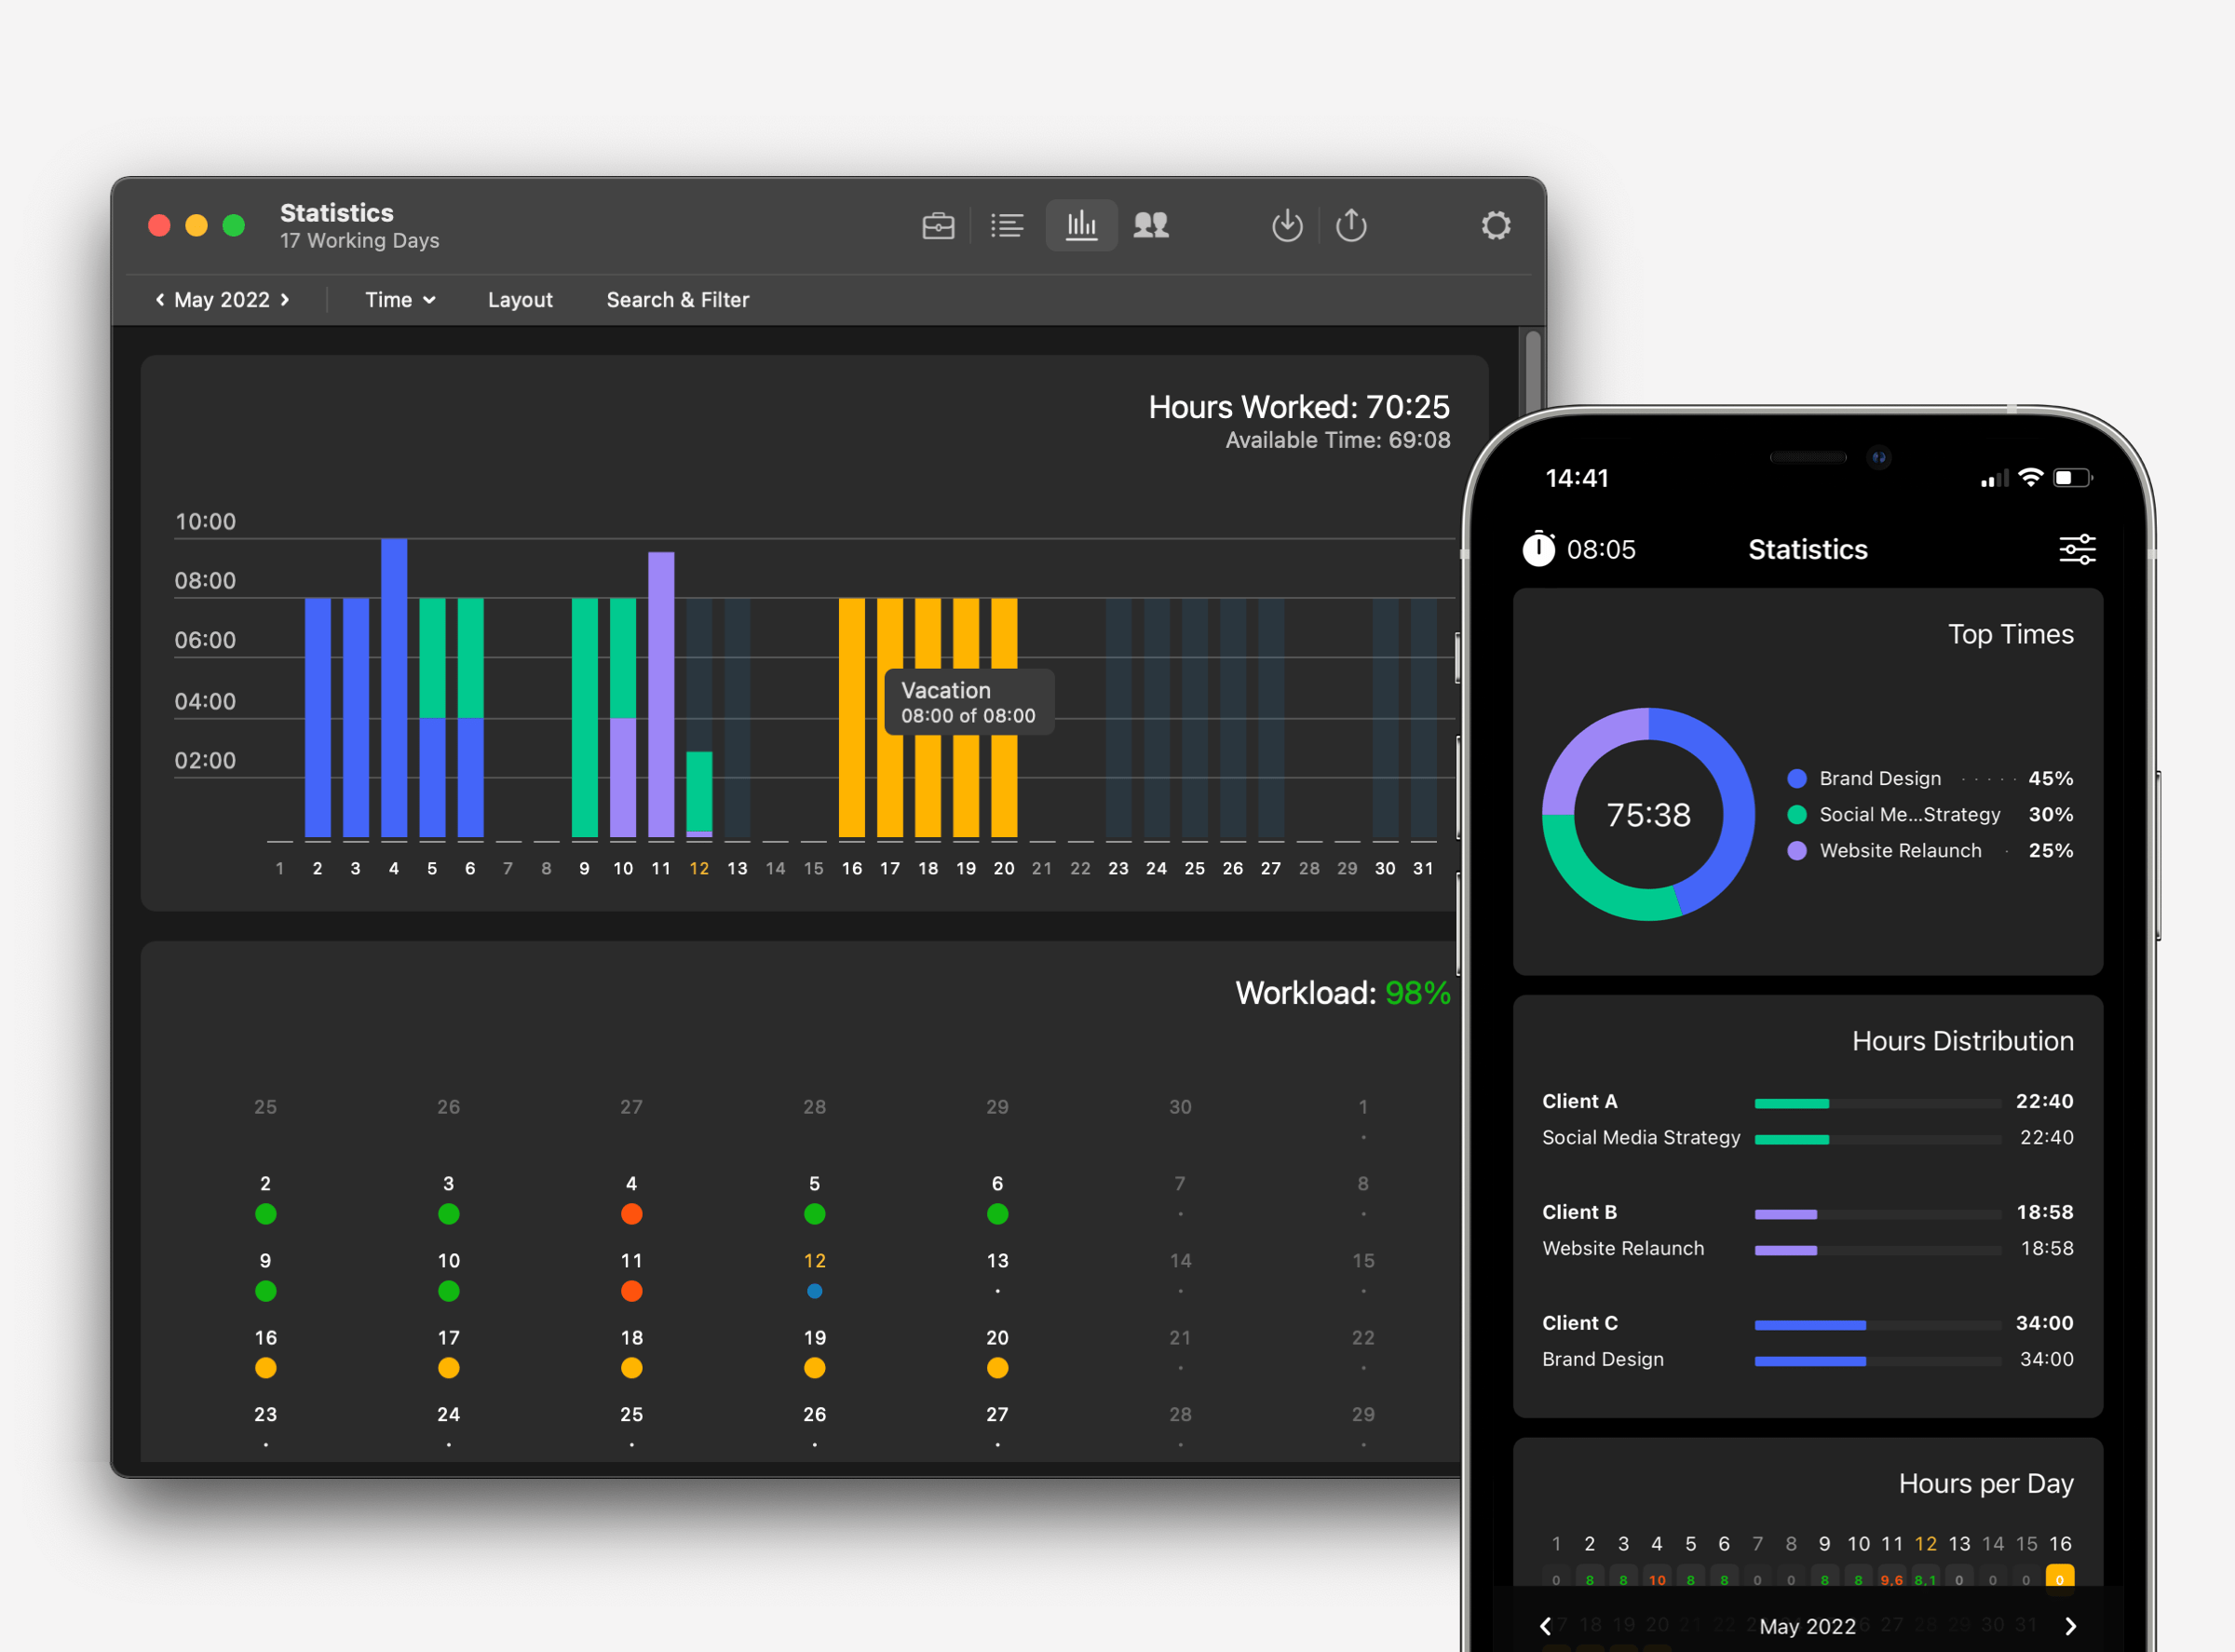
You also see your planned and available time - based on your daily working hours (adjustable in the "Settings").
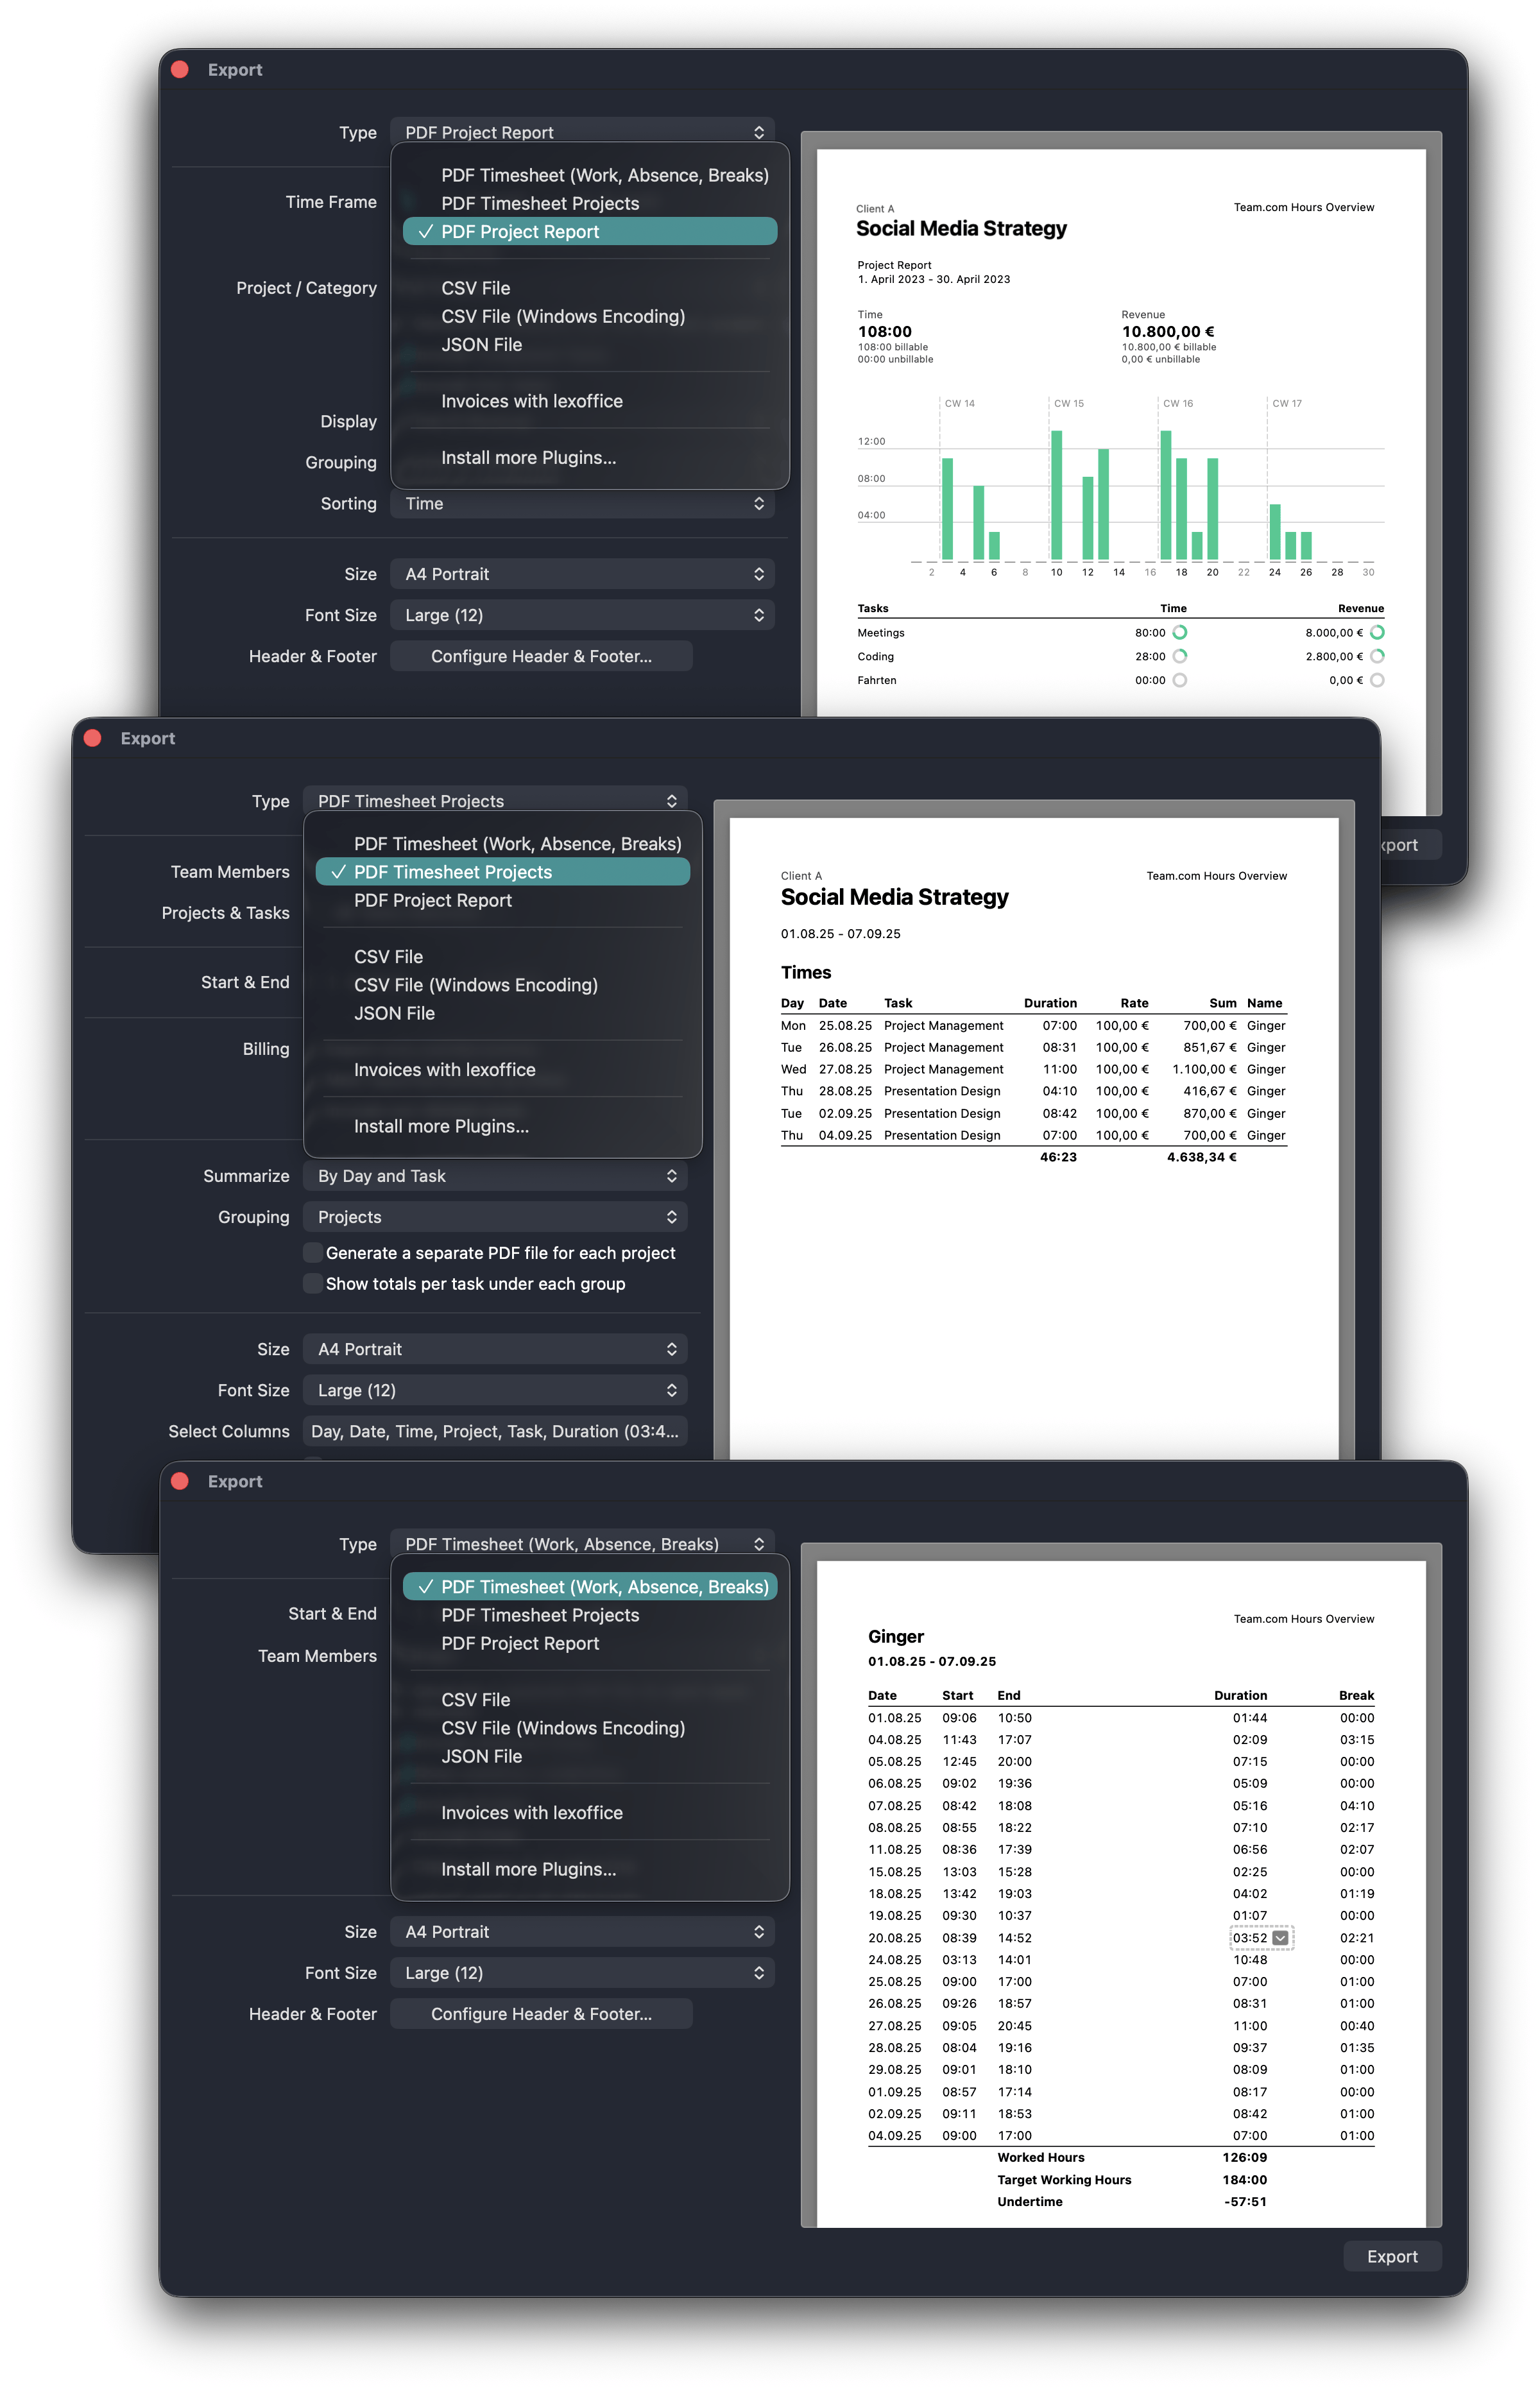
Export Timesheets & Project Reports
You have a number of options to export your current working times or those of your team - as an overview for you and your clients:
CSV, JSON
Recorded times as a text file
PDF Timesheet (Work, Absence, Breaks)
How many hours did you or a member of your team work and how many breaks and overtime hours did you take? Accurate
documentation with time stamp. Important: This document complies with the legal requirements of the Working Hours Act (ArbZG) and the European Court of Justice (ruling from 2019) on statutory working hours and breaks as well as digital time recording.
PDF Timesheet Projects
Detailed list of all work performed on projects and tasks with time stamp and associated notes. Often used as a
timesheet and as an attachment to the invoice to the customer.
PDF Project Report
A quick overview of the status of your projects. A summary of all hours worked and revenue on
projects and tasks, including a bar chart.
Or use our various plugins for export, e.g. for invoicing with Lexware Office, sevdesk or GrandTotal. You can find a list of our plugins here
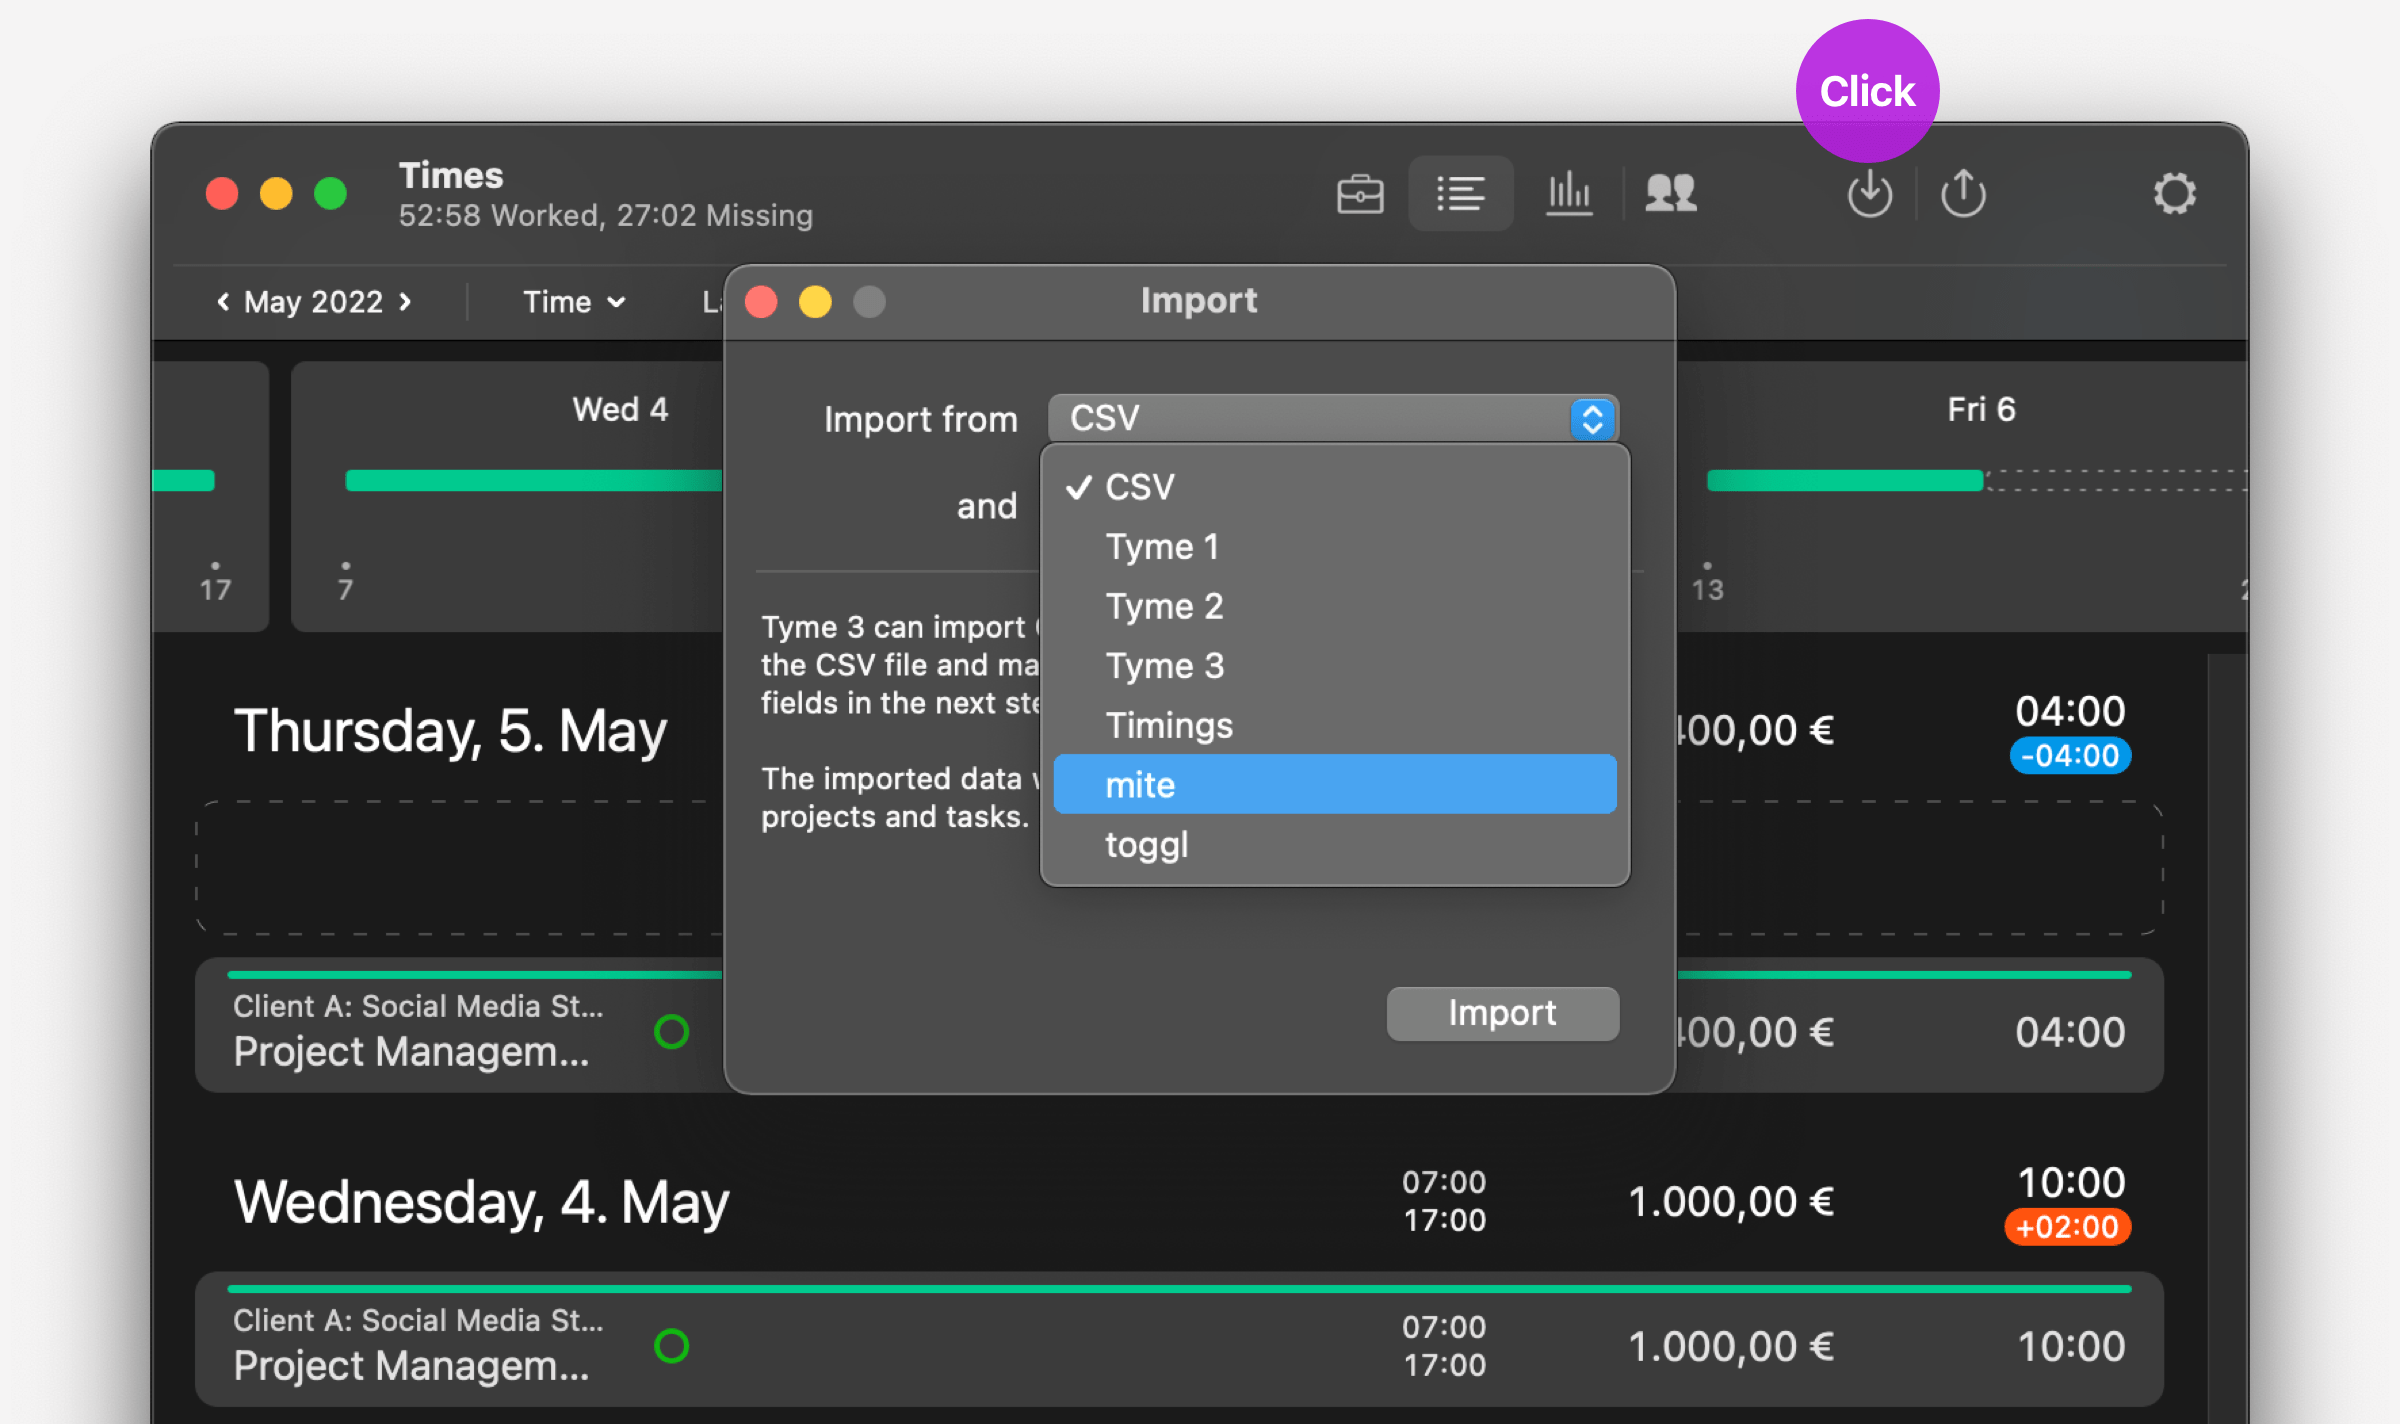
Importing Times From Other Applications
You can import data into Tyme from the following sources:
• CSV
• Timings
• mite
• toggl
• Clockify
• OpenProject
• Jira
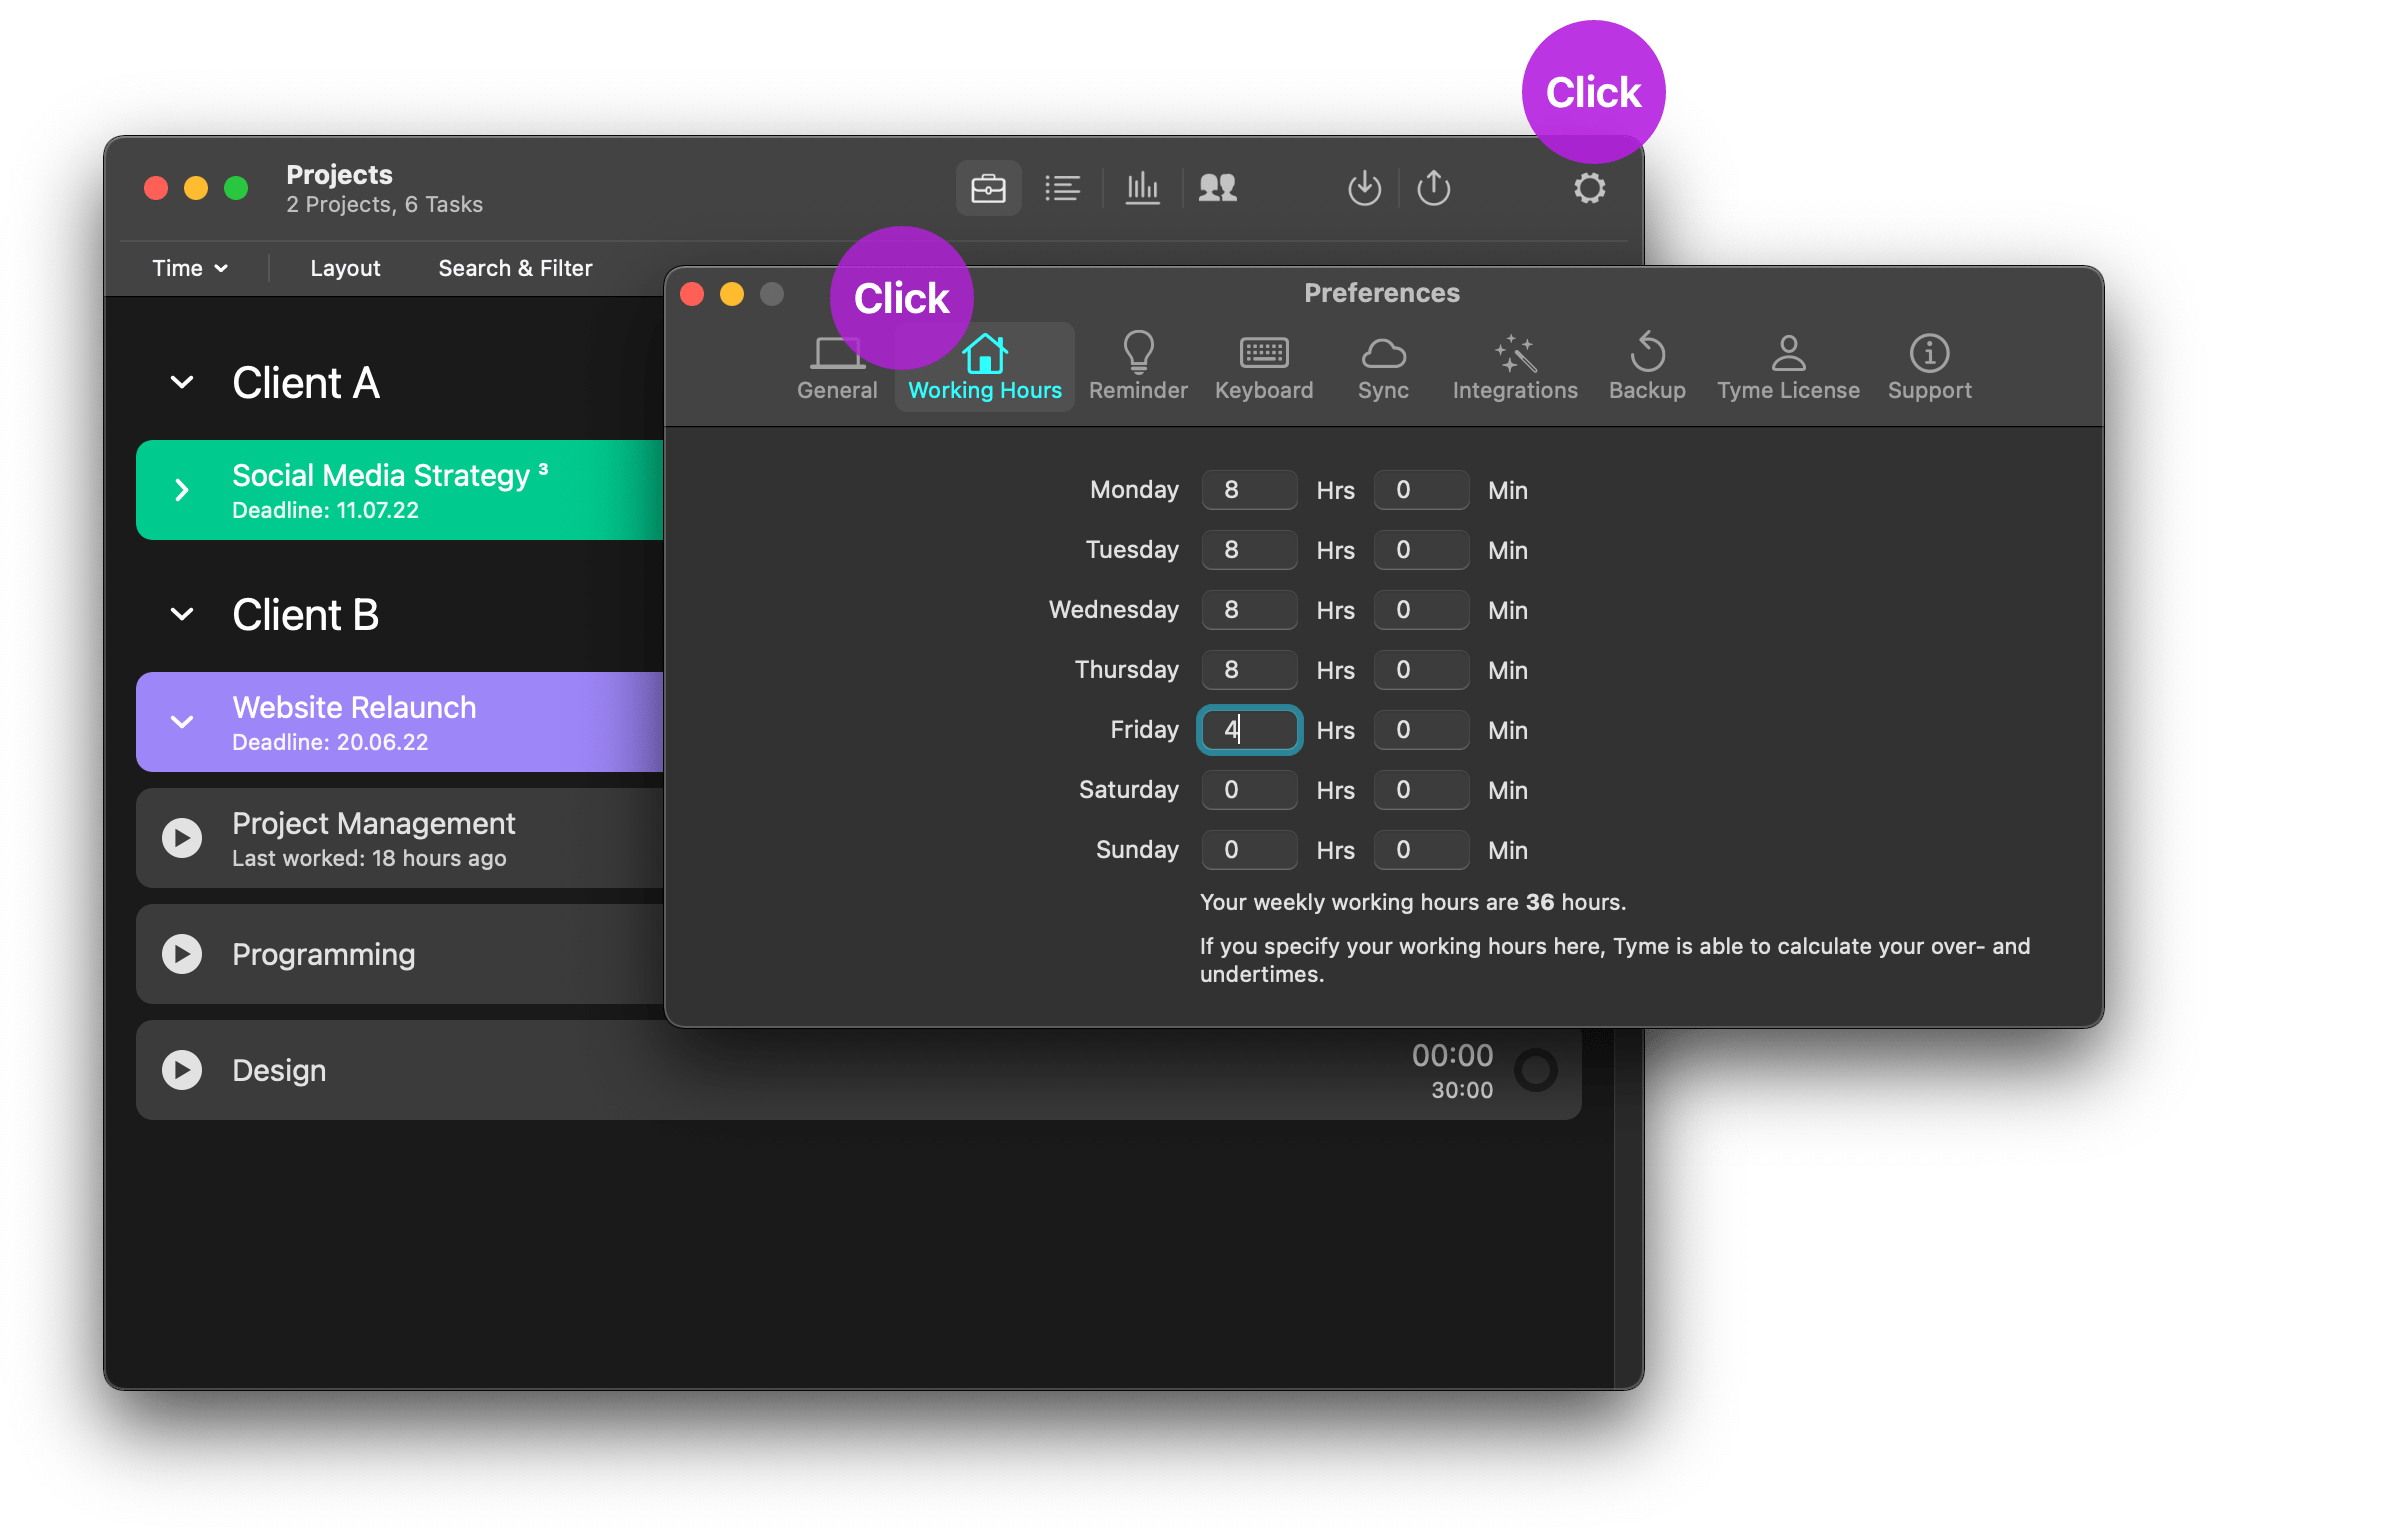
Your Working Hours
In order for Tyme to display your workload correctly, please enter your individual daily working hours in the "Settings" → "Working Hours".
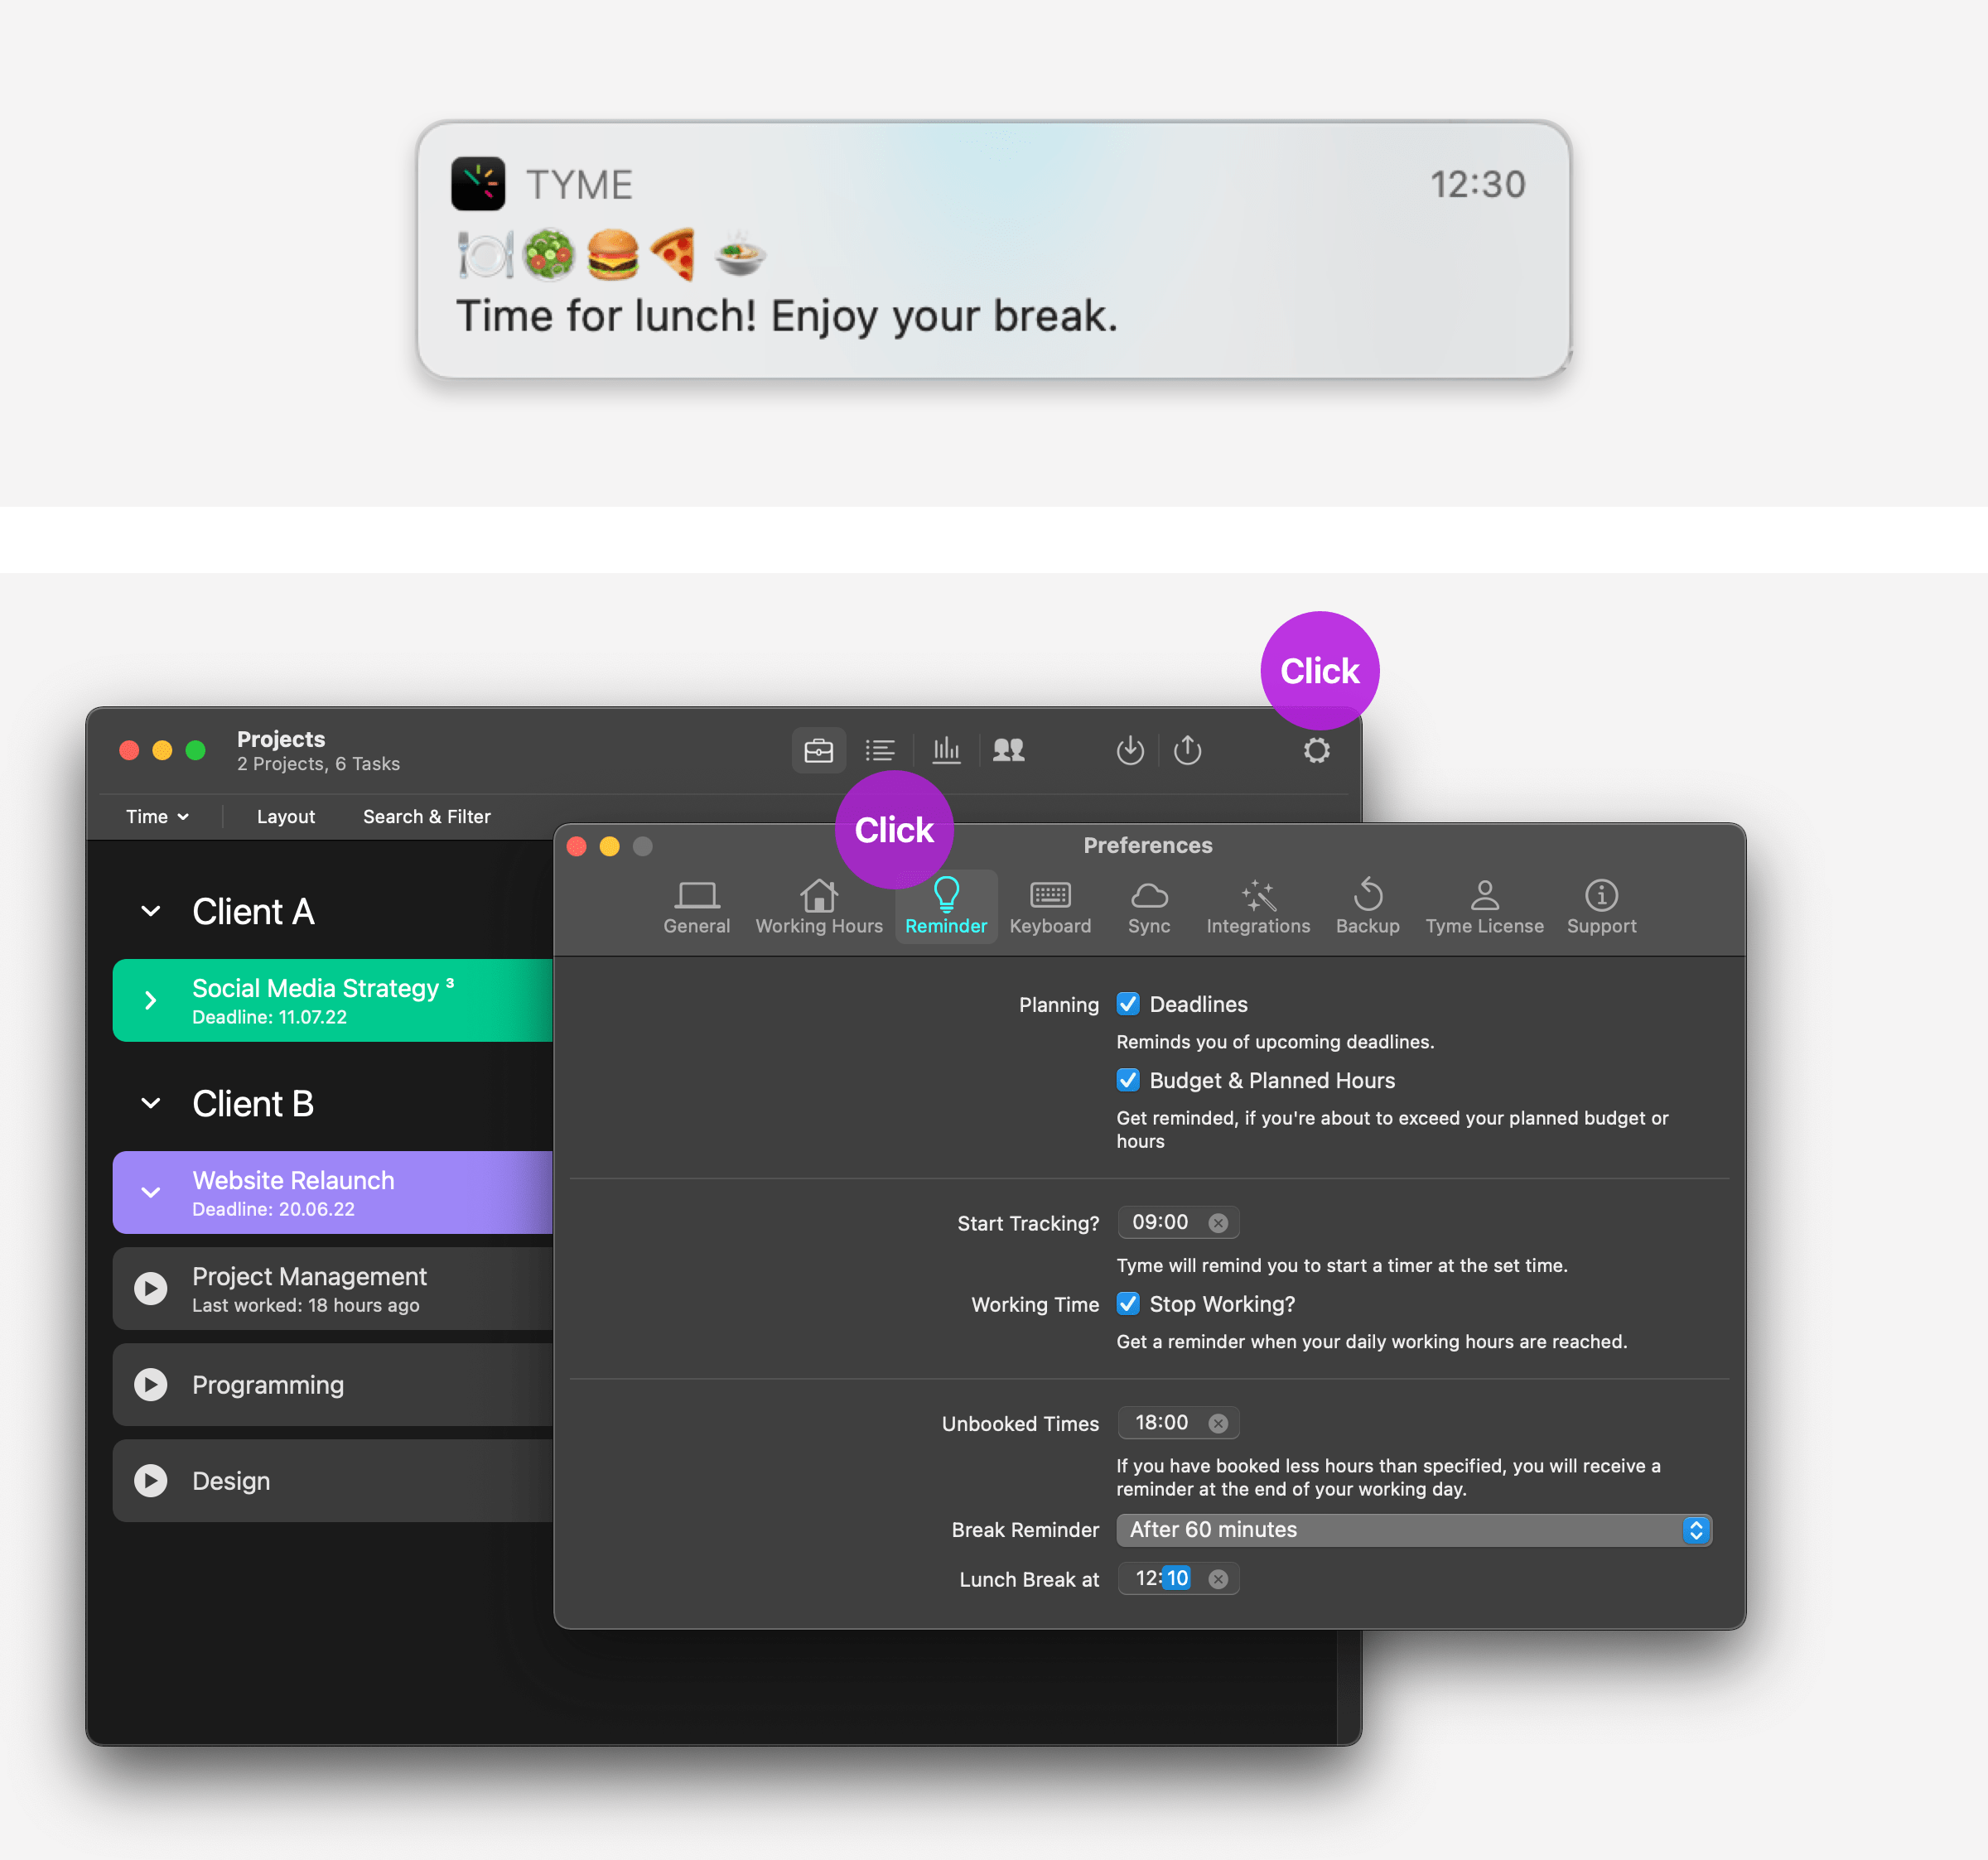
Reminders
Tyme's reminder functions make your life easier. Forgot to start the timer? Is there a deadline coming up? Have you reached your daily working time? Have you been focusing too long and need a break? Did you forget to book times? Tyme can remind you of all these things. Configure the reminders in "Settings" → "Reminders".
Time Tracking as a Team
With Tyme, you can track your team's daily working time as you work. This gives you an accurate overview of your performance and workload. Are you working overtime? Are you on time? Does your actual effort match the quote?
Setting up deadlines and budgets allow you to control exactly by the hour. This will help you improve your future estimates and calculations.
Your working time and workload can be monitored in the statistics and exported in various formats, e.g. as a Timesheet or Project Report.
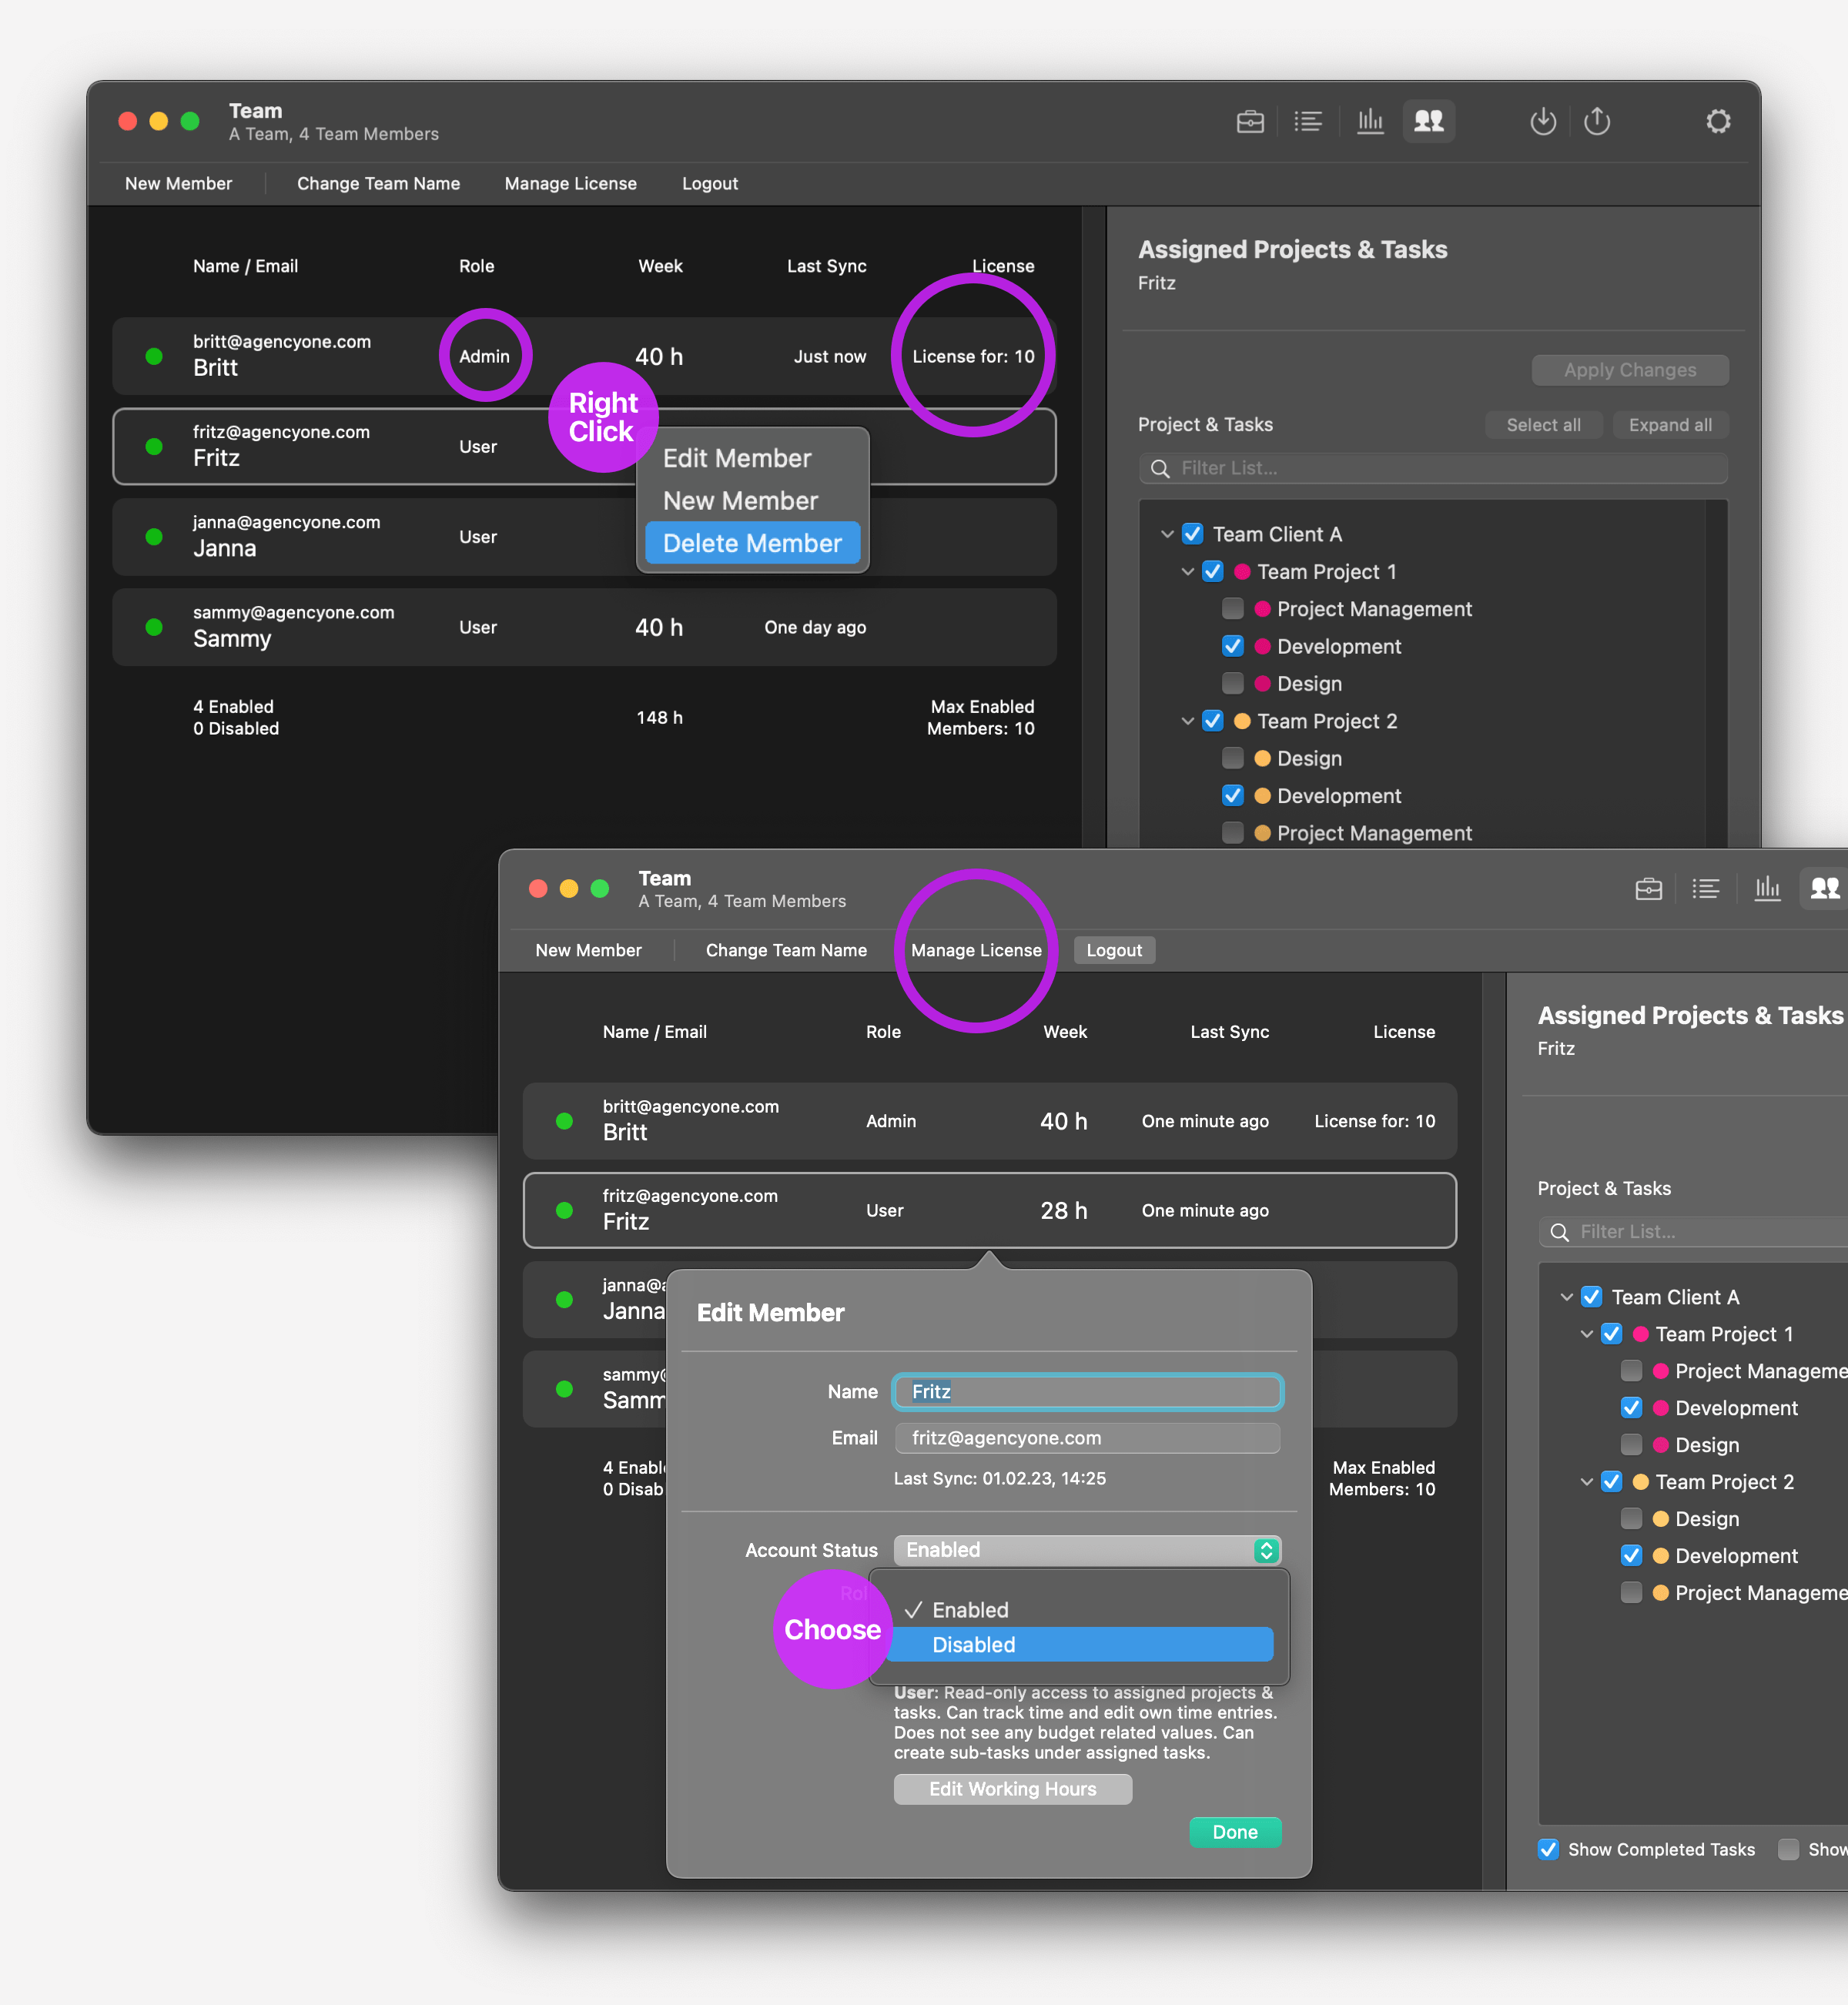
The Team Screen
Open Tyme. As the team admin you will directly land on the Team Screen or if you are not logged in, the Login Window will appear.
You will find yourself as the first member of your team on the screen. The number of possible team members (your license) is displayed in the line with your name.
Note: This is only the case after the trial version has expired, when you have also signed up for a real subscription.
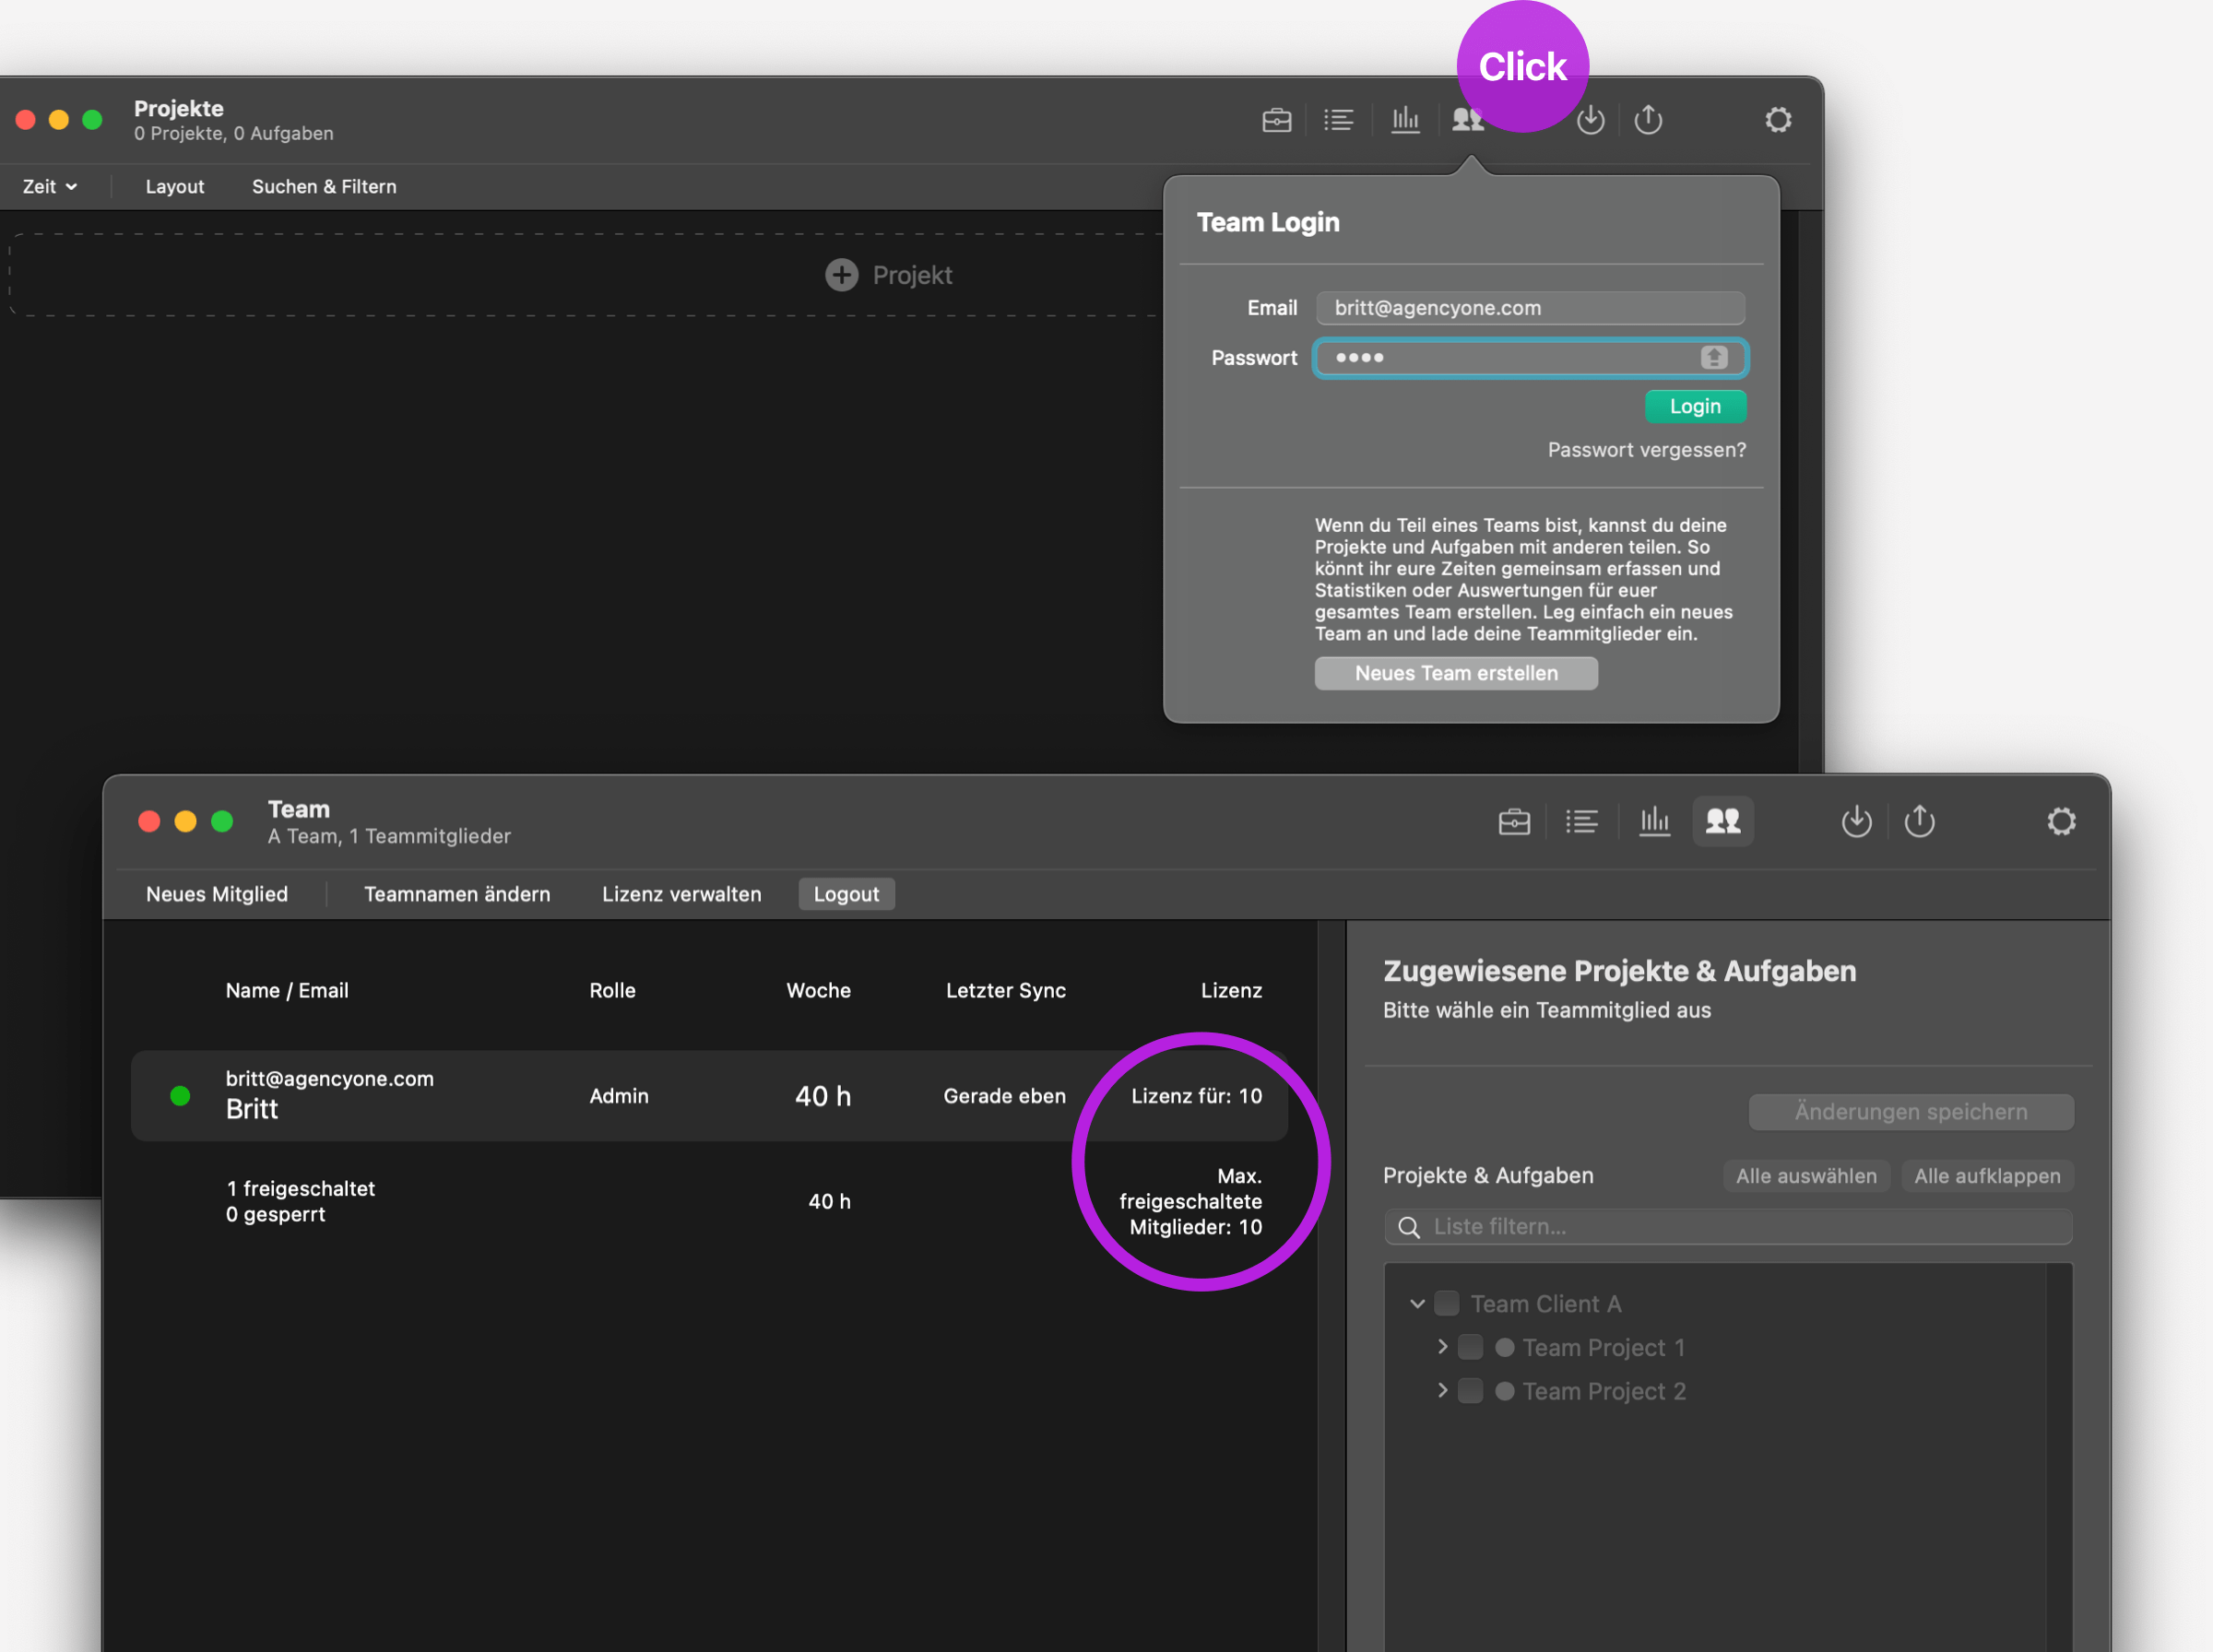
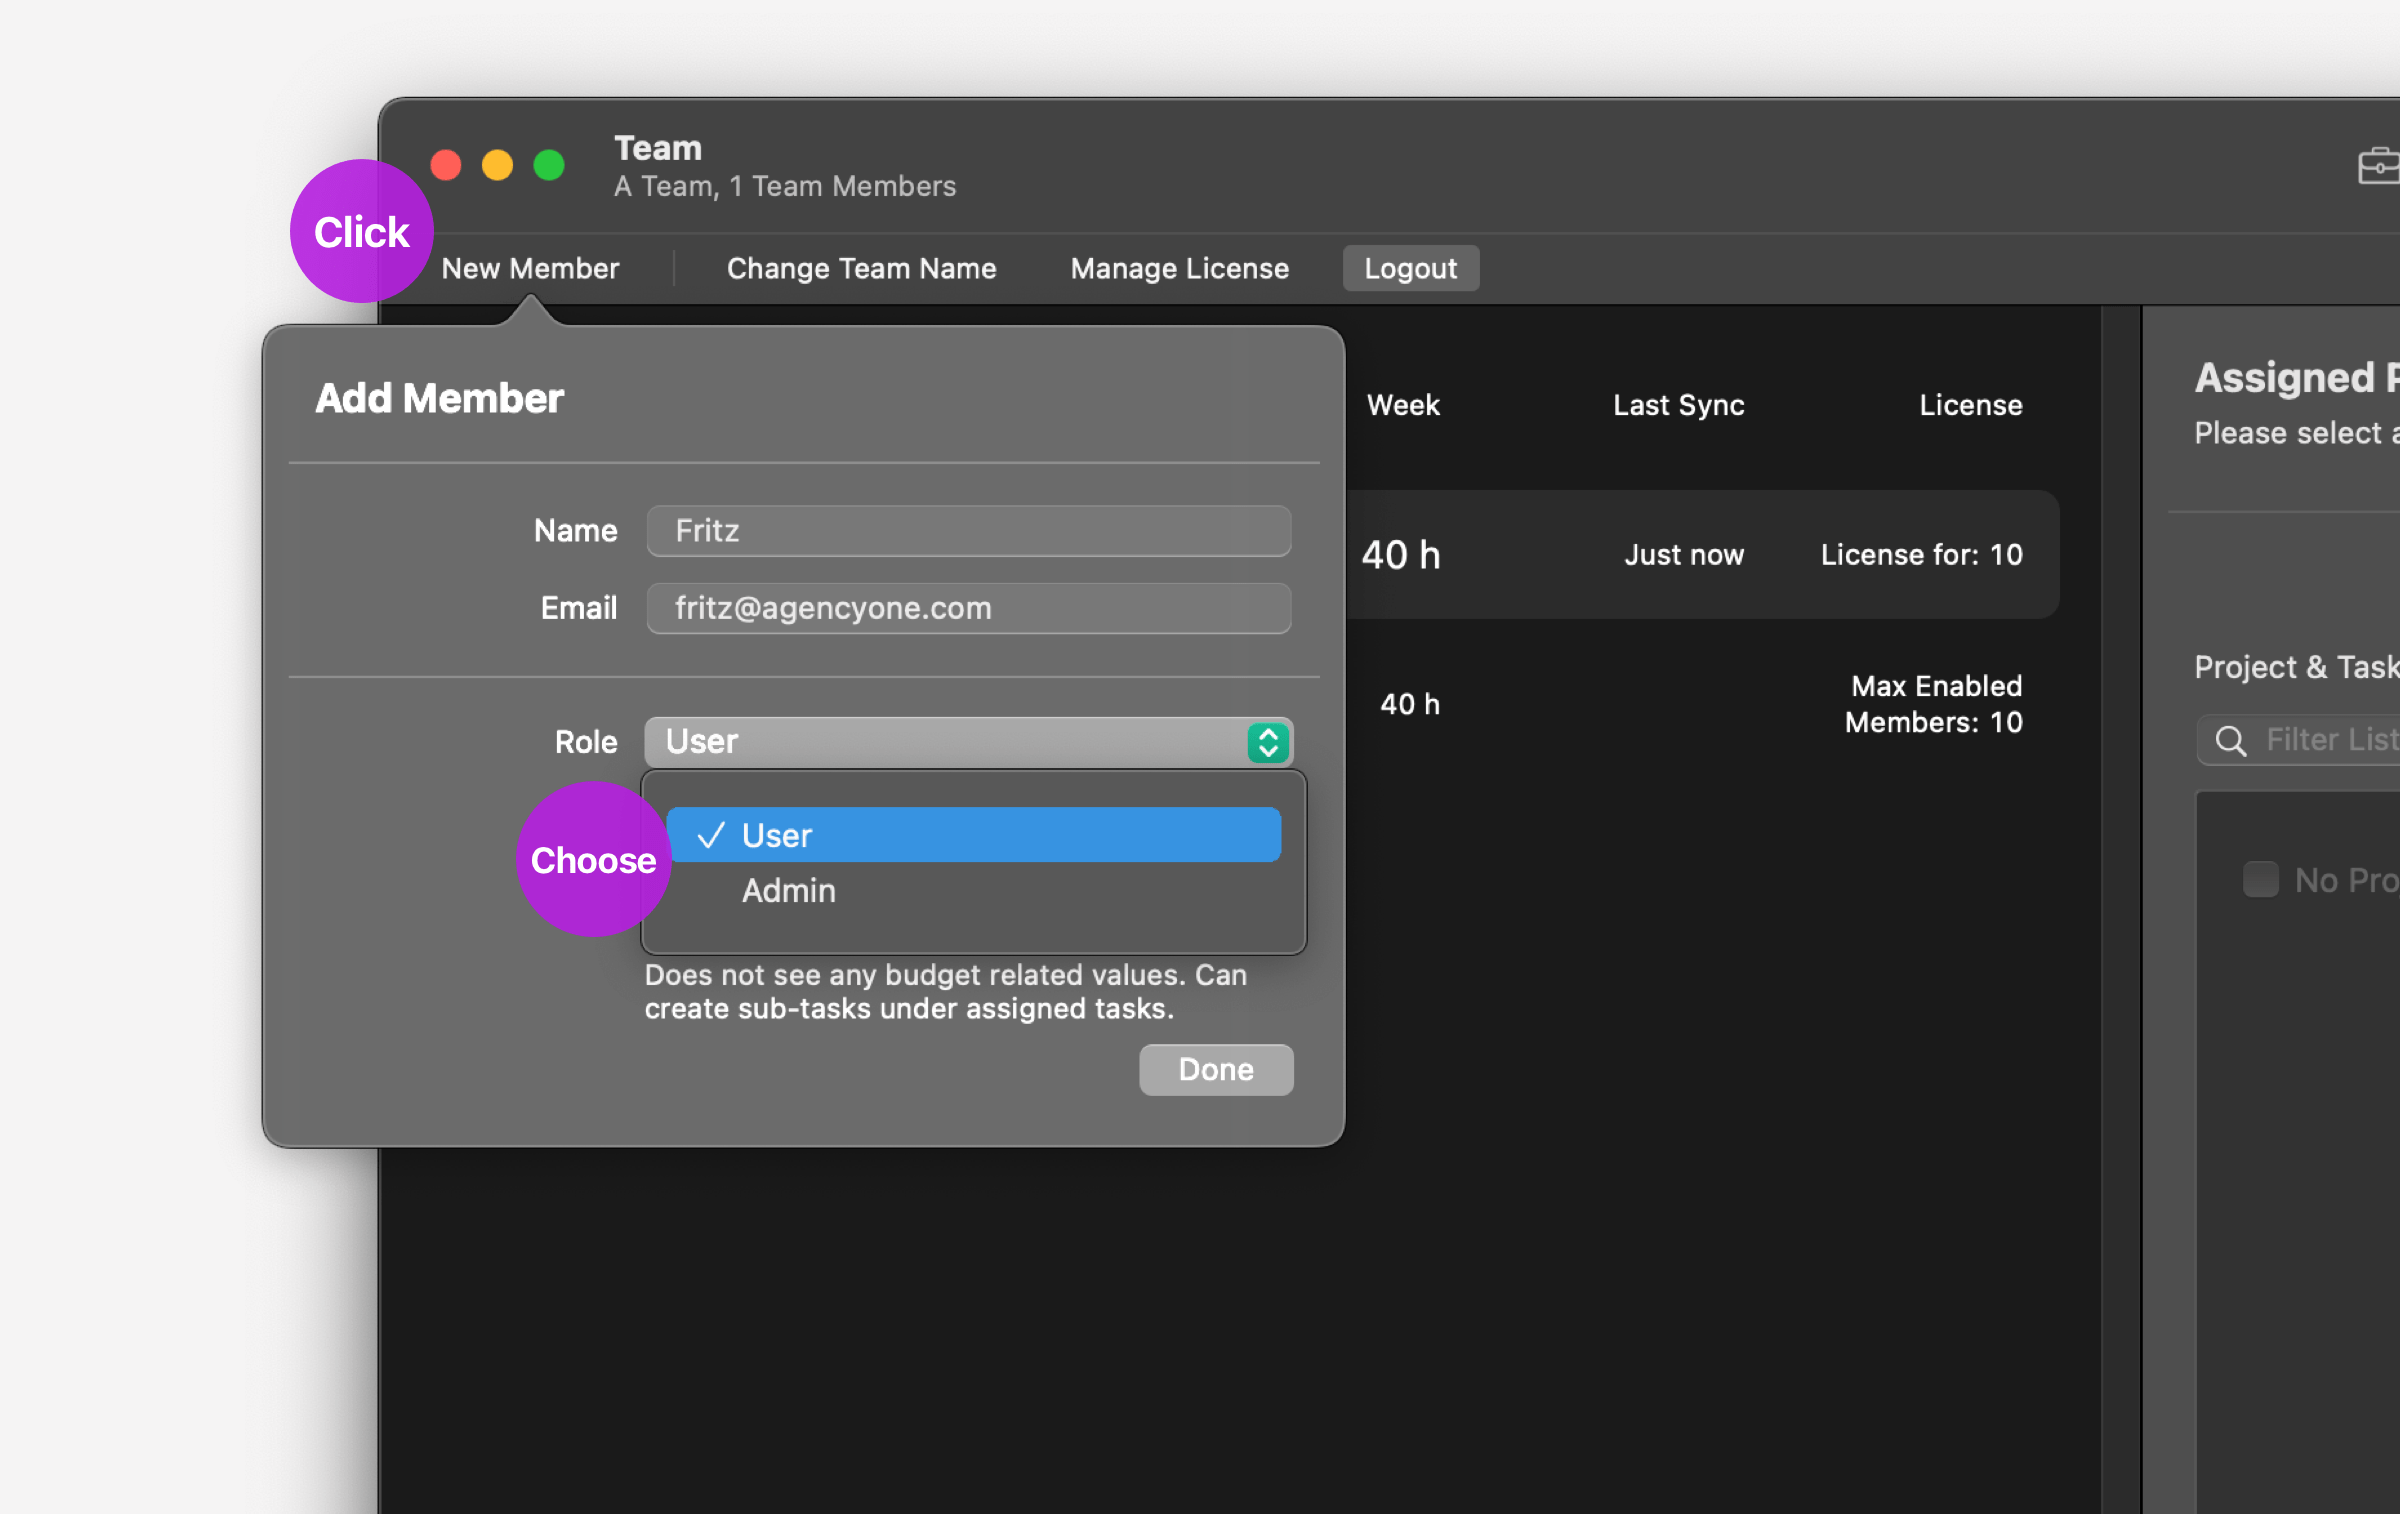
Add new members to your team by clicking the "New Member" button on the left side of the screen.
- First enter name and email address.
- then choose a role for the member - choose between "Admin" or "User":
a) Admins can create and assign projects and tasks. They have full access to all projects, tasks and the time entries of all members.
b) Users have read-only access to assigned projects and tasks. They can record times and edit their own time entries. Users can create own sub-tasks under assigned tasks.
Important: All newly added members will then receive an activation email from Tyme, which they must confirm.
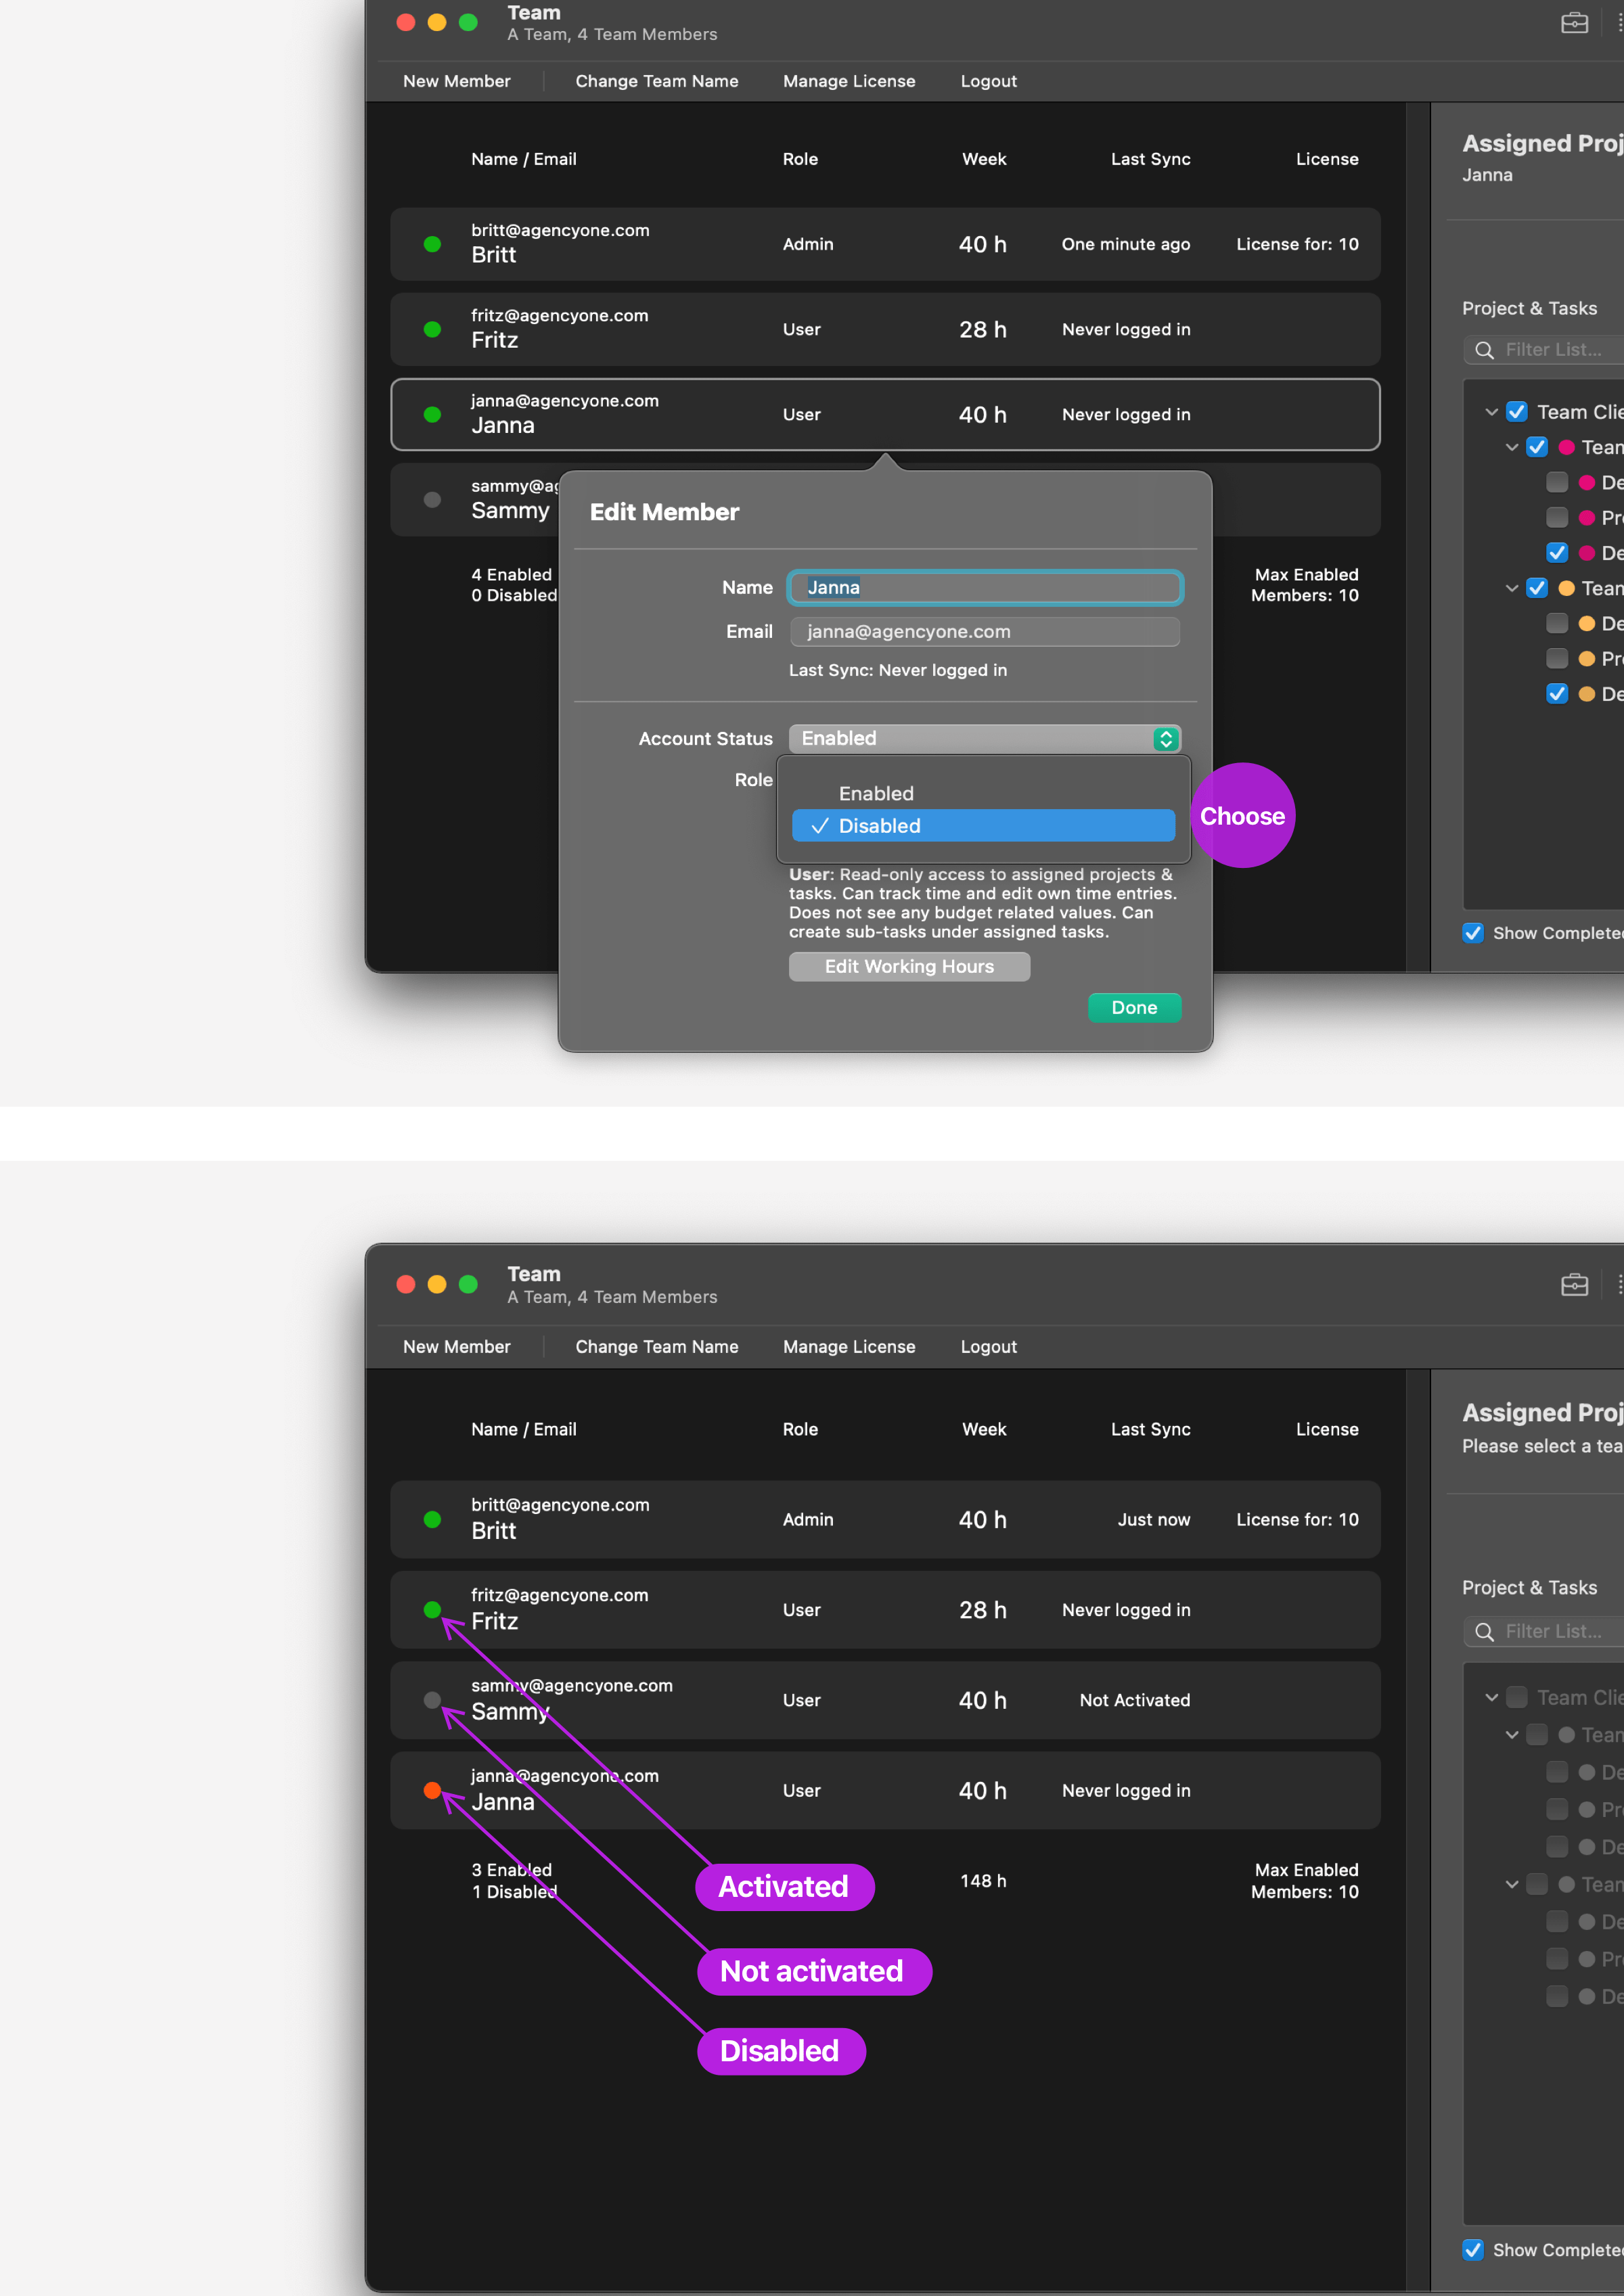
Via right click on a team member you can edit their data.
Here you can also enter individual working hours for the team member. Each member can also define this in the "Settings".
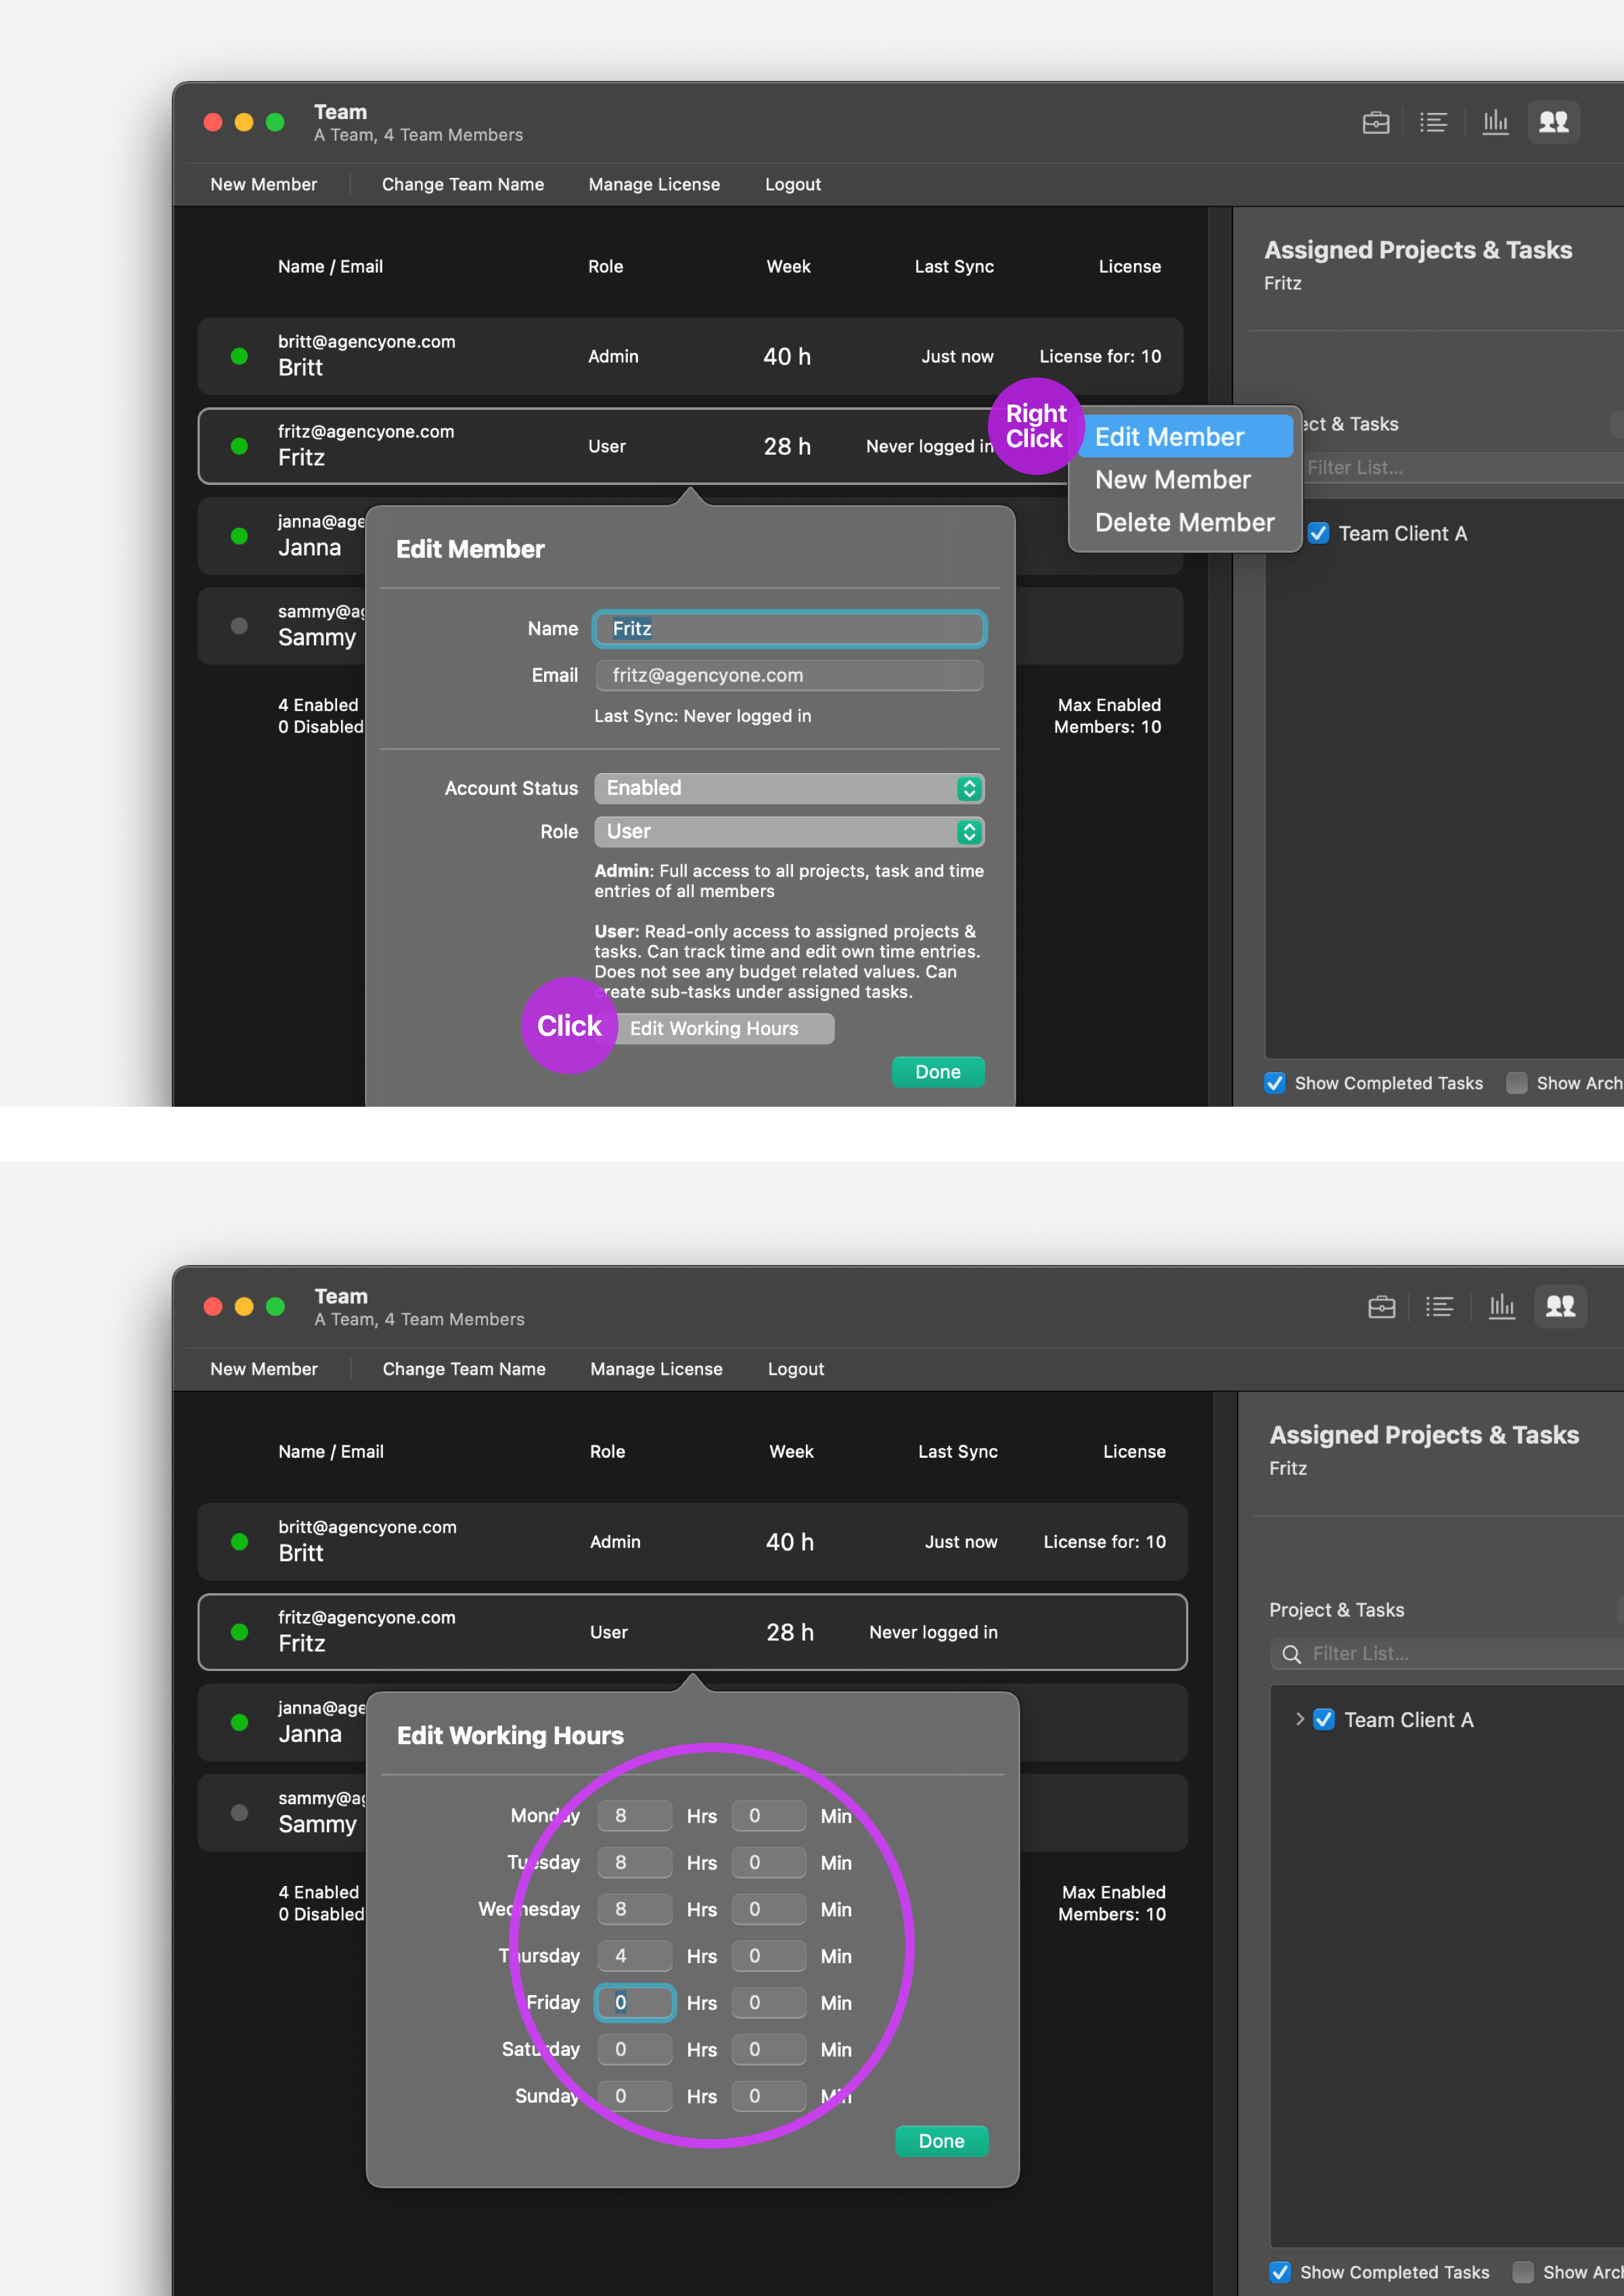
Your team member can have different statuses.
-
"Activated" - The member has confirmed his account via activation email from Tyme and has assigned a password
-
"Not Activated" - The member has not activated his account yet
-
"Disabled" - The member has been temporarily disabled by the admin. This can be practical if a member is currently not present (e.g. on parental leave or sabbatical) and needs to be replaced by another person. Only "enabled" members also use up a license
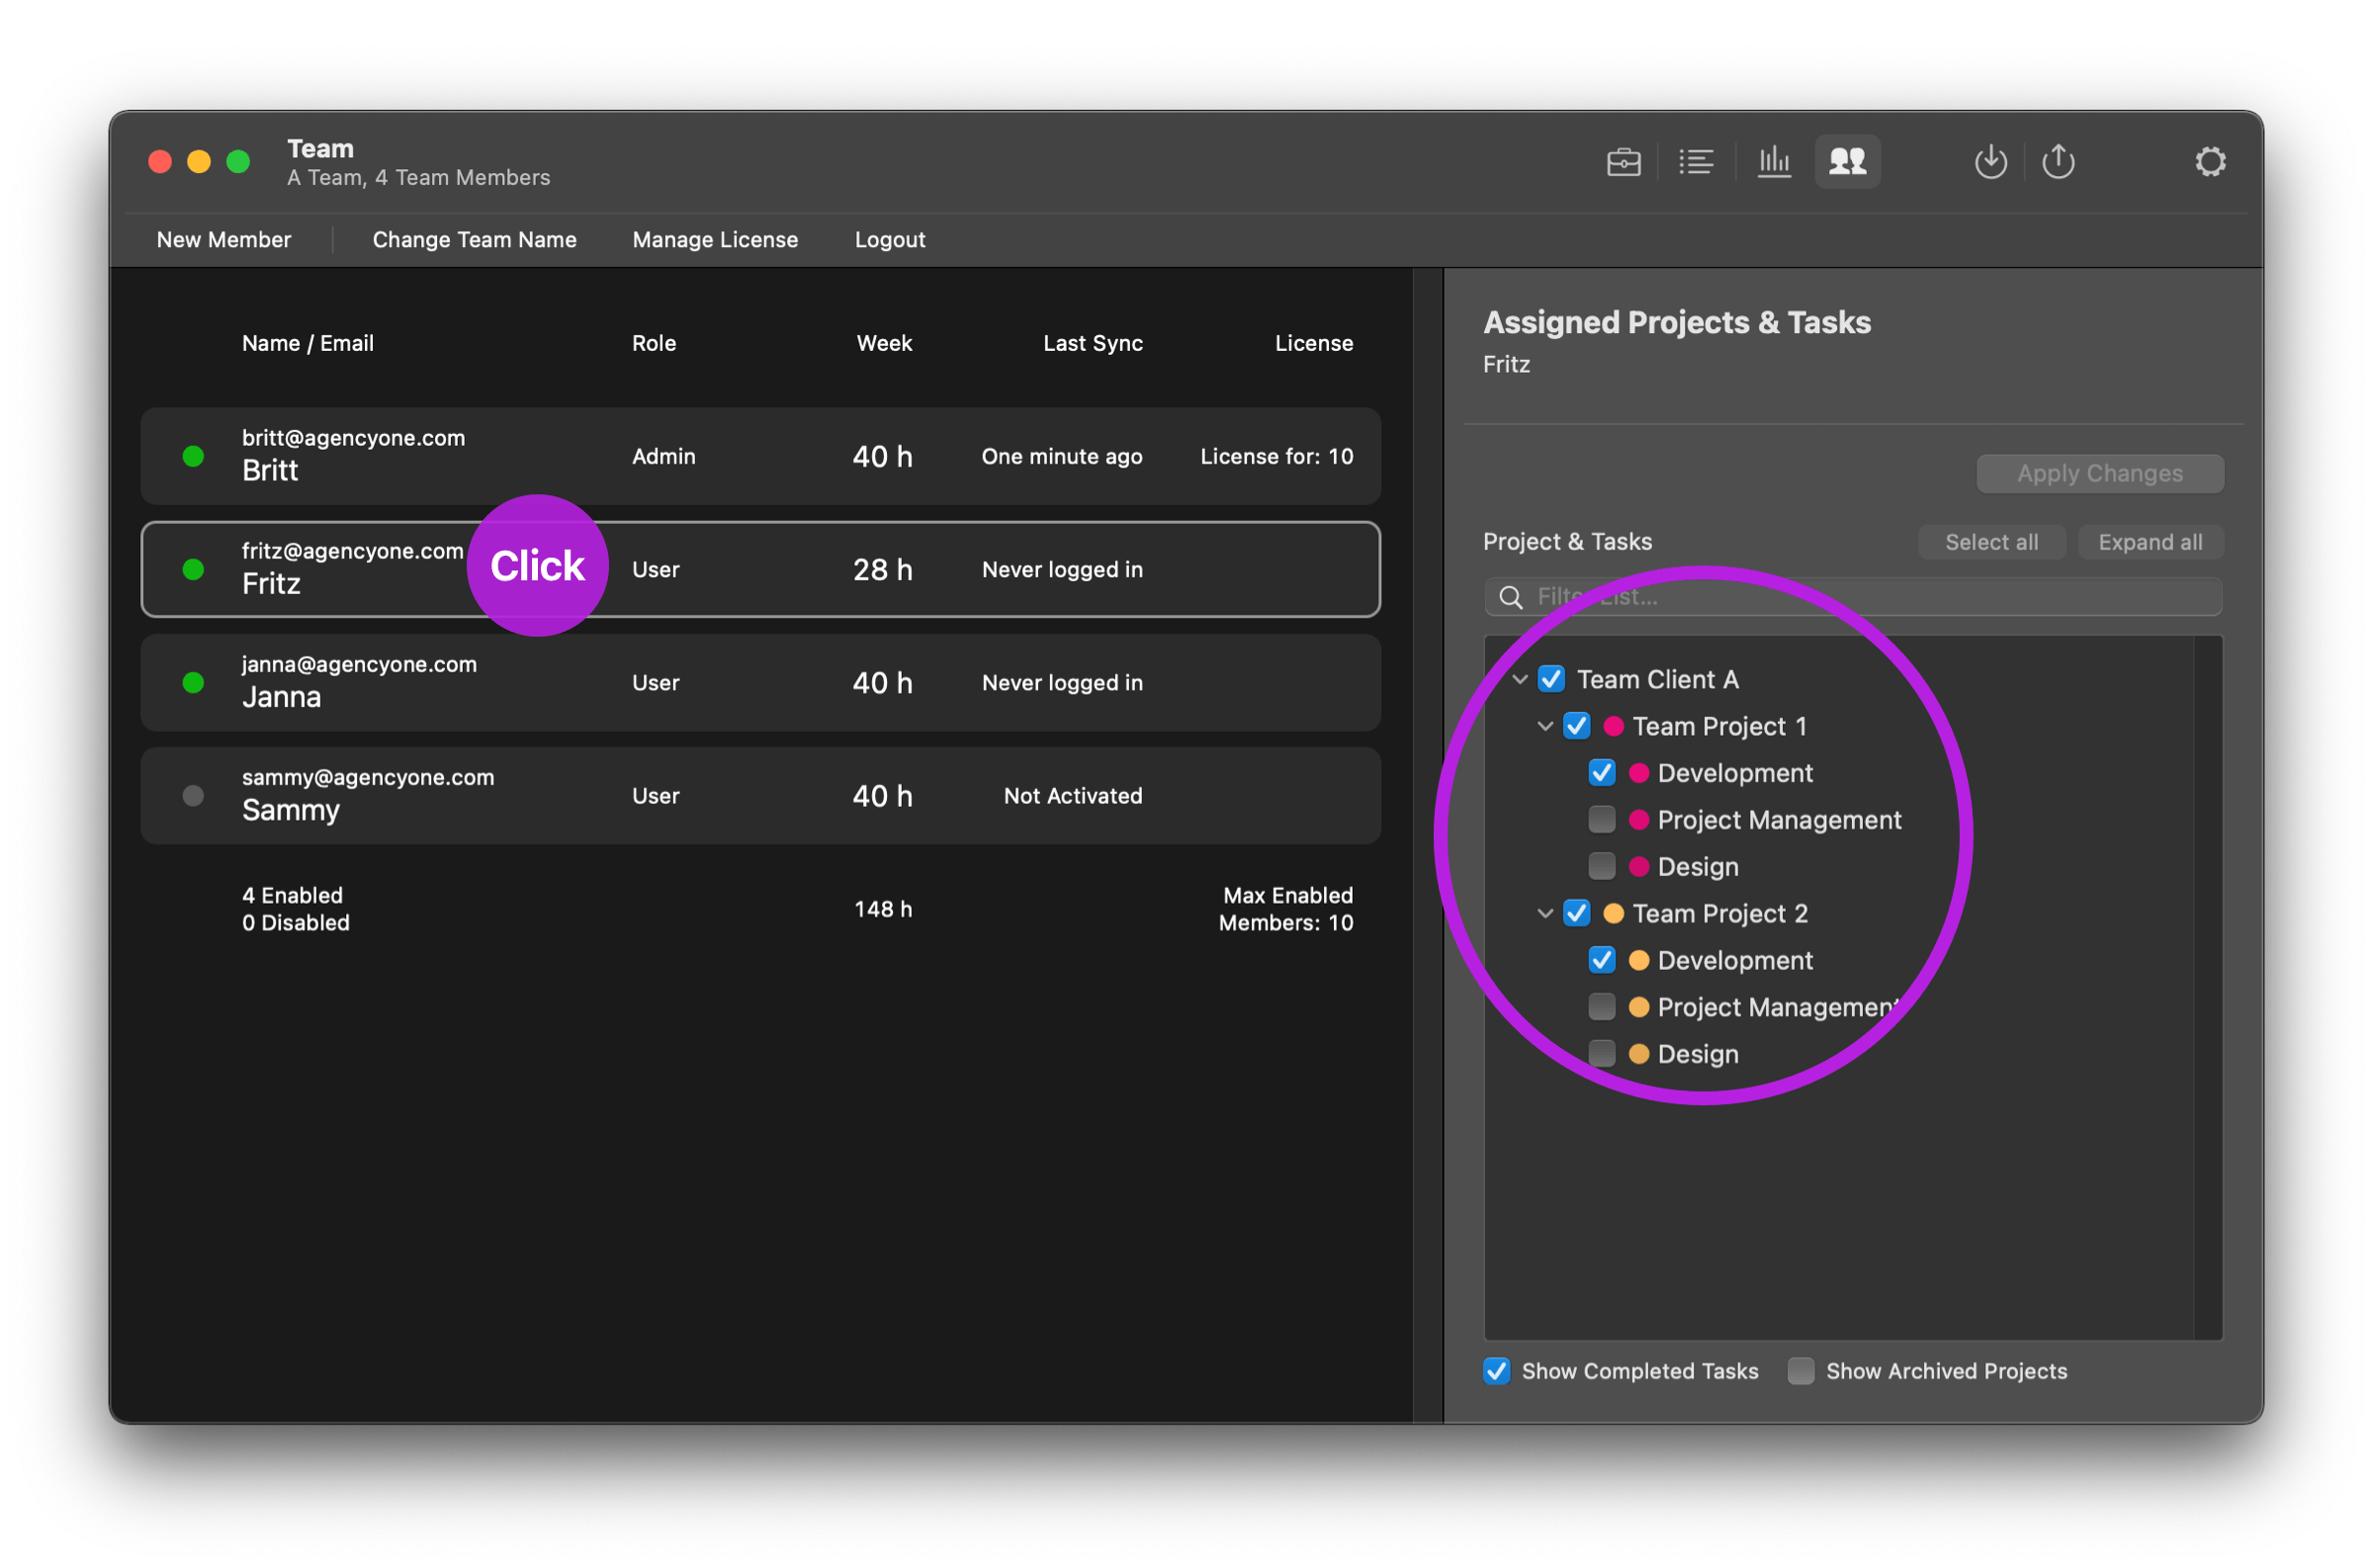
In the right column of the team screen you can assign projects and tasks to each team member so that all team members can record their working hours.
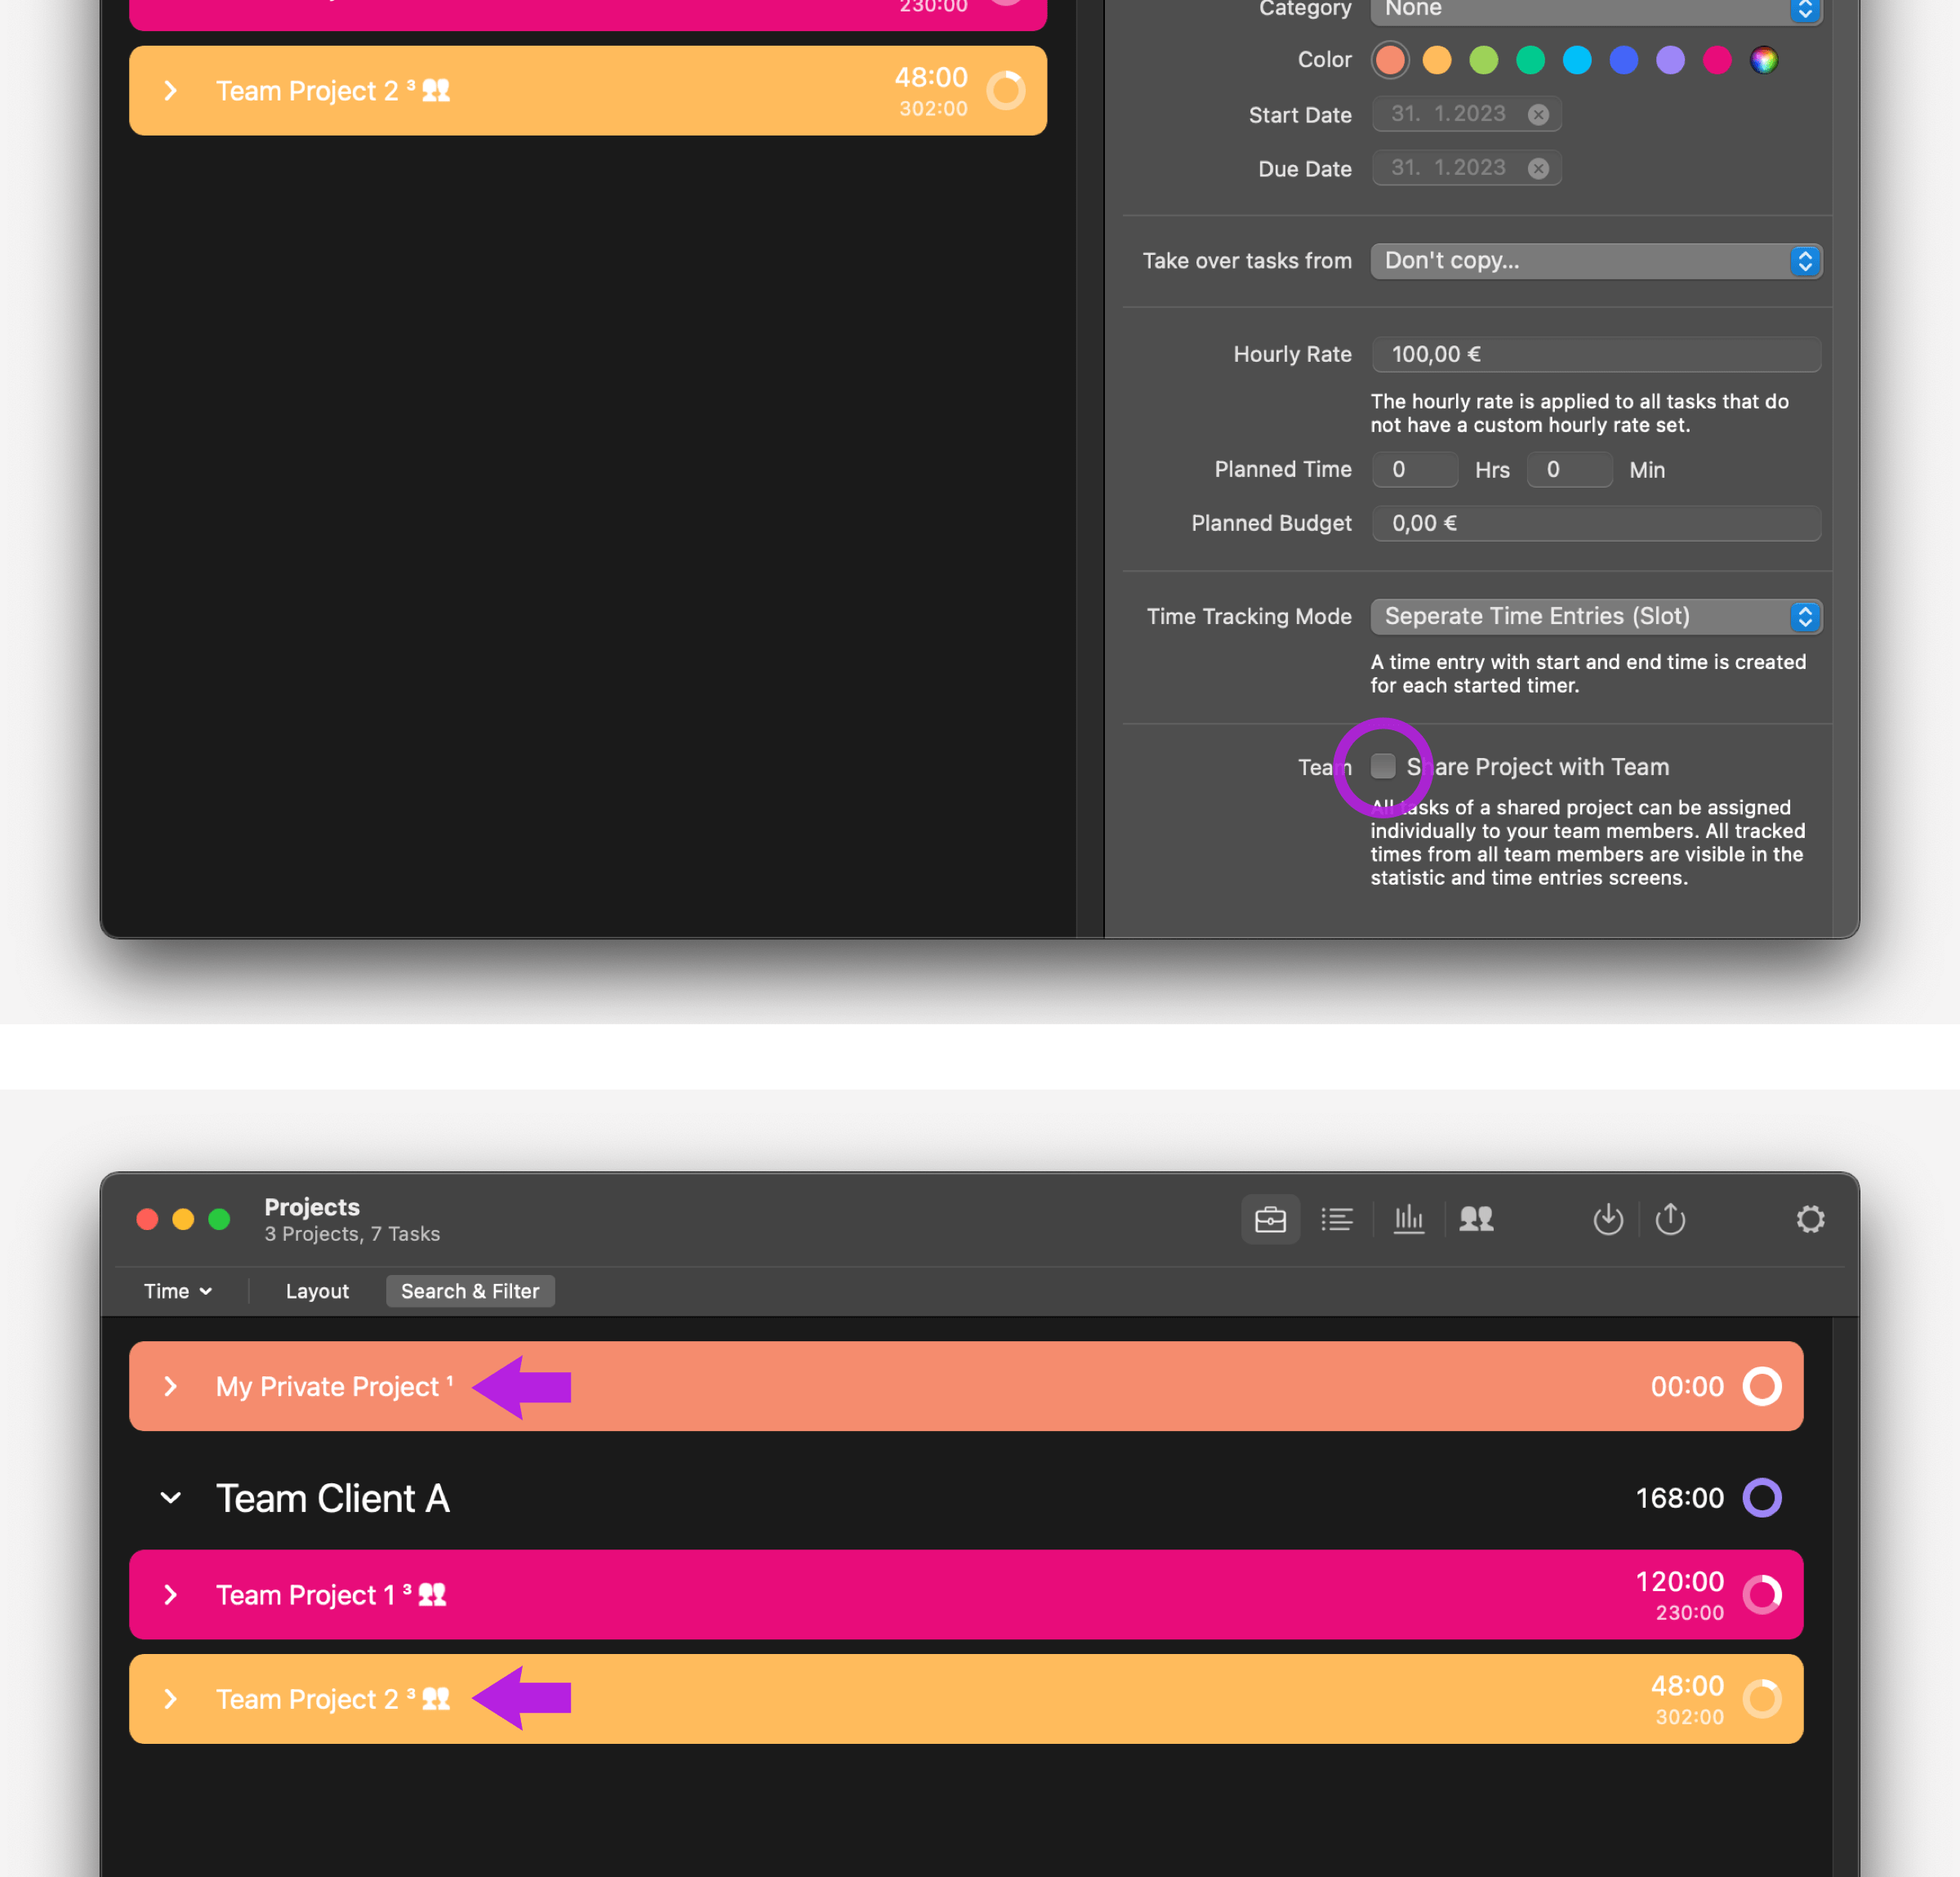
The Projects
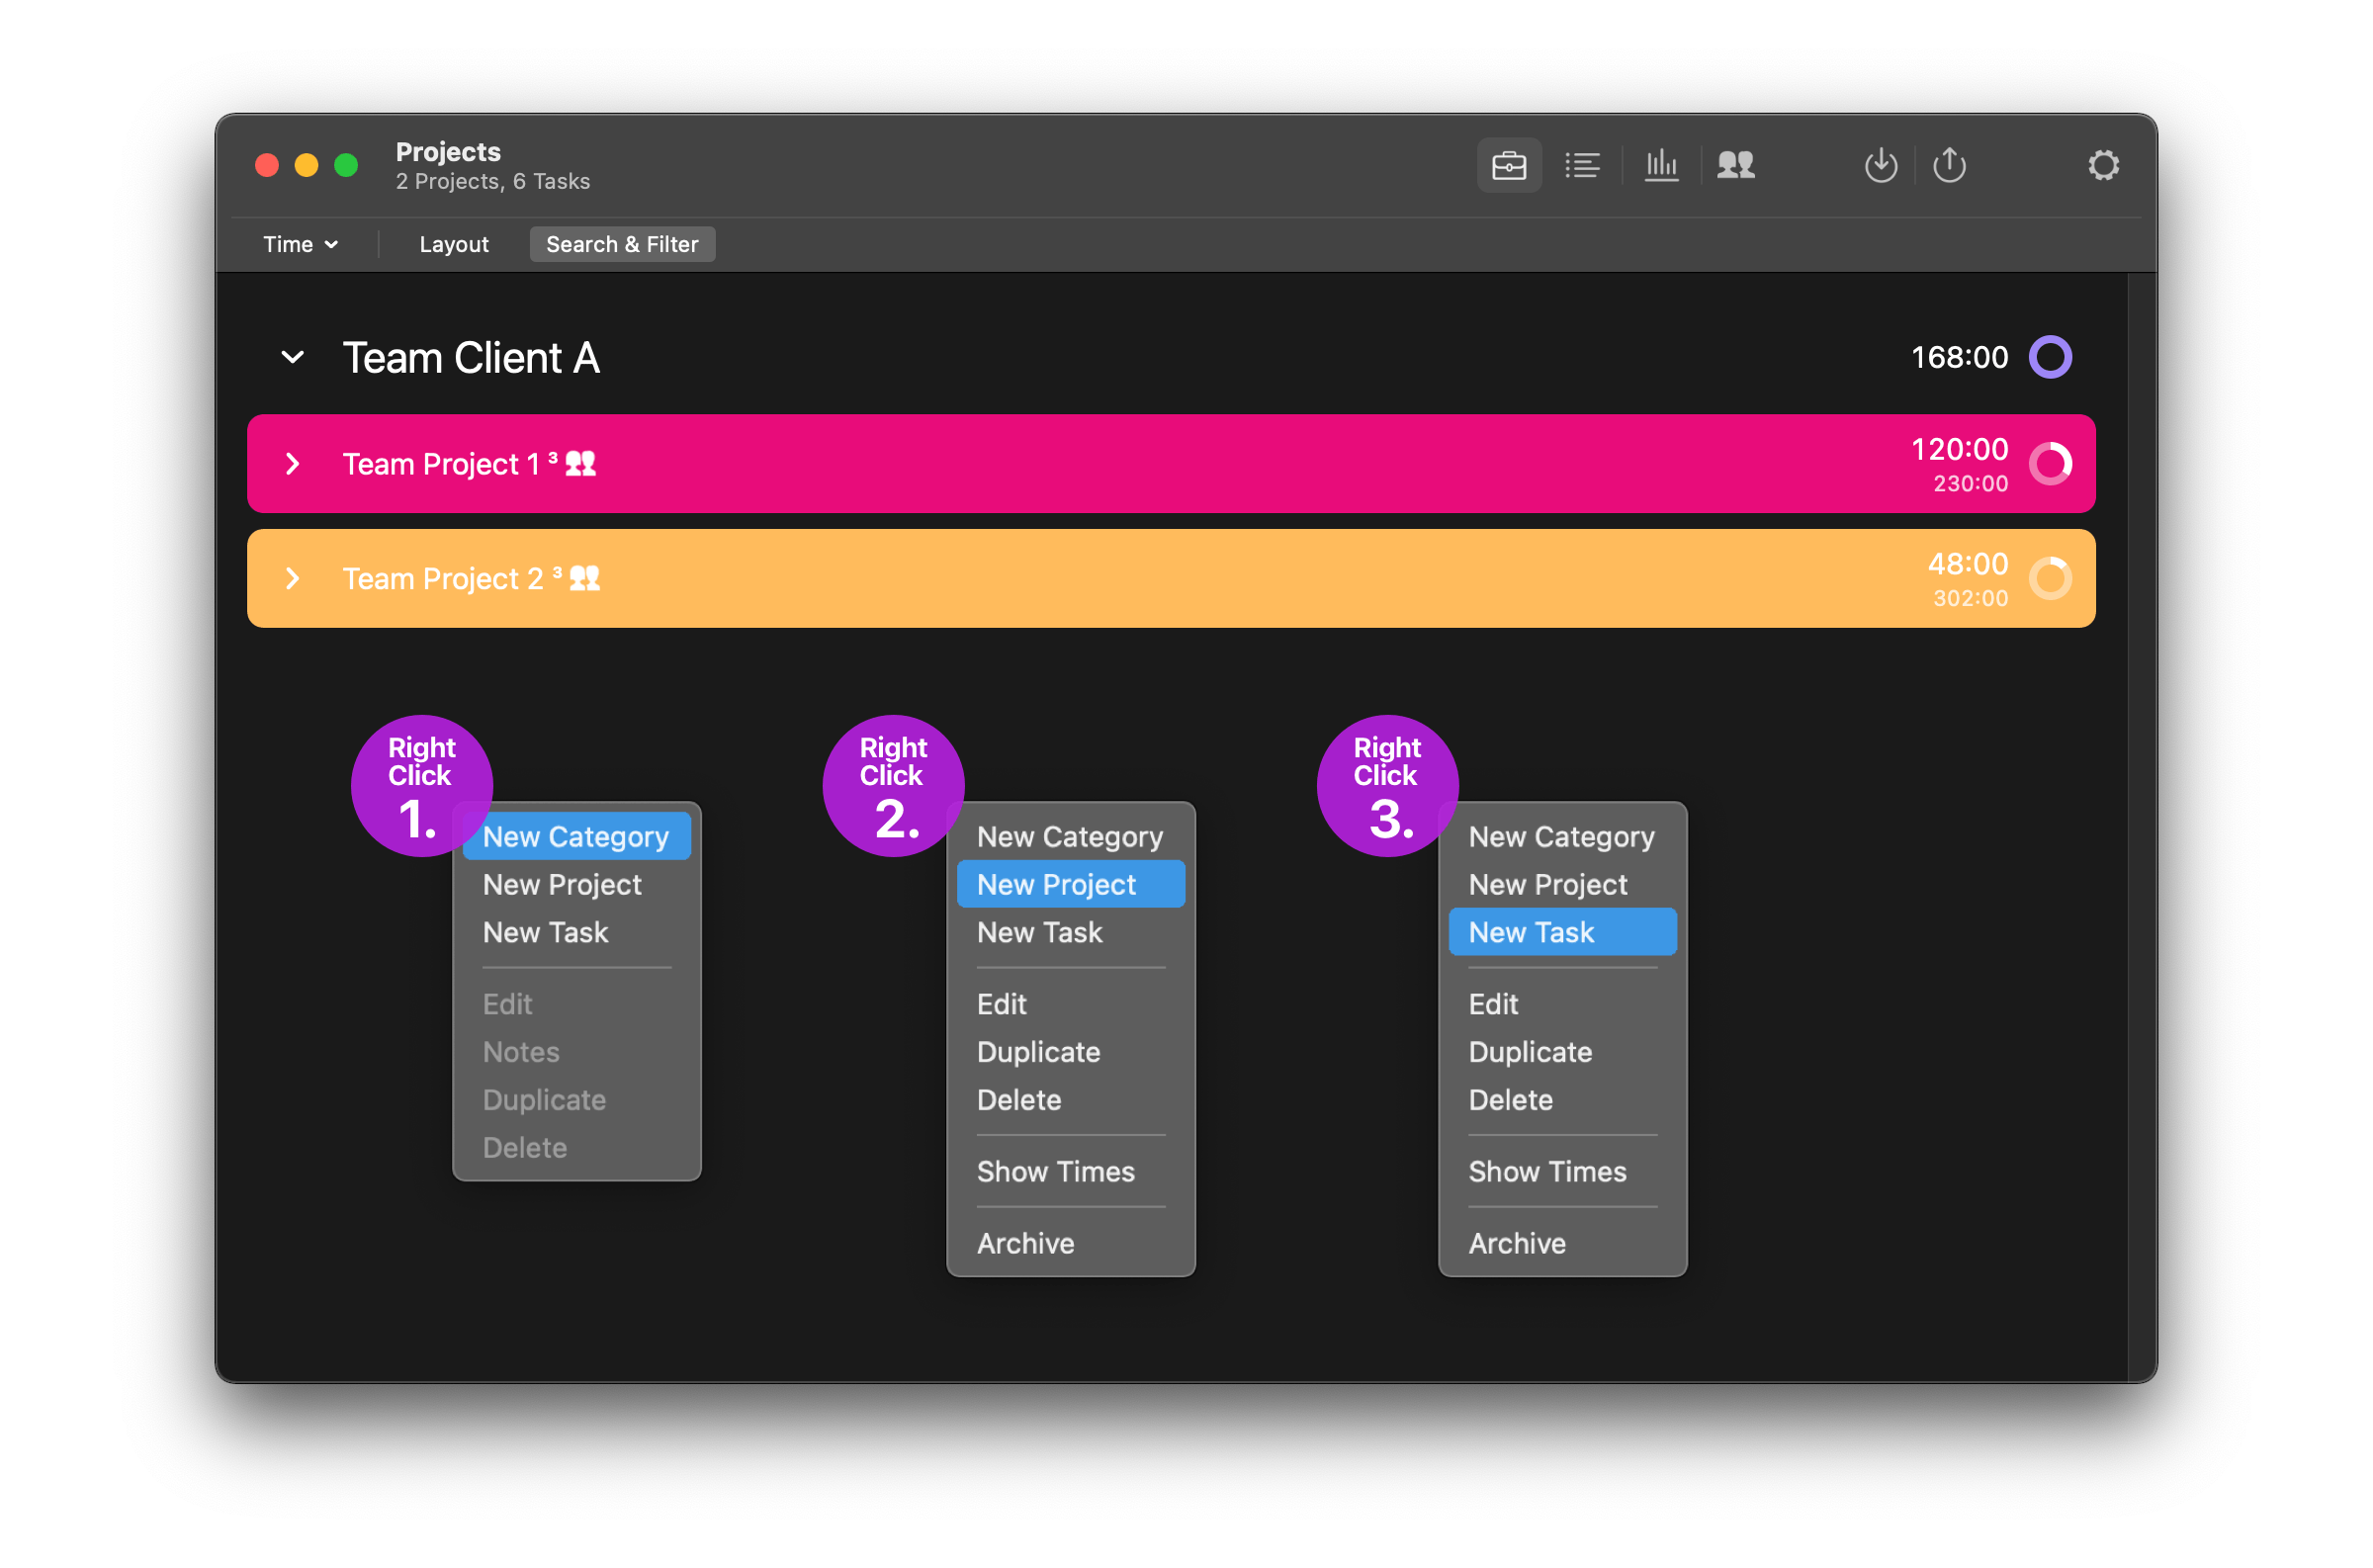
In the Project List (found in the main navigation of Tyme) you can set up your Categories (e.g. Clients), Projects and Tasks. This is ideally done on the basis of an offer you have made to your client.
⟶ See: First Steps - Setup and Structure.
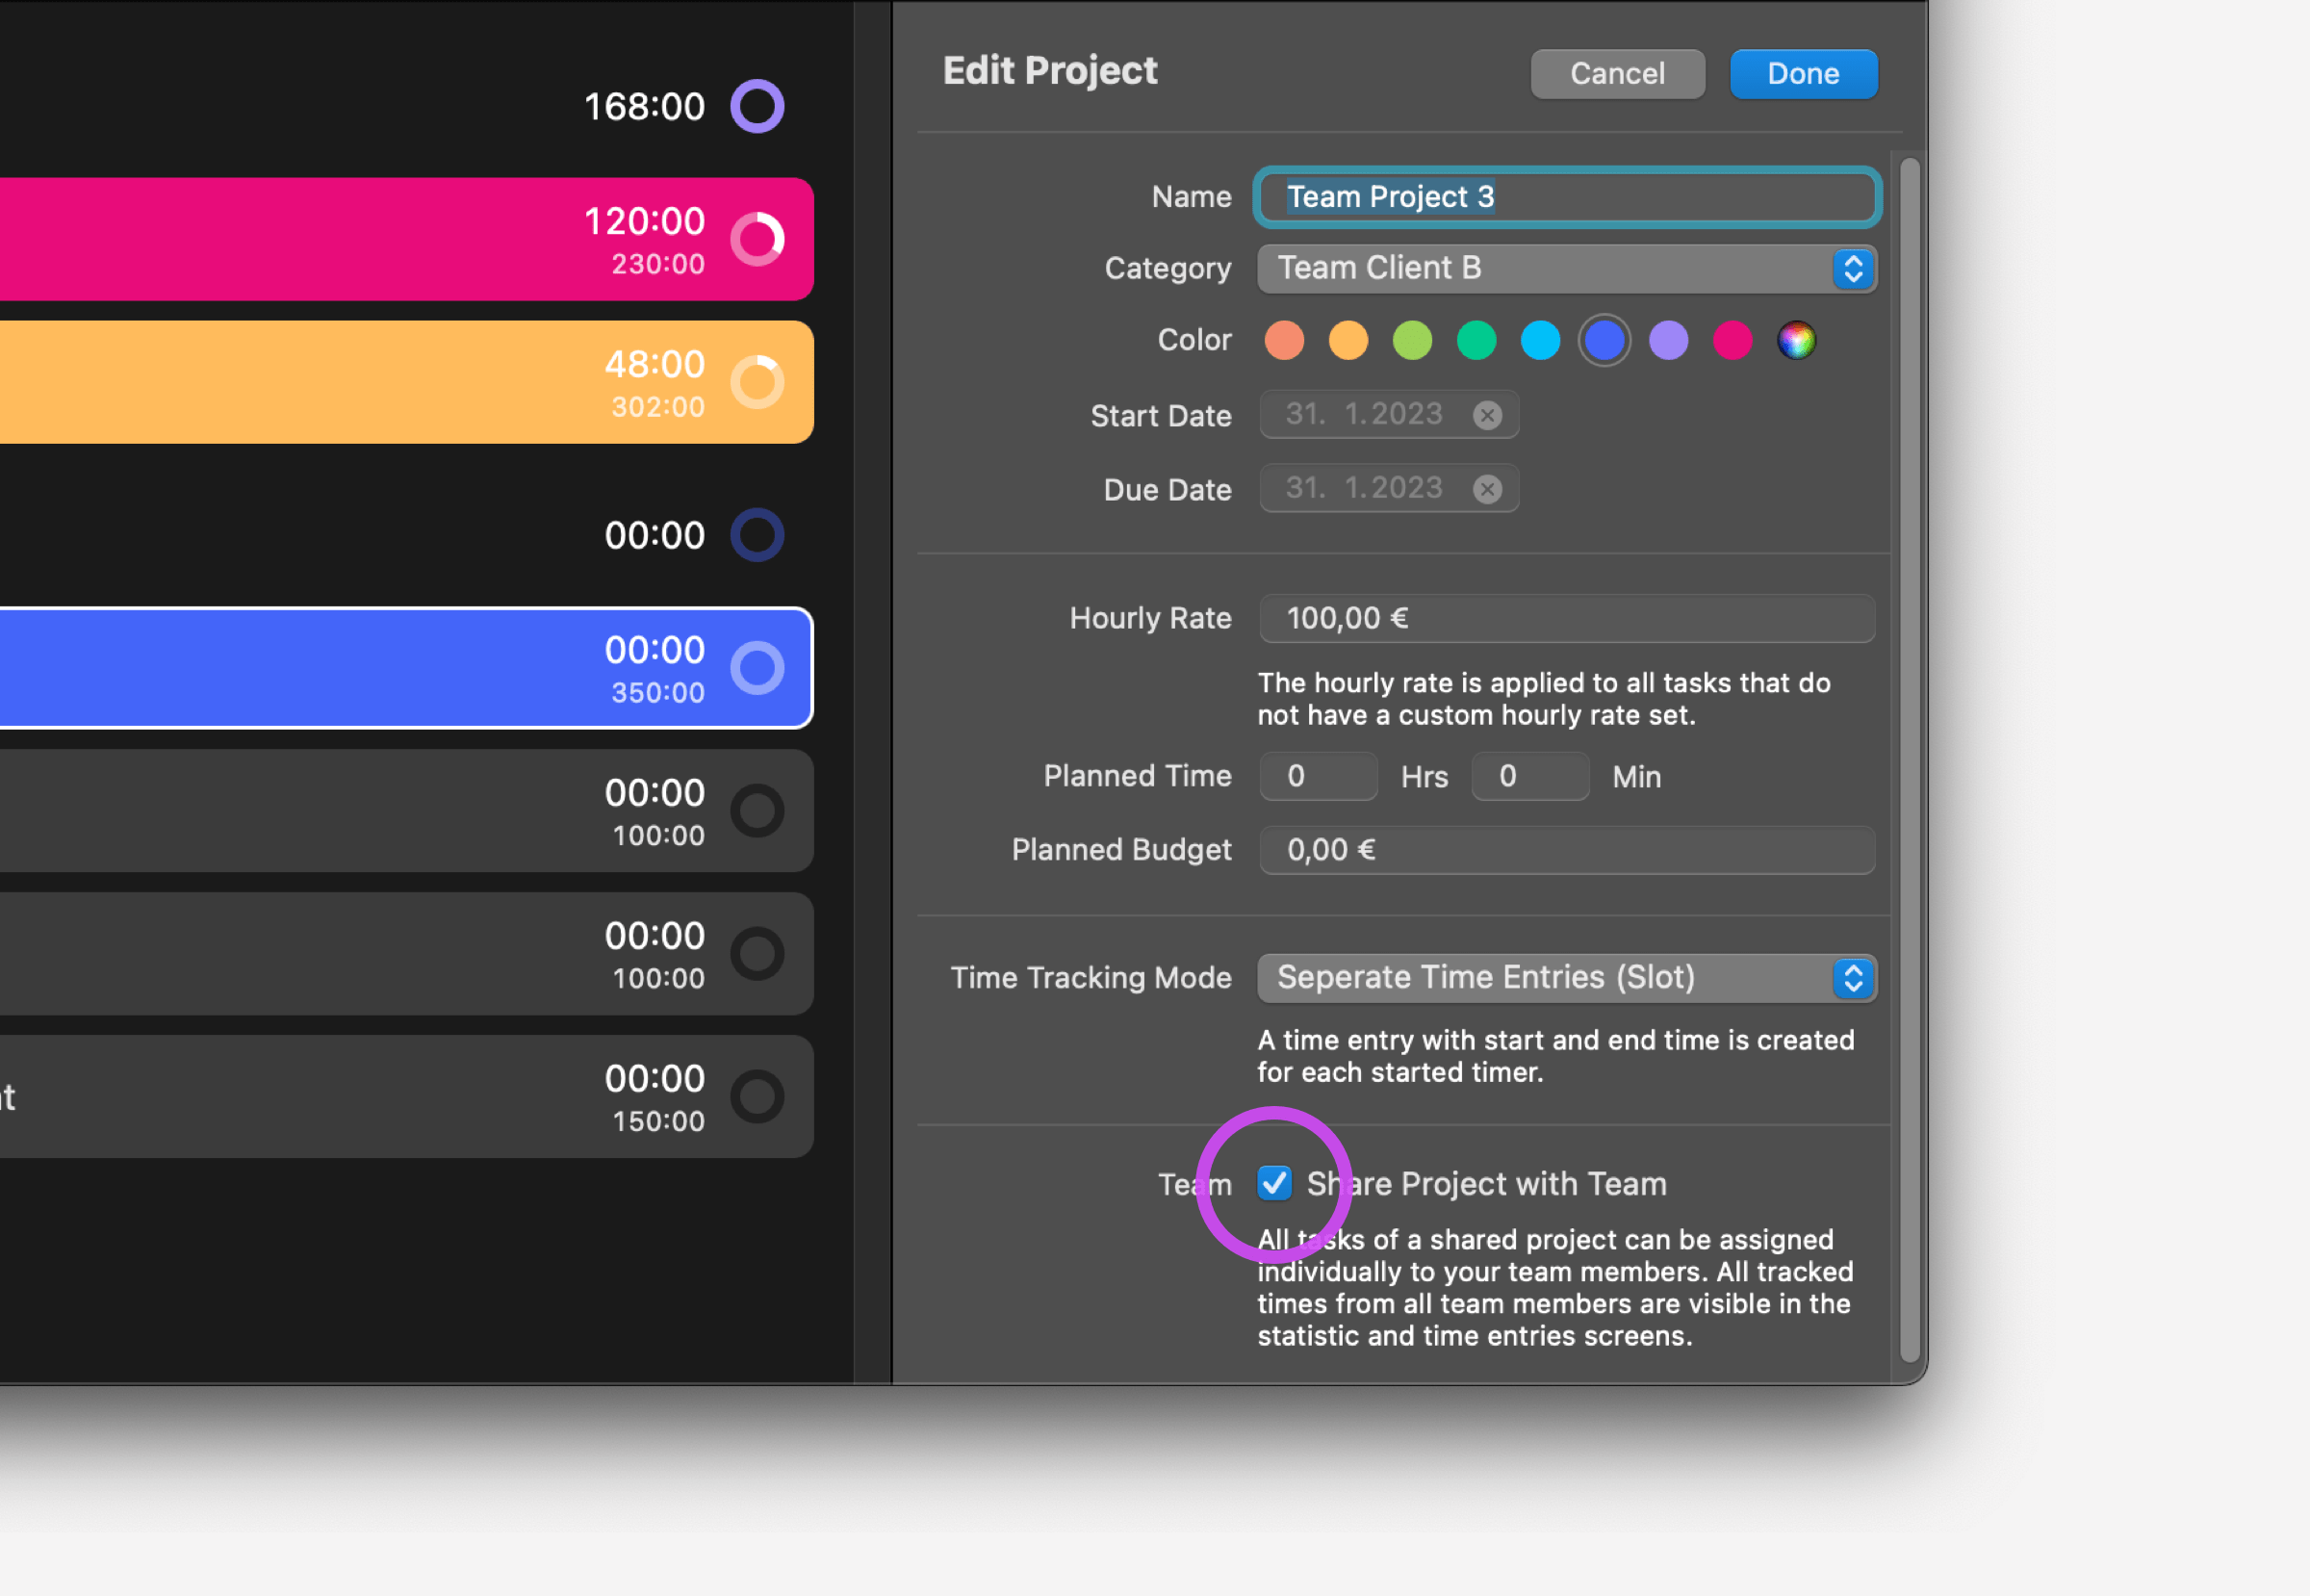
By clicking on a project or task you can set name, project color, start and end date, budget, hourly rate, etc. here.
Important: If you want the project to be available for your team members, the checkbox "Share Project with Team" must be checked.
Private Projects
It is possible for all members to create "private projects" that are not shared with the team.
Important: For this, the checkbox "Share Project With Team" must be deactivated.
You can also recognize a "Private project" by the fact that it is not marked with a team icon in the project list.
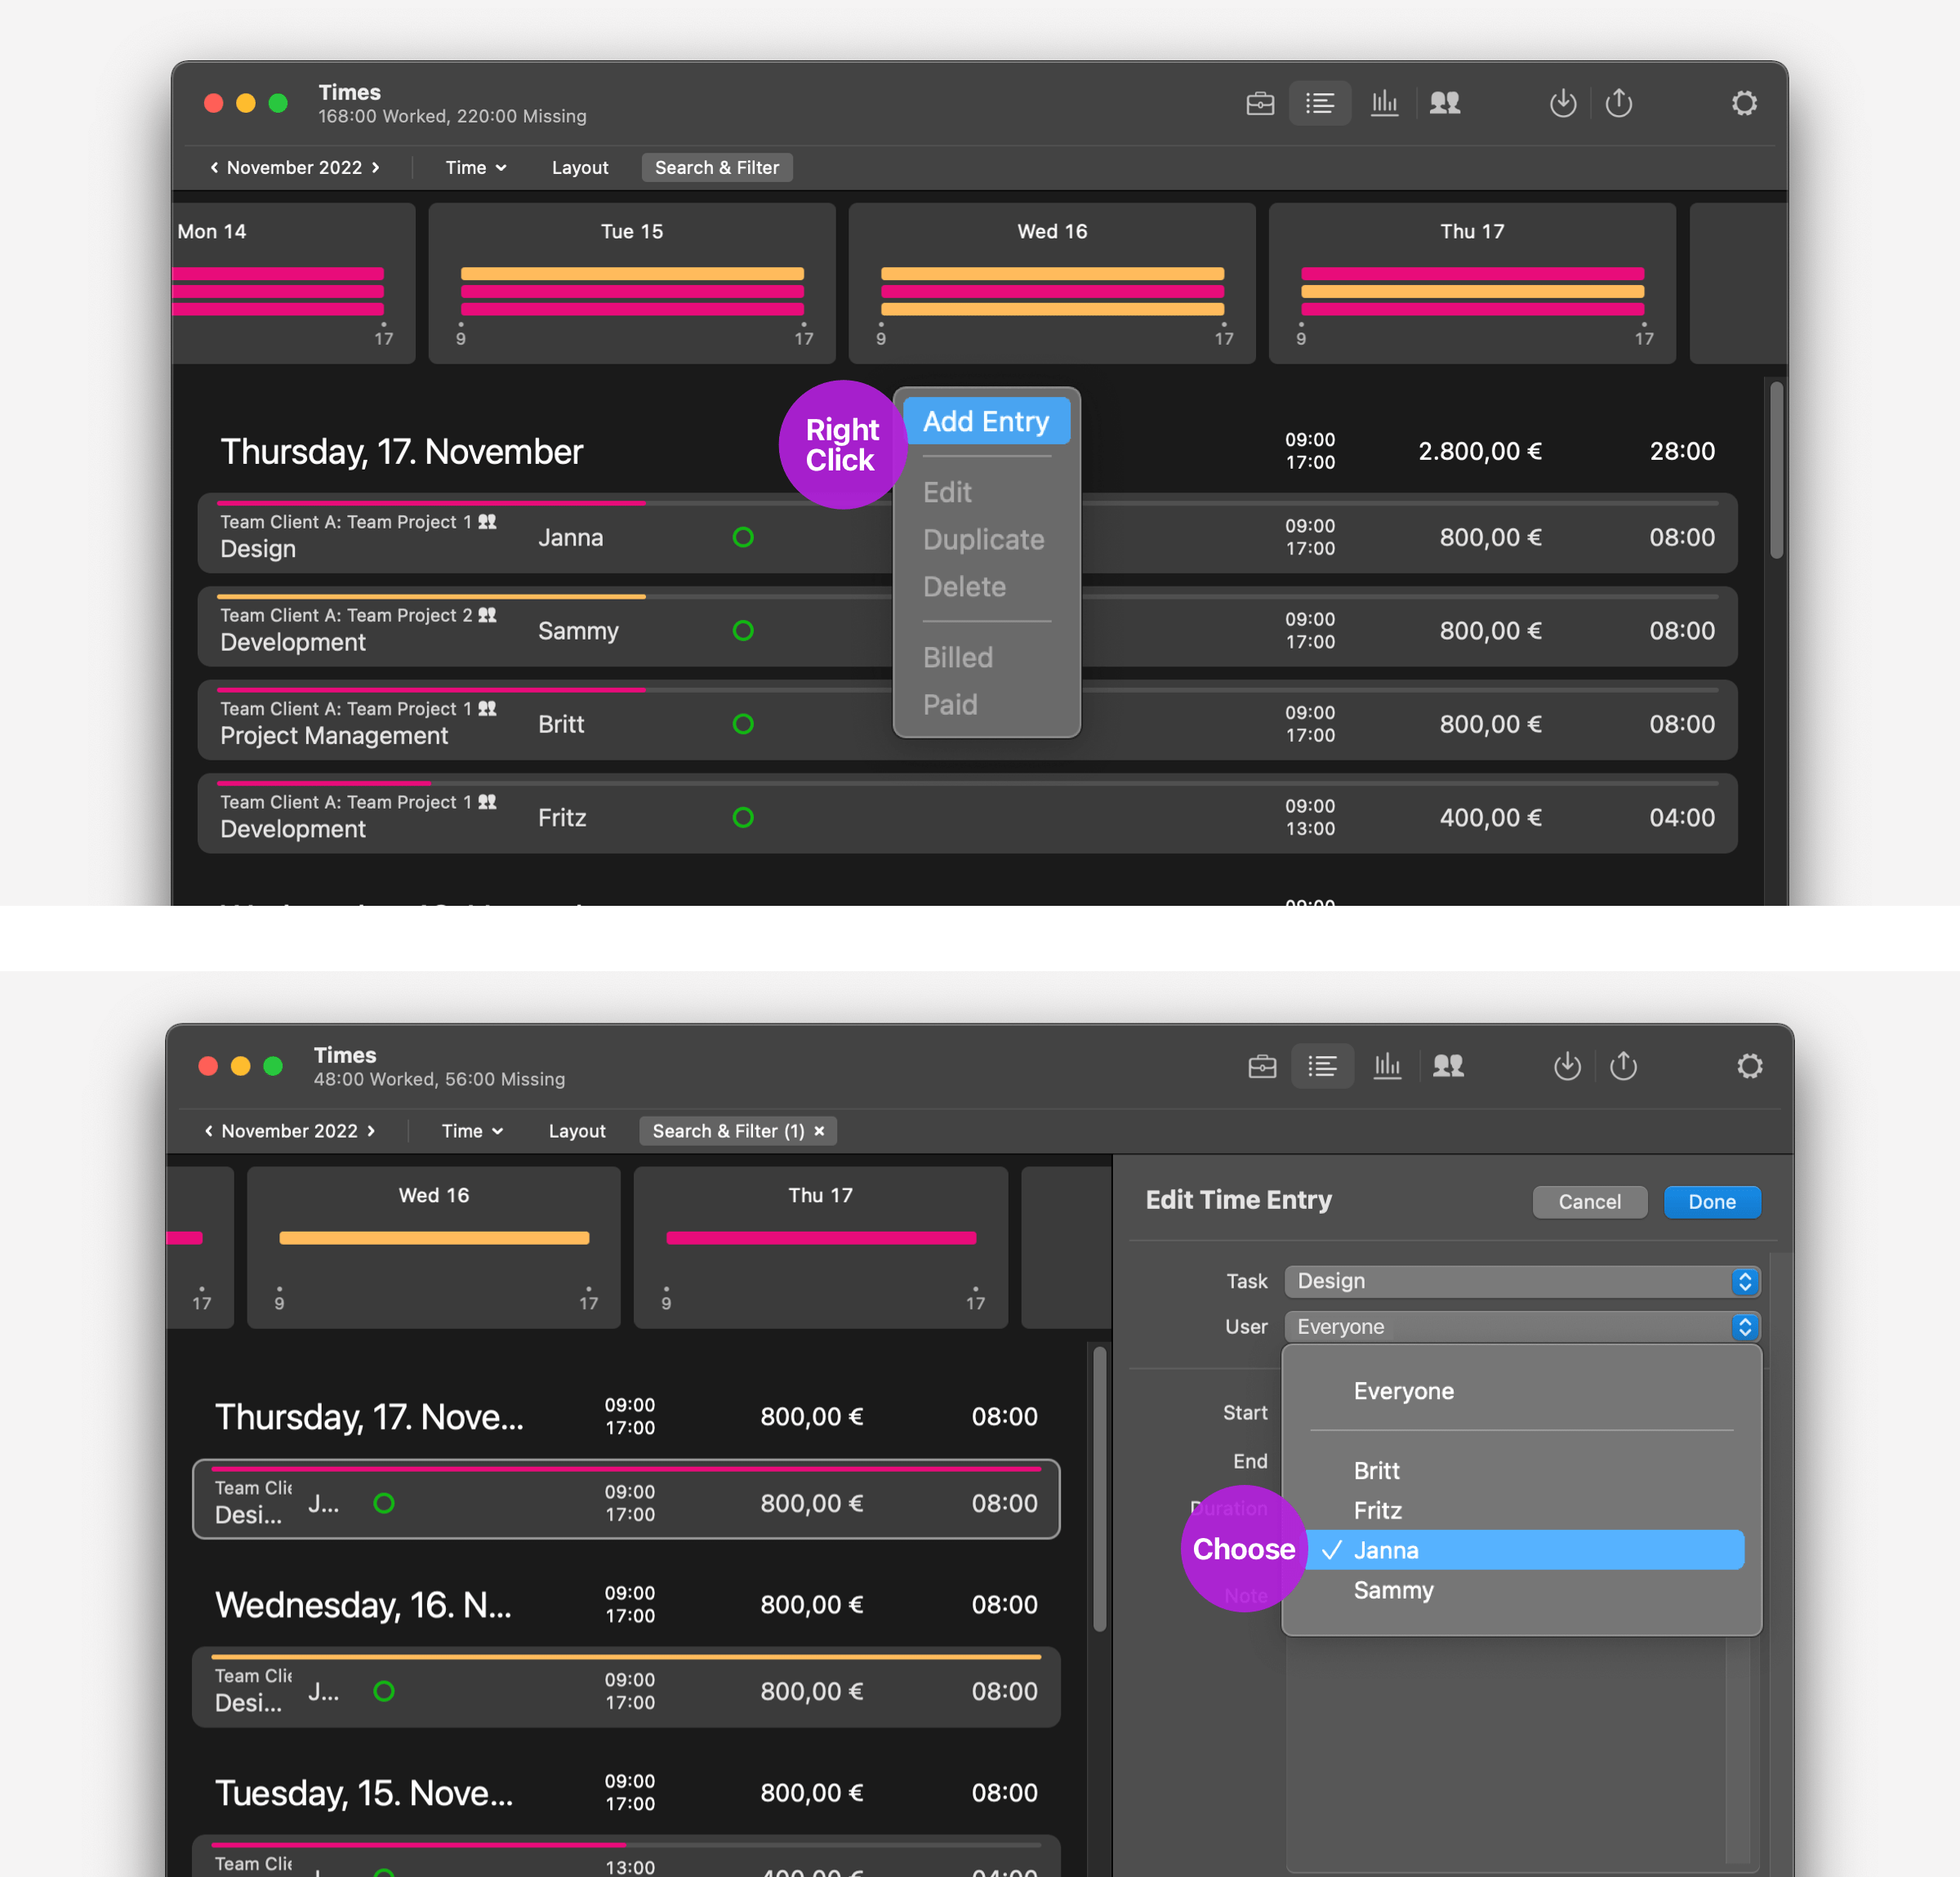
Time Entries Of Your Team
In the Times Screen you will find all the times recorded by you and your team members.
As admin you have the option to add or change time entries for your team members by secondary click (keyboard
shortcut: ⌘+n), in case someone made a mistake.
⟶ See: First Steps - Enter times manually.
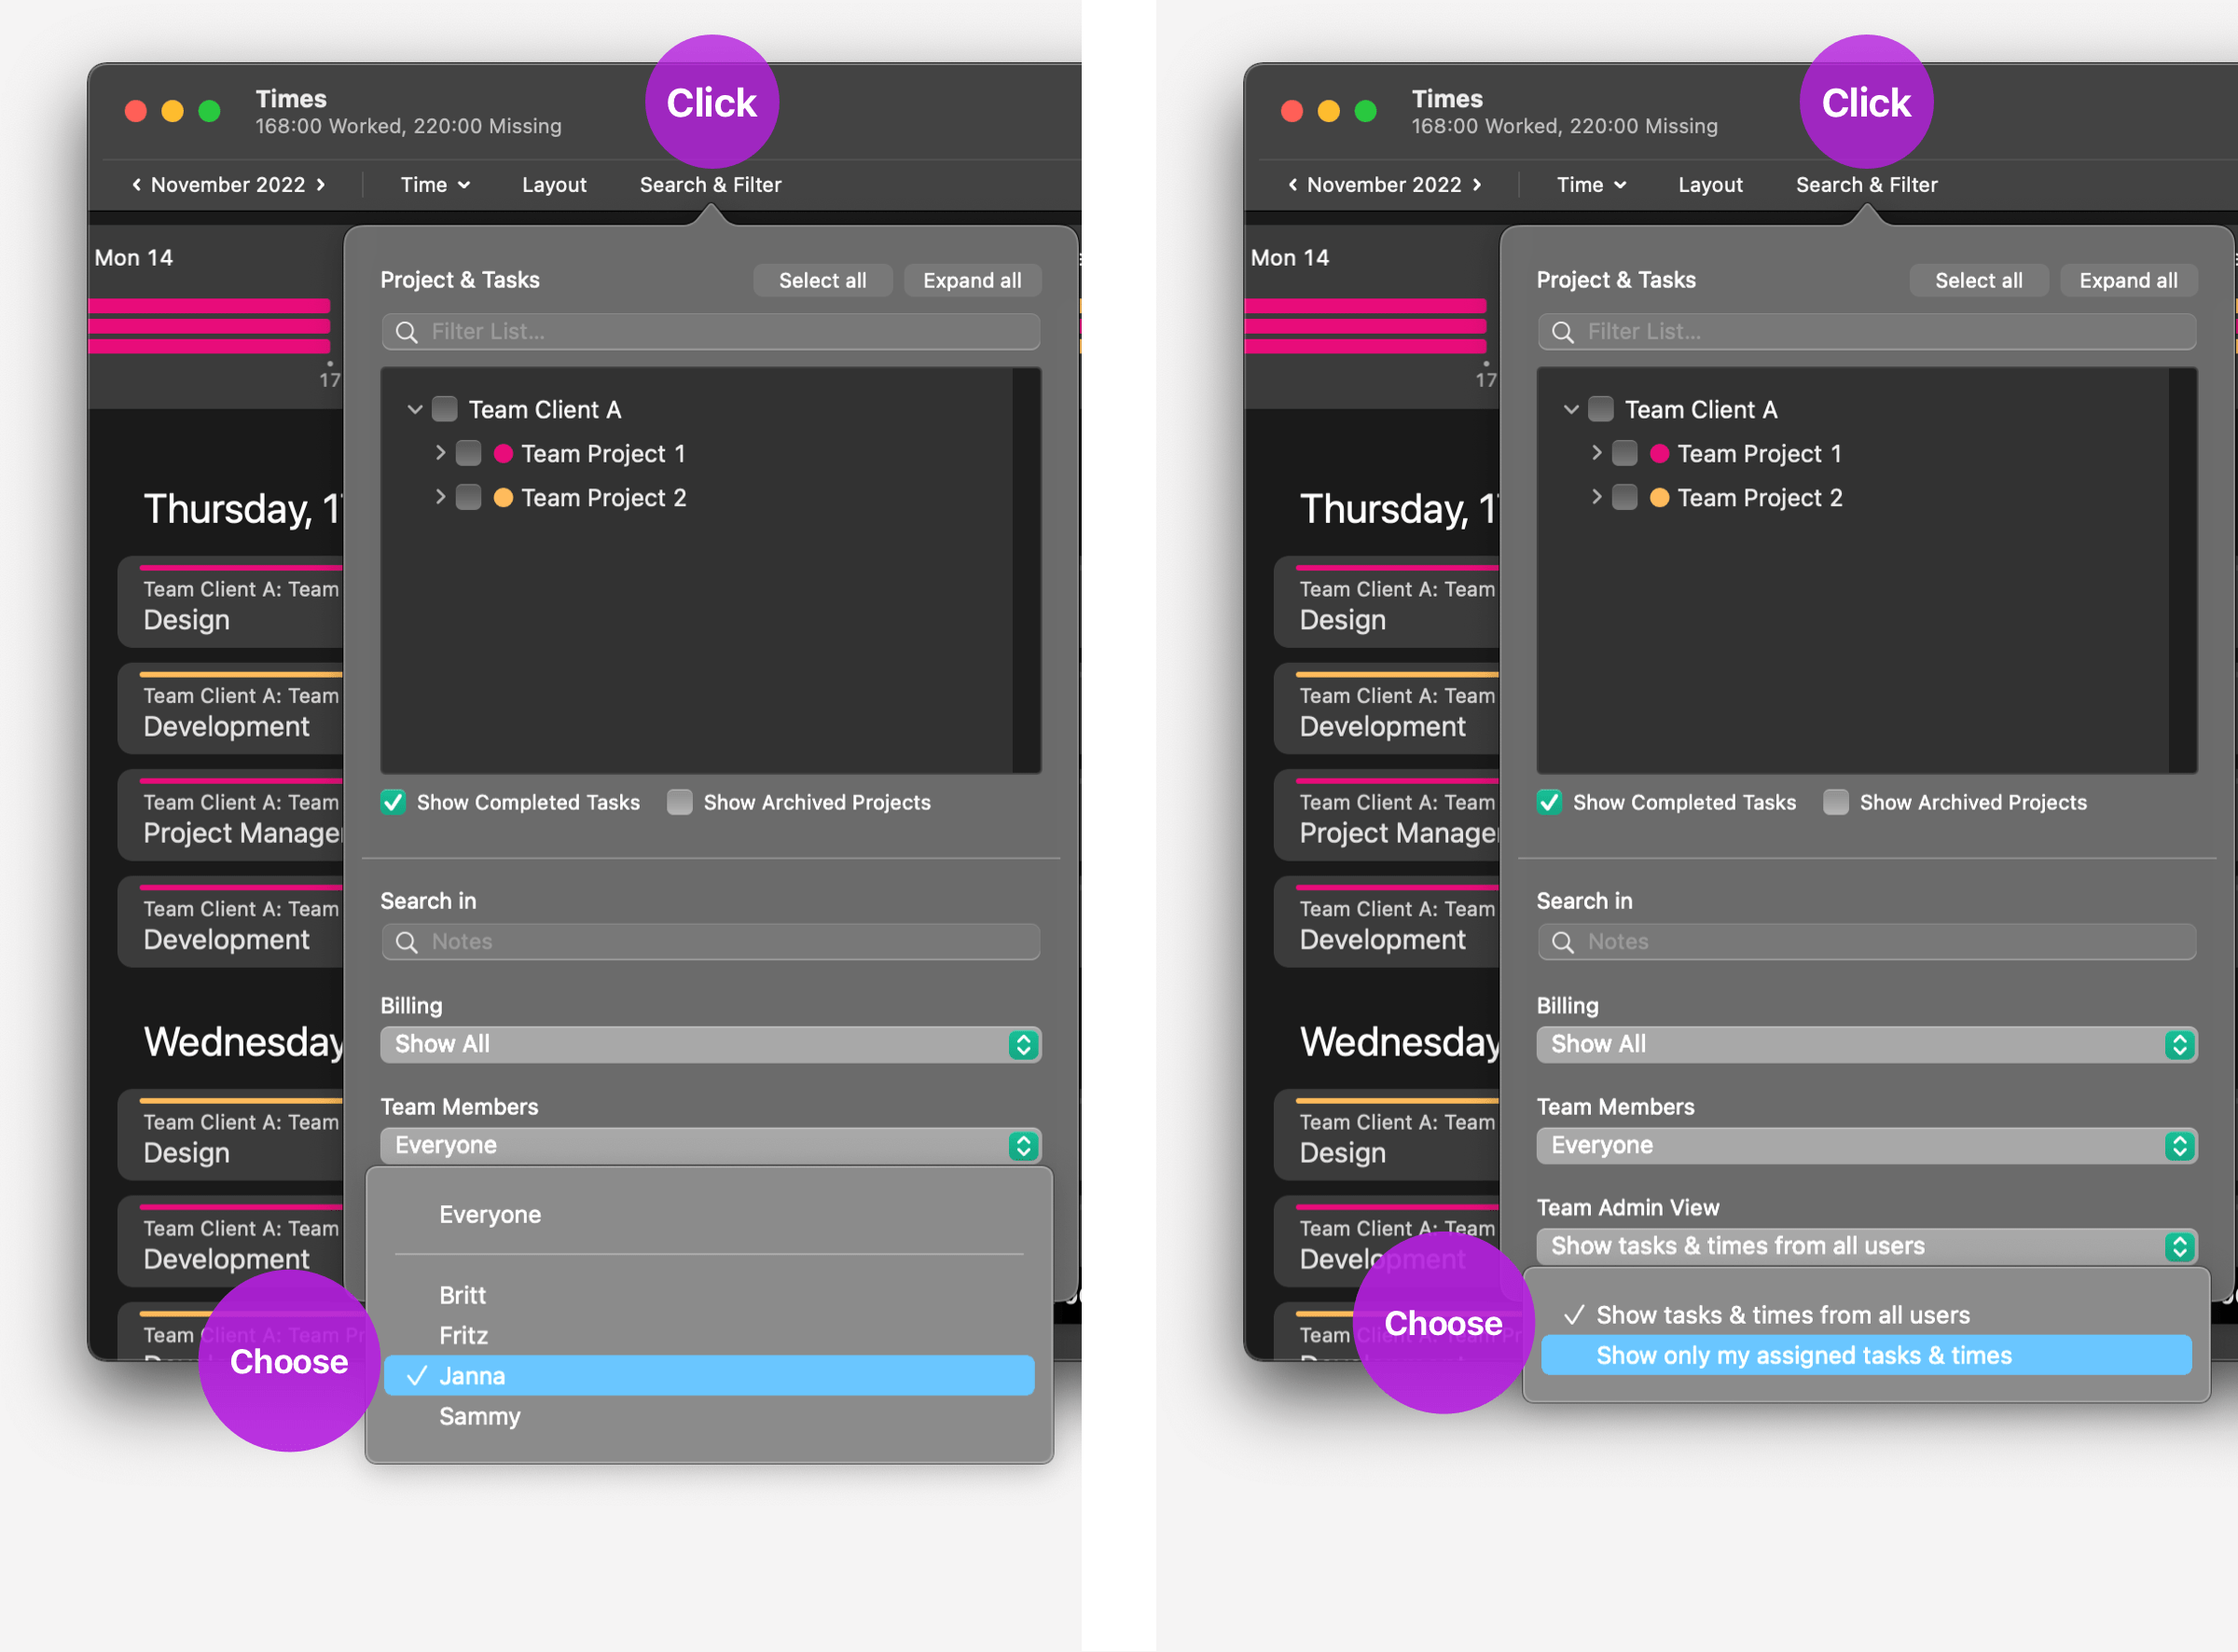
Search, Filter & Archive in a team
The search function can be found on every Tyme screen. Here, you can search for projects or notes, for example.
The search field also contains the filter. Use this to narrow down your search results or filter directly, e.g. by projects and tasks. As Team Admin, you can also filter by team members.
You will also find the archive here.
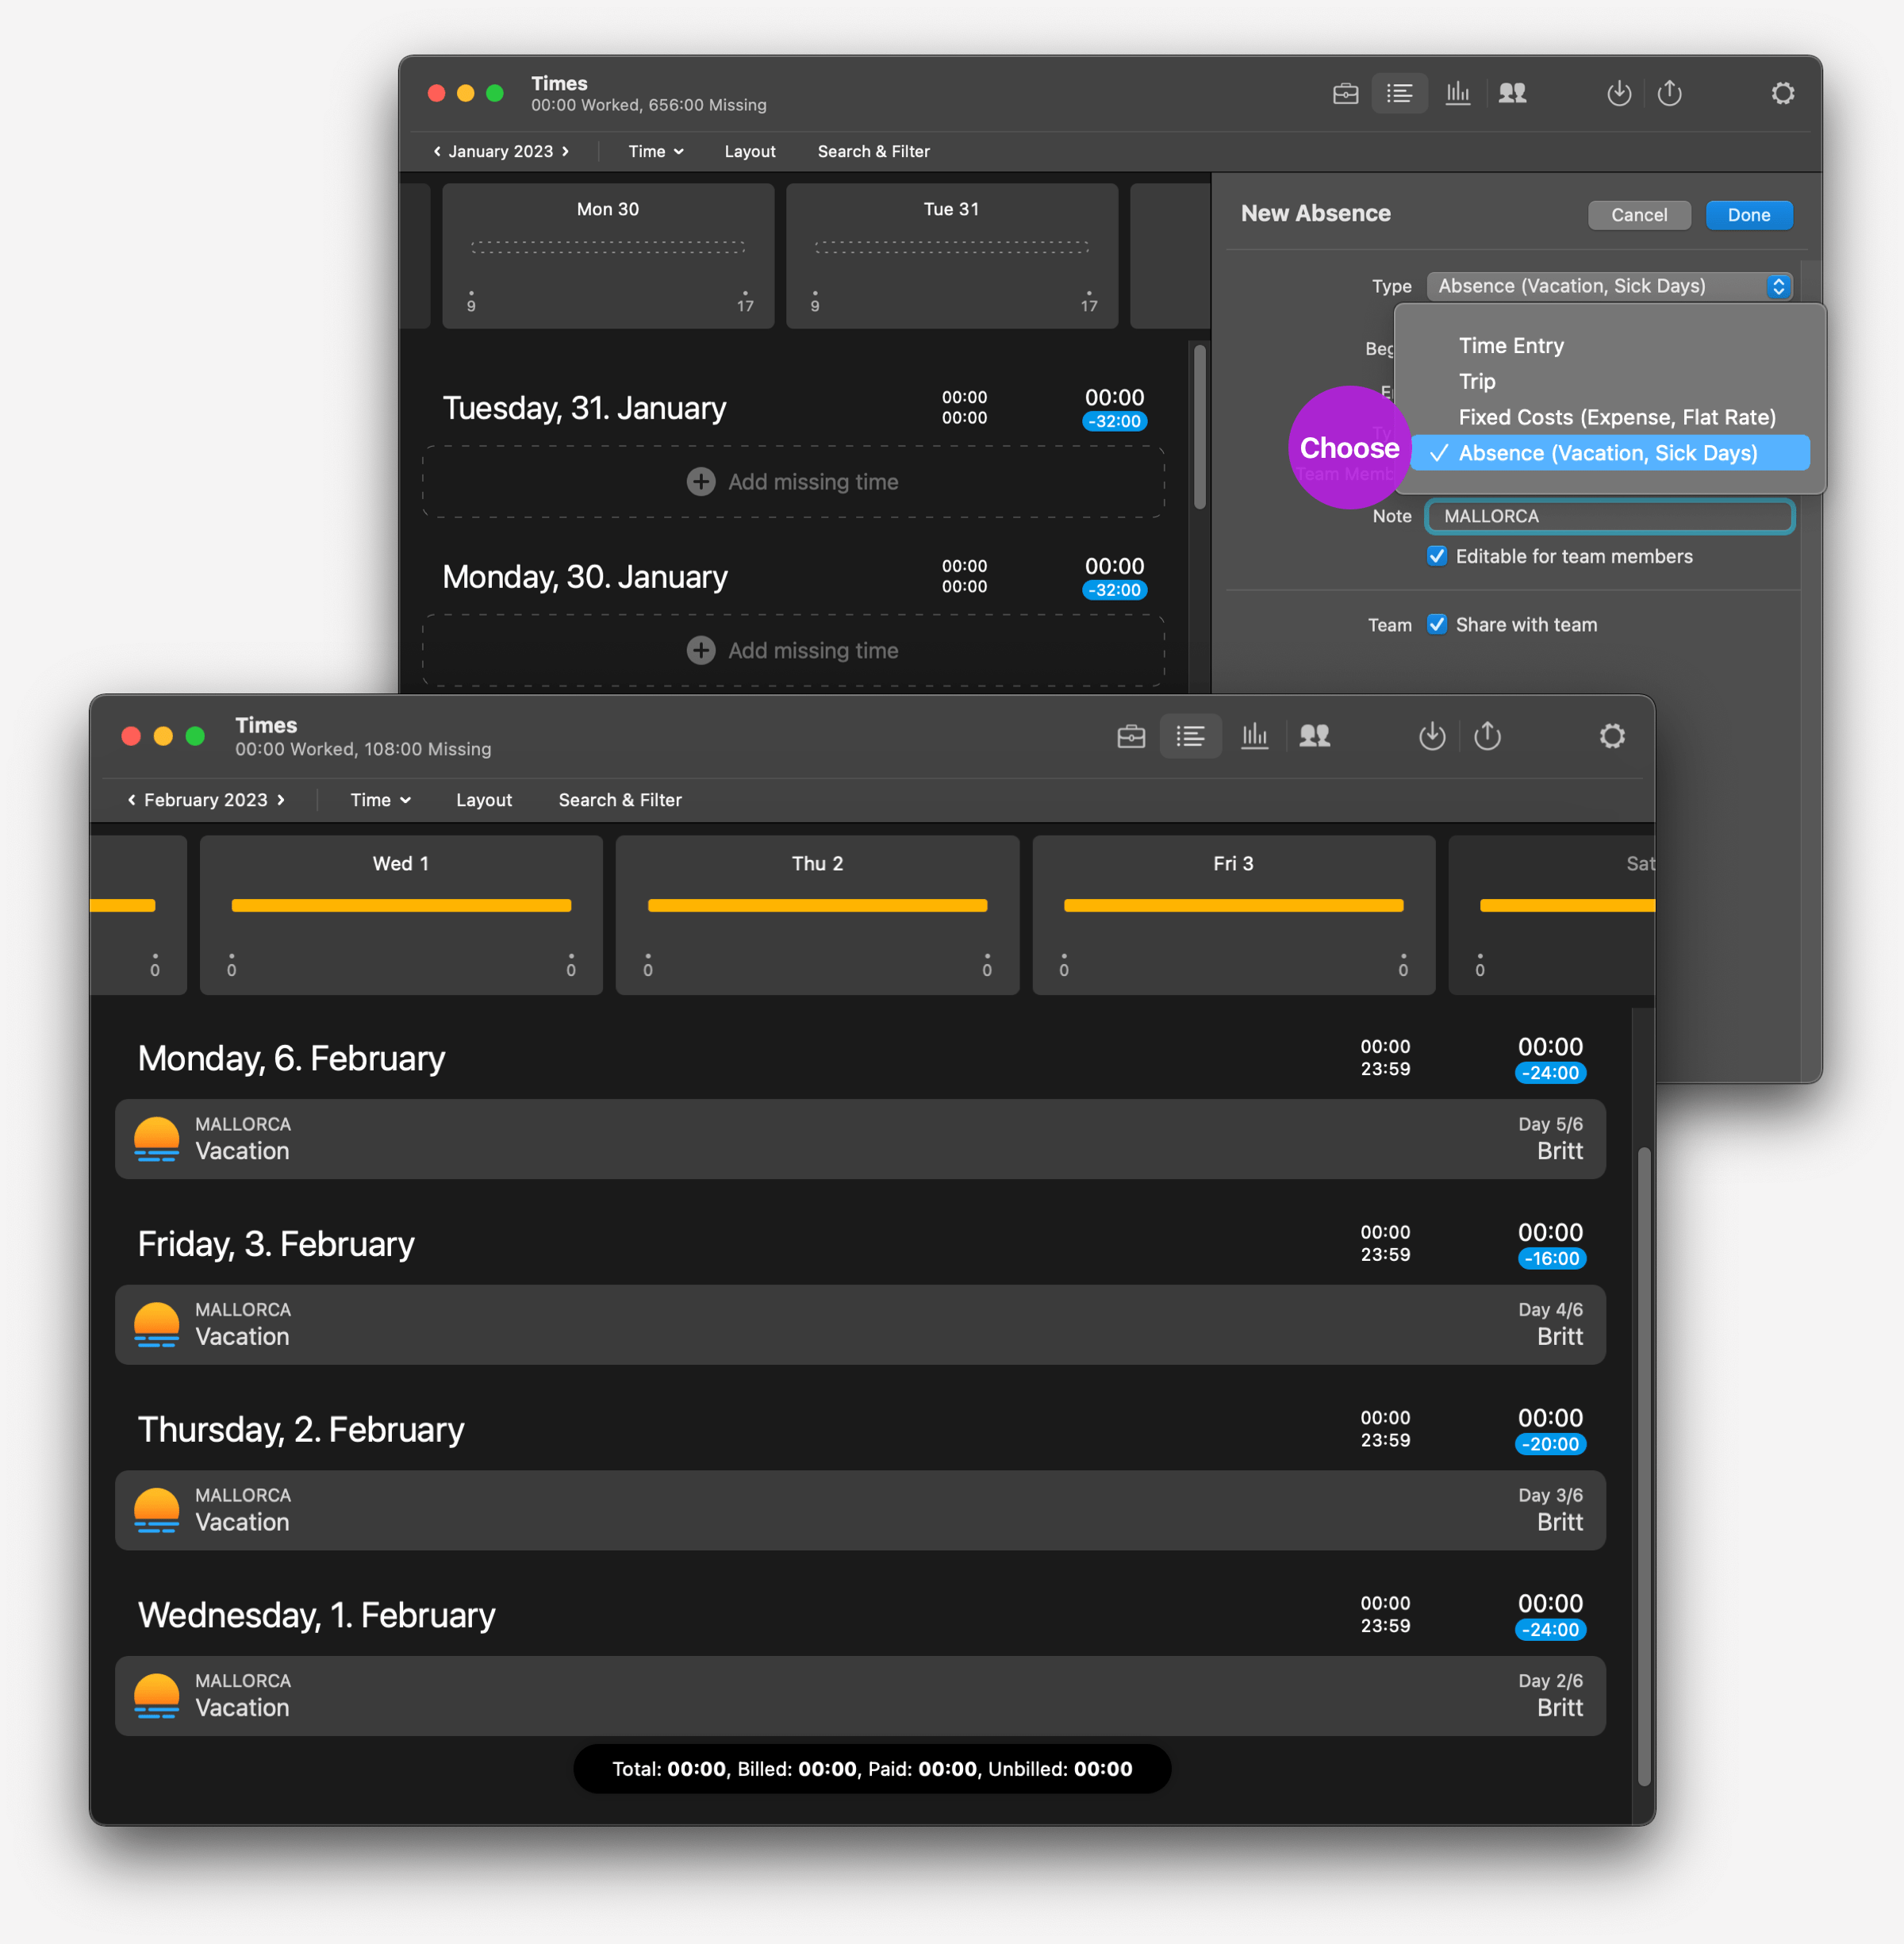
Vacation & Absence
Vacations can also be entered by Right Click (keyboard shortcut: ⌘+n). For this purpose, "Absence (Vacation, Sick Days)" must be selected in the Pulldown.
All team members can also enter their vacations by themselves.
Team Statistics
In the Statistics Screen you will find all the times recorded by you and your team members in the form of an overview of team workload (overtime and undertime), project progress, already generated revenue or used and planned budget.
License Management
You can adjust your team size at any time. Meaning: add new members, edit members, disable or delete members.
There are essentially two different approaches to managing licenses for a team:
1. A team with a collective license.
Your team has a team admin (e.g. a project manager) who is responsible for license management. Then it should also be this person who buys the licenses for all team members. This person also manages the payment and payment method ( e.g. a company credit card) and receives the invoice from Tyme.
If the team admin now adds a new member, and thus the number of "unlocked members" of your team grows, the team's license may also need to be extended. You can do this under the menu item "Manage License".
If the team admin disables a team member temporarily e.g. because of a sabbatical or a parental leave, then the empty seat can be occupied by another member during this time.
If the team admin deletes a member, times already booked will remain. Their personal data (name, email) will be
removed.
2. A team with single licenses.
You want to form a team with several single users (e.g. freelancers)? Of course that is also possible. In this case
you only have to create a team. The billing remains as before - everyone pays for their license themselves. (With
new team members you have the choice again).
⟶ Something goes wrong? Then contact our Tyme Support
Train You and Your Team
It is certainly helpful and important for all "Tyme Beginners" to get familiar with the basic functions of Tyme. In our section Getting Started we have collected all relevant topics to get you started with Tyme.
Here every Tyme user can learn the most important functions and principles of Tyme – no matter if member of a team,
freelancer or single user.
⟶ Check out our tutorial: Getting Started with Tyme
4.7

Start with a 14-day free trial.